YAFF - Yet Another 5 Footer Falcon Build
- Thread starter Dazza007
- Start date
Maybe shipping tube end caps? ; )I always wonder what formed the 'shell' of the pits in the real Falcon? I'm a newbie to the SS Falcon and I am wondering if it is spray paint or deoderant can caps or something similar. Does anyone know?
joberg
Legendary Member
I would've select plastic water pipes and cutting them at the right depth, put a backing and voilàAre they deep enough? Read with your exacting eye and penchant for sub-millimeter detail you should tell us if the diameter is correct")
The tell is the lip -- several of the mandible pits incorporate this lip into the build itself...
; )
; )
rustbucket
Active Member
rustbucket
Active Member
looked a bit rougher when primer applied and still may go for a resin print but not right now..
the one on left is full original print vs 2 part....point 4 nozzle
the one on left is full original print vs 2 part....point 4 nozzle
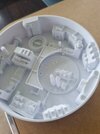
Nearly there on the Mandible Pits and panels - about 6 greeblies left and these pits will be finished.
just thought Id throw this out there as it took me a while to get right - but this is how I am handling the pipework.
The bulk of the surface pipes are part of the Print - with small sections that get glued on for some of the curved connections.
Ignore the gaps - this is just a dry fit at the moment, glue should fix those, and maybe a very light sand.


The pipes were a real pain to print - but I settled on using Tree Supports (I know sounds weird) - which ended up creating a small 'nest' for the pipes to sit in - and came out perfect

Fortunately theres only 2 on the top port plate - but a lot more on the bottom plate.

just thought Id throw this out there as it took me a while to get right - but this is how I am handling the pipework.
The bulk of the surface pipes are part of the Print - with small sections that get glued on for some of the curved connections.
Ignore the gaps - this is just a dry fit at the moment, glue should fix those, and maybe a very light sand.
The pipes were a real pain to print - but I settled on using Tree Supports (I know sounds weird) - which ended up creating a small 'nest' for the pipes to sit in - and came out perfect
Fortunately theres only 2 on the top port plate - but a lot more on the bottom plate.
Tree supports, sometimes called Organic supports, are really the best type of support you can select for most any kind of printing. I have really just stopped using the other types.
And for those wondering how far I am through this, here's a rough indication. (and more pretty pictures)
I do have a fair bit of the Upper Engine Deck (and some of the lower Deck completed - but as this was one of the first things I did, I will probably redo a fair percentage of the components - so not showing it on here
Orange Bits are started but not complete... - I still have a lot to do on the underside. (and quite a few versions, including original ANH, ESB version and ESB version with landing Gear (and at some stage the Ramp))
Not all of the grey bits have been printed so are not in the folders yet - mainly the starboard Mandibles. Going to have the Port Mandibles all Printed and hopefully first coat of paint on this weekend coming.
I have done a bit on the Engine Vents, but am redoing these as well at some stage.
This doc shows how to do the main frame to the center, using 20mm Aluminum ExtrusionWOW.
I have printed out the main frame and assembled it, and have started on the jaws and the port frames. How do they connect to the center exactly? I think I understand but looking at these renders I am a bit confused.
I just realized I don't have a document to show connecting the Jaw Frame to the main frame, so will knock that out sometime this week.
There's a couple of sections on the Mandible part of the frame that have been changes recently, I will post a message to the group once these are all tested and final - just more around making parts easily accessible for lighting
Re the ledges - not yet, these are to be added specifically for the engine deck - which will be mainly mag mounted.Thanks. I will not continue the jaws but focus on the ports. I dont see a document on how to attach those? I just want to make sure I do them right...
Also, I see some ledges on the center circle on the back of it. are these in the folders?
The docking Tubes are pretty easy to attach - each part has 2 bolts to the center and then slots into the outer frame - when you add the docking rings - they screw into the tube frame parts - yeah a bit confusing - i'll take some photos. - basically glue up each tube frame, then glue the panels to these frames and you have a completed section.
Similar threads
- Replies
- 10
- Views
- 997
- Replies
- 18
- Views
- 4,661
- Replies
- 70
- Views
- 4,852