Thoughts and tips on painting the Millenium Falcon

Well, I'm used to the five footer (left). And its pits are not uniformly dark. They're definitely weathered somewhat roughly, but the main colour still dominates. (and I know these flash-illuminated photos do look different from how they are to the eye)

Even the 32" (right), despite way darker pits, doesn't have uniformly dark pits either!
 

Attachments

  • kg_m-falcon_-131.jpg
    kg_m-falcon_-131.jpg
    586.8 KB · Views: 55
  • 772_SWO_1667.jpg
    772_SWO_1667.jpg
    2.4 MB · Views: 61
Thanks for those images! Really great to see!

At risk of hijacking this discussion, you wouldn’t happen to have any shots showing the interiors of the lower two pits, would you? I haven’t seen any shots that show all the insides clearly.

And tying this loosely back to the original topic of painting, for some reason some folks seem to paint all their Falcon pits black or dark grey, which looks very weird since the original models didn’t look like that at all. :)
There is no risk of hijacking here, post and ask for what you need!

Regarding the pits, it's the same issue I had with around the engine fans. Your brain is telling you/ remembering how something looks.
Interestingly on that subject I did notice how white they actually are on the 5ft model. On the 32" they seem to have painted shadows and around the circular gun turret, down the edges of the engine lid, and in those pits have been painted black but then pushed back with some white. It adds a significant amount of depth to the pits that way I suppose as it is somewhat black all the way down inside but then the more external components are a white shade although still more grimy looking than on the 5ft model.
Then you look at a photo like the one Jaitea posted of the front and back of the 32 model. The circular pits on the front are very dark. Studying those pics the last 2 days I realised that whatever editing or printing process those went through, it has made the darker elements of the photograph very dark and the highlights much brighter. If that photo was your only reference or memory, you're going to have a falcon with dark pits.

The purpose of this thread was to help me improve my Falcon but also reference for others to have some points in mind before even starting their paint jobs and you made a perfect point , the Falcon pits are not overly dark.
Just going into this with that information in your brain is a big advantage to your outcome.
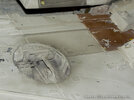
I do not know about others, but despite using the same base color as the hull in the pits once, it is "weathered" with grime and stuff it comes out grey, then add in angle of the shadows and can often look black?

For example close up on mine it is just the hull color, but for the most part lots of grime through oil washes and pastels. I figure if dirt is going to settle anywhere it would be in those pits and I wanted that "dirty engine" look

View attachment 1903435


For me personally, while I am aiming for the 5ft studio model look, but I also am willing to make some changes to incorporate some of what I like on the 32" and some of what I like on the full size sets

For example, I like to copy the look of the side walls here

View attachment 1903437
and in the Galaxy's edge one
View attachment 1903443

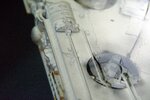
In addition, I prefer a little more visual interest in some of those pits by making it look like different materials/replaced parts instead of one uniform paint color

View attachment 1903438

or I figure this part here would probably be more metallic look like some engine parts

View attachment 1903440

View attachment 1903439
View attachment 1903441
View attachment 1903442

Unfortunately, a lot of the detail painting gets lost in pics, or when viewed from a distance just reads as a uniform color

I think this is a good place to remember RULE 1, it's your model and you paint it however you want.
If your Falcon cockpit is going to have a P40 flying tigers teeth and eyes, I say you go for it.

You have done a brilliant job detailing there Analyzer, and you're stating what I wanted to achieve in the beginning. I wanted my model to feel and look like the Falcon, and incorporating all those elements from the different models and sets helps achieve that.

And to add, I look at the studio models as a snapshot in time. In the world of the Millenium Falcon, the week after ROTJ perhaps a tie fighter destroyed a panel and it needed replacing, 6 months later an engine part failed, needed a nice shiny new one. So some variation from the studio model is perfectly acceptable if you want it to look like The Falcon (obviously a different story if you want a replica of the studio model).
As part of the more recent canon, that freighter started off as a clean white ship and we're supposed to believe that once it came to the models we see in the original trilogy, it never really changed again minus a rectangular radar dish (which is actually a really cool design but meh, I like a round radar dish, thanks Disney).

Cheers,
Josh
 
Well, I'm used to the five footer (left). And its pits are not uniformly dark. They're definitely weathered somewhat roughly, but the main colour still dominates. (and I know these flash-illuminated photos do look different from how they are to the eye)

Even the 32" (right), despite way darker pits, doesn't have uniformly dark pits either!
Good point, and definitely something to keep in mind if trying to copy the filming models as close as possible

For me, they just look a bit unfinished or unrefined when seen up close. Something for example I wanted to "improve upon" to get more of the full size 1:1 look of something like the Galaxy's edge falcon
1738960039400.png

Like the vent thing on the left here feels like it should have those indents blackened or darkened to give the illusion of a vent, or those things on top to have a little more shadow like definition to make them look like separate individual pieces placed on top

The ILM style paint jobs are definitely gear towards having lighting and shadows help pick out details and appear amazing on screen, but up close in normal lighting look a bit weird sometimes to me

People look for different things. Some want to copy the filming model exactly as is, warts and all including the cockpit that does not look like the filming interior of the cockpit for example. Some want no glass because the filming models did not have it
Others want specifically the 32" etc...

and speaking of the canopy glass, I intend to eventually mask and paint the "glass" one, I just haven't got to it yet.
The non-glass obviously looks better in photos, but for me, looks a bit odd or unfinished in person
 
The ILM style paint jobs are definitely gear towards having lighting and shadows help pick out details and appear amazing on screen, but up close in normal lighting look a bit weird sometimes to me

People look for different things. Some want to copy the filming model exactly as is, warts and all including the cockpit that does not look like the filming interior of the cockpit for example. Some want no glass because the filming models did not have it
Others want specifically the 32" etc...

The ILM models are filming props.

If George Lucas had told the ILM guys to build another set of these models that could be viewed up-close in-person, you can bet they would have done some things differently.


Take the 5-footer. It's awesome as a prop. Not so much as an in-person display model. The weathering streaks & laser blast damage are so well-done on the exterior . . . and then the cockpit is a joke with no window glass and seats in the wrong scale. The engines on the back of the model aren't there at all.

The cockpit & engines were not a problem for filming. If the model was on display to see in person, they would be. Those are some of the first places people look at, and human eyes see recessed darker areas much better than cameras do.
 
Last edited:
Well, I think I'm getting closer to being happy with this now. It looks a lot more like the Falcon now. I have taken everyones advice and faded the colours down a bit and rusted up the red.
If anyone can see where further improvements can be made, I'm happy to hear them.
Cheers,
Josh


Oh, now that's looking good.

IMO the reds and grays are both much better looking now. It might be time to leave them alone.

I think the whole thing could use more random "dots" and spots of weathering, if that makes sense. More little marks & damage that aren't part of a larger scheme/shape like the rain runoff lines.

The ILM 5-footer has a surprising amount of yellow areas along the exposed sidewall areas. I've never liked the way it looks, but it's there.

The ILM models have a lot of small random colored spots on the greeblie areas. They used several colors.

One of ILM's tricks was to have the models detailed & weathered by several different guys. They each did passes and gradually it added up to the final look. It diluted the painters' individual quirks and made the models look more consistent.
 
Last edited:
Oh, now that's looking good.

IMO the reds and grays are both much better looking now. It might be time to leave them alone.

I think the whole thing could use more random "dots" and spots of weathering, if that makes sense. More little marks & damage that aren't part of a larger scheme/shape like the rain runoff lines.

The ILM 5-footer has a surprising amount of yellow areas along the exposed sidewall areas. I've never liked the way it looks, but it's there.

The ILM models have a lot of small random colored spots on the greeblie areas. They used several colors.

One of ILM's tricks was to have the models detailed & weathered by several different guys. They each did passes and gradually it added up to the final look. It diluted the painters' individual quirks and made the models look more consistent.

Thanks for the kind words.
Ok, I see what you're saying. I'll start to tread carefully here as the 5ft model is heavily weathered compared to the 32" which seems to be more streaking, toothbrush splatter and a few chips with some rusty dabs here and there.

I'll need to study some close up reference pictures to have a solid idea in my head of what I'm doing, so it doesn't become randomly splotching paint around. If you have any pictures in mind, please post them.

My sidewalls do have some rusty splotches which probably don't show in my direct sunlight pictures, perhaps it needs a bit more attention.
I do notice most of my grey panels are fairly untouched, they could use some light chipping.

It must have been a lot of fun for those guys at ILM all weathering the Falcon, weathering is the fun part in my opinion and when you can just go for it and not try to copy something, that would be cool.

Cheers,
Josh
 
Well, I think I'm getting closer to being happy with this now. It looks a lot more like the Falcon now. I have taken everyones advice and faded the colours down a bit and rusted up the red.
If anyone can see where further improvements can be made, I'm happy to hear them.
Cheers,
Josh


I think your good to go and the faded tones blend together to get the Falcon look without as much contrast.
Just the right amount of weathering as well without the blackened exhaust being overpowering
 
214.jpg


215.jpg


There are lots of so-called hash-marks and dots all over the 32" ... my advice instead of instant black use a grey or dark grey pencil/marker to build up layers of these marks/dots ... start on the bottom side to get a hang of it ;)

Chaïm
 
Oooh, good pics of the 32" model!


But I can't help critiquing the ILM model weathering when I see it.

IMO the random dotting on the underside of the 32" is too heavy. The top surface is not so overdone.

I think all the SW models don't have enough frontal-area wear. (The front end and windshield of a car get covered in scratches & dead bugs. The sides & back of the car do not). It's not a big factor in outer space, but a few trips down to planet surfaces would rack it up fast.

Side note - IMO the weathering on the Falcon in 'Force Awakens' should have looked very different from the OT, because the ship had been sitting abandoned in the desert for years.
 
Last edited:
I think your good to go and the faded tones blend together to get the Falcon look without as much contrast.
Just the right amount of weathering as well without the blackened exhaust being overpowering
Thanks bud,
I guess I'll continue around and do some more minor detailing as suggested but yeah, I don't feel the need to get too drastic.
View attachment 1903837

View attachment 1903838

There are lots of so-called hash-marks and dots all over the 32" ... my advice instead of instant black use a grey or dark grey pencil/marker to build up layers of these marks/dots ... start on the bottom side to get a hang of it ;)

Chaïm
Really appreciate you posting those mate! Will be a good reference.
Oooh, good pics of the 32" model!


But I can't help critiquing the ILM model weathering when I see it.

IMO the random dotting on the underside of the 32" is too heavy. The top surface is not so overdone.

I think all the SW models don't have enough frontal-area wear. (The front end and windshield of a car get covered in scratches & dead bugs. The sides & back of the car do not). It's not a big factor in outer space, but a few trips down to planet surfaces would rack it up fast.

Side note - IMO the weathering on the Falcon in 'Force Awakens' should have looked very different from the OT, because the ship had been sitting abandoned in the desert for years.
I agree with you, the Force Awakens should have showed a much more weathered Falcon. Guess you need continuity with your toy sales!

Cheers,
Josh
 
But it had a tarp! ;)
Actually there is some truth in that. Covered over on a desert planet, it wouldn't rust and the tarp would help with fade.
I would expect sand blasting and marks from the tarp flapping for 20 + years though.
Still, it's reasonable.
Cheers,
Josh
 
My take on the Falcon is getting as close as possible to the 5’ filming model as I could. I went to great lengths airbrushing my build to match the miniature.
I used a variety of methods for the weathering and streaking, from a brush to a paper towel to a pastel stick.

IMG_8234.jpeg
IMG_8235.jpeg
MY FALCON BEAUTY A 2 copy 2.jpg
 
Last edited:
My take on the Falcon is getting as close as possible to the 5’ filming model as I could. I went to great lengths airbrushing my build to match the miniature.
I used a variety of methods for the weathering and streaking, from a brush to a paper towel to a pastel stick.

View attachment 1904230View attachment 1904231View attachment 1904233
You achieved that perfect result we're all striving for! Just fantastic. My hat off to you :)
I may have to take some inspiration from the 5' Falcon. Thanks for sharing!
Cheers,
Josh
 
Forgot to mention it’s a heavily modified mpc. Headlights, cockpit and tunnel and sidewalls all scratch built.
Oh yeah, the engine deck gives it away, I hadn't realised at first as the other changes threw me off. Would love to see some more pictures? Especially your work on the sidewalls.

Speaking of this kit, did the repop a couple of years back fix the sidewall height?
Cheers,
Josh
 
Back
Top