You are using an out of date browser. It may not display this or other websites correctly.
You should upgrade or use an alternative browser.
You should upgrade or use an alternative browser.
YAFF - Yet Another 5 Footer Falcon Build
- Thread starter Dazza007
- Start date
Beautiful work on the cockpit Dazza007. Your homework on interior details shows. Good comment on Maruska’s and the other experts contributions, without which reasonable replication would not be possible even with state of the art tech. Draftsman talent clearly present. I applaud the CAD & 3D printing you guys have.
Thanks for the kind words - I'm really having fun with this at the moment.
My hats off to all of the info you guys have collated - I wouldn't even attempt this without all of the info that others have painstakingly researched.
Which is why I am going to follow in Maruska's footsteps and make all of the fusion models free to anyone who wants to give it a go - once I am happy with everything. (I will release them in sections - so cockpit first)
I should also reiterate that these are currently modelled from kit photos, and reference photos, so none will be 100% accurate. to me they are visually close enough, but definitely not for the purists.
Last edited:
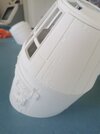
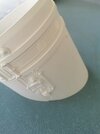
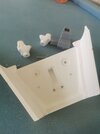
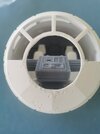
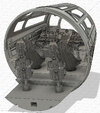
Nearly there - I have broken the main components down for printing and have some nice looking prints off so far.
Ill post those picks soon.
Really only main part is the detailing on the edges of the grid. The good old Panther G Bandai.
The Damage was a little tricky - due to the complexity of the damage shapes, they came out looking a little nasty when exported to my Slicer. Solved this by making sections a lot smaller - so you will see some lines in the picture that don't actually print, but are just there to compensate for this. It does look really nice in the prints.
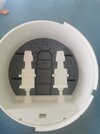
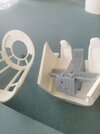
The Upper Canopy is attached using magnets, so comes off easily - I have also mounted the seats using magnets, gives you an easy way to rotate them to any position.
I have also put some lighting holes in both the Bulkhead and the Console - Still to figure out how to light the side walls and finish them off.

Ill post those picks soon.
Really only main part is the detailing on the edges of the grid. The good old Panther G Bandai.
The Damage was a little tricky - due to the complexity of the damage shapes, they came out looking a little nasty when exported to my Slicer. Solved this by making sections a lot smaller - so you will see some lines in the picture that don't actually print, but are just there to compensate for this. It does look really nice in the prints.
The Upper Canopy is attached using magnets, so comes off easily - I have also mounted the seats using magnets, gives you an easy way to rotate them to any position.
I have also put some lighting holes in both the Bulkhead and the Console - Still to figure out how to light the side walls and finish them off.
Funnily enough I was actually thinking of that - it might be down the track, but I wanted to end up with a few options for people to print - ie ANH, ESB and Actual Studio Scale Cockpits that could be swapped out.Any plans on modeling the inside cockpit detail seen on the studio model, with what looks like the LS Morgan Roadster dashboard parts, among other bits?
I was also going to do 2 variations for the Lower shell, the original ANH one, and one with the ESB extras, including landing gear and Ramp.
It will take a while, but I will get there - I have 2 bits on the printers at the moment for the cockpit, which will get me to about 90% finished for the cockpit - so about 5% finished overall.
") - saying that I do have the bulk of the upper engine bay complete as well, just not printed or broken down for printing yet
- saying that I do have the bulk of the upper engine bay complete as well, just not printed or broken down for printing yetI have attached a couple of photos - keep in mind these are pretty much straight off the printer - no sanding or priming yet, which will help with any visible layer lines. It also shows my magnetic mounting - ie the seats, console, upper canopy all clip on with magnets, making it easy to access, and swivel the seats around.
I am pretty pleased with how the modelled damage came out as well.
White models are FDM (Bambu P1S), Grey are Resin (Anycubic M5S Pro)
Attachments
-
 IMG_20240511_142700.jpg1.3 MB · Views: 145
 -
 IMG_20240511_142615.jpg1.9 MB · Views: 138
 -
 IMG_20240511_142807.jpg1.7 MB · Views: 134
 -
 IMG_20240511_142649.jpg1.4 MB · Views: 134
 -
 IMG_20240511_142608.jpg1.4 MB · Views: 138
 -
 IMG_20240511_142602.jpg1.8 MB · Views: 148
 -
 20240511_154850.jpg1 MB · Views: 143
Last edited:
Hey all,
Just about to push my 3D Files out this weekend, Pretty happy with the results so far.
(I have fixed the windows since this photo was taken) - I have decided I will release STL, STP, and Fusion F3D files, so people can tweak them to their own requirements.
Next Question however is - what should I do next, I'm torn between the following, so if you are keen on any parts, let me know and I can prioritize based on what people are needing/wanting.
1 - All 8 Pits - I have already done a couple but am going to redo them all from scratch in fusion
2 - Radar Dish and base - I have Manu's one as a starting point
3 - Gunner Turret - Same have already done but redoing it, with Internal seating area
4 - Both Mandibles
5 - Finish off the Engine Deck for printing
Once again I will reiterate - this is no where near 100% accurate - most of the kit parts are modelled from photos, its more of a hobbyist version, rather than a Purist one.
Attachments
The radar dish and base have been done and are public. Not with all the greeblies, most of us as using model kits for those, but the base parts are done. Same with the gun platforms, the bases have been done and are public, but not with the plating or greeblies.
You're getting very nice prints though, it's difficult to see any of the layer lines. What layer thickness are you using?
You're getting very nice prints though, it's difficult to see any of the layer lines. What layer thickness are you using?
Thanks Dave, you have just made my life a lot easier - I will look up those files and greeble them up.The radar dish and base have been done and are public. Not with all the greeblies, most of us as using model kits for those, but the base parts are done. Same with the gun platforms, the bases have been done and are public, but not with the plating or greeblies.
You're getting very nice prints though, it's difficult to see any of the layer lines. What layer thickness are you using?
I'm using 0.08mm Layer height with a Matte PLA, but after reading a bit on the Matte, I am going to switch to PLA+, so that might make a little difference.
Hi All,
Here is the first part of my Studio Scale 3D printable Millennium Falcon Model - the Cockpit
(There is more to come - this is just the first drop)
Please read the attached Google Docs File
https://docs.google.com/document/d/1kDN5...Uumzpe20lY
Files can be located here
https://drive.google.com/drive/folders/1...Eb6cBmk8c0
Everything is covered under the Creative Commons license -
Have fun
Cheers D
Thanks for posting these!
I've created mine via taking measurements off of the Bandai kit. I'm not sure what process you're using for your measurements but it looks like, accounting for your plating details, we're both really close to each other. A millimeter or two difference here and there. It's helpful to know that, with two data points, we seem to be going in the right direction.

I've created mine via taking measurements off of the Bandai kit. I'm not sure what process you're using for your measurements but it looks like, accounting for your plating details, we're both really close to each other. A millimeter or two difference here and there. It's helpful to know that, with two data points, we seem to be going in the right direction.
That is great to hear - you always wonder when doing something like this - "did I do something wrong" -Thanks for posting these!
I've created mine via taking measurements off of the Bandai kit. I'm not sure what process you're using for your measurements but it looks like, accounting for your plating details, we're both really close to each other. A millimeter or two difference here and there. It's helpful to know that, with two data points, we seem to be going in the right direction.
View attachment 1821990
I was planning on getting a PG Bandai myself to measure off - but decided I could do the bulk of it from the other reference materials I could find - the ton of photos and the Bandai decal plans. I actually though if I was off a bit, at least people would have a model they could tweak to some degree
Getting through the Radar dish, still a few of the nastier greebles to do, but its taking shape. Not too far off trying a print out anyway
Thanks to Manugu, theRealDaveWinter and Aleksandr for the base models - and to everyone else on here for the excellent references
I do realize the Circular Scribes on the inside of the dome are not correct, still to fix those.
Cheers D

Thanks to Manugu, theRealDaveWinter and Aleksandr for the base models - and to everyone else on here for the excellent references
I do realize the Circular Scribes on the inside of the dome are not correct, still to fix those.
Cheers D
I made this same mistake myself, but just an FYI, those circular scribe marks are not engraved in the dish. They were penciled on. Along with the little circles inside the sealab parts. Also, not everything was uniform in length. Some of the UBoat rails are longer than others.
Thanks for that info, great to know - now I look at the uboat rails I see what you mean - I was going to go over it towards the end and bend the 'legs' of the odd one as it is in the photos - the problem with modelling it is everything looks too perfect - so good to add a bit of variation. I just noticed some of the rails are actually not exactly half way between the sealab parts as wellI made this same mistake myself, but just an FYI, those circular scribe marks are not engraved in the dish. They were penciled on. Along with the little circles inside the sealab parts. Also, not everything was uniform in length. Some of the UBoat rails are longer than others.
There are three different types of rails in the Uboat kit, each with slightly different spacing between the stanchions, which is why a couple are longer than others. There are a couple bent slightly too.
There's also 2 additional sealab parts, combined to form one circle, that sits on top of the Saturn V 3rd stage bottom. You'll also notice that the cut down sealab parts that create the 11 outer "petals' are not curved to match the dish. Those are hard plastic parts and so are flat, with only the two ends glued down.

There's also 2 additional sealab parts, combined to form one circle, that sits on top of the Saturn V 3rd stage bottom. You'll also notice that the cut down sealab parts that create the 11 outer "petals' are not curved to match the dish. Those are hard plastic parts and so are flat, with only the two ends glued down.
Similar threads
- Replies
- 10
- Views
- 1,490
- Replies
- 18
- Views
- 5,796
- Replies
- 70
- Views
- 8,147