YAFF - Yet Another 5 Footer Falcon Build

Dazza007,
Great idea to have landing gear struts that are attached to a strong frame. The armature (frame) design also must permit easy access to disc body top and bottom plus rotation. I did not use an engine hoist as most of the 5 ft. Falcon builders did which the best method to efficiently permit construction access, detailing and painting.

Attached is a picture that shows the disc with all of the key removable structures and panels of my build disconnected. Horizontal poles port and starboard enable careful flipping. Rotation is accomplished by a strong turntable. My wooden structure and skin are strong. However, the metal piping armature preferred, was not used. Landing gear retraction, ramp movement, radar rotation modules and other features for maintenance made that difficult.

Bottom line: Completed & assembled Falcon is very heavy regardless of material used. Robust, over designed armature is highly recommended. Your orientation method needs to be well thought out in advance. Best of luck.
Hi Searun,
Thanks for the advice - I have tried to think of every possibility, but more than likely have missed some.

Its interesting looking at your photo - my main method of accessing the battery and the main electronics, will be via the upper jaw as well.
The Docking Rings, Upper Jaw, Radar Dish and Turrets will all be attached via neodymium magnets, so easy to remove when required.


Cheers D
 
Dazza007: armature ain't going to move at that weight and design:cool::cool:(y)(y):love::love:

Yep, gonna be heavy I think (Might need to rethink a few options) - just out of curiosity what does everyone else's 5 footers weigh?

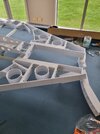
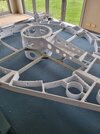
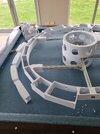
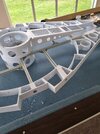
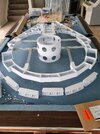
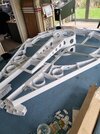
Couple of shots of the printing to date - not fully glued or bolted yet (Waiting on Extrusion), but should give a bit of an idea.

1719176936788.png
1719177034268.png
 
Last edited:
Here's the link to my 3d models for the Radar Dish for anyone interested.
The dish itself was based from a model of Manugu's, and a lot of tweaks thanks to invaluable feedback from the group here (Thanks Dave especially)

STLs and STP Files can be located here

In my build - the Dish A-Frame clips into the Upper base using magnets, so if you don't want to use that method you will just need to modify the files to suit.

Anyway have fun - Cheers D

1719181969122.png


1719182301486.png
 
Exciting times, my Aluminum Extrusion arrived today, so now its down to cutting to size, finishing the last few prints, and then assembly of the base frame
1719883096081.png


Only a few pieces left to complete the ring.
At the moment I am just bolting everything together for the first run - final run will be glue and bolts - just don't want to start gluing and realize I made a mistake somewhere (Yes done that a few times) - some of the parts a re printed in upper and lower sections, so these are bolted onto the other parts using straps as you can see in this photo.

Next photo series will be it assembled
1719883261999.png
 
Well the frame is now complete, and is solid as - now to start filling in the details.
I will weigh it at some stage, but its not too heavy yet - I can still hold it comfortably with one hand.
The upper jaw part detaches to allow access to a recessed electronics area in case anyone is wondering
 

Attachments

  • 20240712_154453.jpg
    20240712_154453.jpg
    1.1 MB · Views: 59
  • 20240712_154450.jpg
    20240712_154450.jpg
    1.5 MB · Views: 50
  • 20240712_154425.jpg
    20240712_154425.jpg
    1.8 MB · Views: 51
  • 20240712_154423.jpg
    20240712_154423.jpg
    2 MB · Views: 47
  • 20240712_154417.jpg
    20240712_154417.jpg
    1.8 MB · Views: 60
  • 20240712_154407.jpg
    20240712_154407.jpg
    1.7 MB · Views: 59
Maybe you could bore some more holes in the internal structure without compromising strength...especially in the concave pieces:unsure:(y)(y)
 
Sorry for the delay in Posting, have been frantically finishing off modelling the Jaws - they are a lot of work, but have the inners and uppers complete now, just ready to glue and then paint.
I have split the surface along panel and greebly seams to minimize any noticeable joins.
1722641835766.png
 
Last edited:
Thanks for the composite detail shots of the mandibles, jaws & mouth. Always find details that need adjustment like more flak damage and greeblie misplacement. Never did perfect in school on “which is the same and which is different” tests. This helps when it comes to the Falcon.
 
Thanks for the composite detail shots of the mandibles, jaws & mouth. Always find details that need adjustment like more flak damage and greeblie misplacement. Never did perfect in school on “which is the same and which is different” tests. This helps when it comes to the Falcon.
Yeah, I find i'm spending a lot of time trying to get it perfect, but it will never be, so I'm aiming for visually close enough.
I'll probably ruin it when I paint it anyway - my painting skills are somewhat lacking. Lucky if I stuff something up painting, I can just replace those bits.

Theres a few other things I have tweaked to make it easier for printing - but that's another story.
 
Think I'll call the Jaws done for the time being - just finished the lowers. (I think)
FYI the box support part is actually for electronics, with the jaws detaching via magnets to access these bays

I will also be doing a version with the landing gear, but might move onto something else now

1722829710718.png

1722829727783.png


1722829748538.png


1722829767113.png
 
Thanks for all the positive comments - Started on the Docking Tubes - so much easier to do compared to the Jaws.
I'll post some photos of the Completed Jaws, once I finish gluing everything together
 
Well a couple of docking tubes down, both uppers - there are both ANH and ESB versions as well - just doing final version prints of these - but attached is an early test one, also showing the splitting to make it fit on my printer. (And make it print with no supports)

1723371066179.png

1723371086635.png


1723371143712.png
 
I am having fun looking at this beautiful work next to the equally beautiful pictures of this sites experts that recreate the Falcon from kit parts.
Thanks, I am really enjoying the process - and like you take a lot of inspiration from what I would call the purists.
This is never going to be as good as doing it via kit parts - but I am going to try and make it is as close as possible.
 
Back
Top