I didn't make pinholes for the magnets, I simply incapsulated them in strong pieces of fabric, then sewed them to the back of the fur (mine, it held perfectly, the faux one as well as the real shearling), and to strips of buckram I added on the longitudinal edges and waistline doublestitched seamlines, this helped to also support the fabric where the hook and the eyelet are placed.
If you are going to replace a fur with a faux one (more SA) you could just cut it a bit more of the size of the original shearling after you removed it (the same I did when I went for the same job), and then refine the fit by wearing it in several tries after fixed it to the frame and before resewing the lining when time to finish the job.
Since you are in the US, I guess the faux fur I suggested, might be too expensive to have in ur country (it's from Italy, Panini Tessuti), maybe you better search a bit more, avoiding expensive shipping and duties for such a fabric which should be cheap.
About the coating, it's a mess and a risky business, and I think I'm part of the ones who can definitely say to have learnt it the hard way...I don't feel to give more suggestions about that...if you mind to make another one by urself and caring about replicating the letter on the back, I think that's actually dumpy, unexplored territory for DIY approach...don't even figure how to plan it properly...
Yes, I think better consider making anything onto a waxed cloth (intended as waxed with typical wax barbour-like methods), as out of the question, but I can say that if the cloth is waxed for instance, with acrylic as SR is, adding a bit of wax works fine.
What about lapels and collar modifications I suggest, yes it's a bit tricky and I was nervous too...but eventually, I can say I did and the result is appreciated, not only by me but also in person by others, so yes, it'd be worth it. However it's just for those corners, I agree it's not just squared, I consider the final shape I gave to that collar, as kinda trapezoid, not just a rectangle for sure
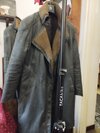
In the pic below, I try to show how the pattern as I tweaked it, it has now straighter lines than those upright corners of lapels and collar (original SR pattern has the lapels attachment to the shoulder, too far towards the front and so then too low, as Mechanismo correctly pointed out, and it would be impossible to pair them as I do in this pic, since their original upright slightly protruding pointed shape, would make them overlap a little when paired this way).
As wrote before, the attachments of the upper parts of the lapels, I increased them making them closer to the shoulders, and then shortening a bit the size of lapels when finally correcting those corners pattern and straightening them.
I recall also some other pics of mine, you can also look how relevant could be the presence of buckram also to the longitudinal edges, on the collar (with a collar stand in neoprene I added, not needed at all costs but it give a great solidity), and on the lapels, I also put a little vid just shot for the moment, where is possible to understand the time I spend to wear, close and open the coat without having to put it in position or any waste of time for folding the proper shape, it gets almost immediately the right position, and the credit belongs all the work I did putting extra magnets, buckram as you also want to put for supporting the open position of the lapel, and all the other stuff I did, hope it might help and possibly give inspiration, I strongly believe that, to actually be a pragmatic garment, it should be possible to wear it in that simple way, without caring about any extra maneuver to do... Of course it needs time and several tried. I just suggest to start with padding before minding about fur and resizing of back and other.
View attachment 1918754


")