You are using an out of date browser. It may not display this or other websites correctly.
You should upgrade or use an alternative browser.
You should upgrade or use an alternative browser.
Let's Talk All Things 3d for prop creation, Scan, Design, Sculpt (real and digital), Print and Finish
- Thread starter greenmachines
- Start date
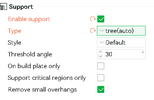
That is definitely a supports needed scenario. The one I referred to as printing into open air. The gaps between the legs are just too far to bridge without stringing so you will need "supports" tirned on. I use "trees" set to auto.View attachment 1917936
Brims have crazy straight lines on them..
View attachment 1917937
That's a real mess!
Short distances can bridge with little damage but this looks like supports needed so I would use the least likely to stick to your part, trees and start with top z distance at 2.5 for easy removal.
The brims are for keeping taller parts from tipping over but I think these little feet are still good candidates for keeping brim on as they have minimal contact holding them in place. However, brim is not the issue after layer one. The feet look great, it is the overhanging sections that now need supports.
Last edited:
skiffy
Sr Member
I’m a strong supporter of breaking down a print if it leads to less support needed and therefore less clean-up afterward. In the case of that last print, I’d split the model in half across the widest bit of the body and print in two pieces so that the legs print from the belly first and feet last (upside down). I’m unsure whether your slicer will let you do that but many will. Of course you’d have to join the two halves afterward but a seam is a lot easier to clean up than that underbelly.
Supports were on.. Trees and Auto setting.That is definitely a supports needed scenario. The one I referred to as printing into open air. The gaps between the legs are just too far to bridge without stringing so you will need "supports" tirned on. I use "trees" set to auto.
Short distances can bridge with little damage but this looks like supports needed so I would use the least likely to stick to your part, trees and start with top z distance at 2.5 for easy removal.
The brims are for keeping taller parts from tipping over but I think these little feet are still good candidates for keeping brim on as they have minimal contact holding them in place. However, brim is not the issue after layer one. The feet look great, it is the overhanging sections that now need supports.
It's my default.
It prints larger objects flawlessly..
II tried Imperial credits which worked OK to
I've run a calibration.. Looks like - 10 will give best results?
Bottom right?
Supports were on.. Trees and Auto setting.
It's my default.
It prints larger objects flawlessly..
View attachment 1918312
II tried Imperial credits which worked OK to
View attachment 1918313
I've run a calibration.. Looks like - 10 will give best results?
View attachment 1918314
Bottom right?
This totally begs the question, if supports were on but I see no supports were produced for the underbelly section, there seems to be a limit setting where it believes it is OK to bridge too far without supports. Of course, I am assuming you did NOT have supports that you removed from the belly before showing that picture of the no contact noodles? Can you upload the stl for me to test on mine to see if it creates supports there? (but after you confirm if it did or didn't create supports there?) I will try to find my bridge setting but I know mine allows me to say how far to bridge before adding supports and maybe that number can be reduced?
Obvious addition to this convo is I would prefer skiffy's solution either way but as a one and done run of small items, I would surely want to find out why a commercially proven printer like yours is doing this, it has to be a setting. It also does NOT look like wet filament issues nor does it look like too hot or too cold for nozzle. It presents exactly as supports needed on a bridge that is too wide to span.
I would love to test this one for bridge distance and bridge speed. Sometimes, bridge speed can be TOO slow which allows the filament to droop. I totally get this is nearly the opposite of commonly agreed upon logic on bridging and overhangs but I don't accept that a bridge is the same as an overhang and I think they need to be treated completely separately. Overhangs have nothing to grab, ever, and should be treated as slow and steady to produce and then cool with droop speed as part of that very exacting equation but Bridging:
Bridging can be improved with higher speeds because it keep the filament more taut while then attaching the other end like a rope bridge. It is a sketchy idea to begin with but one that works at shorter distance and can be extended to minutely longer distances with speed. Slowing down too much for bridges just ends in drooping. My personal take on it of course and would require testing.
Would love to hear your confirmation on whether it did or didn't produce supports in this area we are testing on the hippo.
Last edited:
So I found a few spots where bridging was talked about in my bambu slicer but I then realized we are talking about a non bridged area. The belly is being produced as a "printing into thin air" as it is not a bridge. The center of the belly of the animal is not connected to the legs in any way. It cannot exist without supports. Bridging will not work here as it is not flat but truly separate from the legs at this point. Looking at that layer would show the four legs and the center of the belly, floating by itself in open air. So the question really does come back to, "Did supports actually get printed in that zone" and if not, that is the actual direction of the research we need to do.

But because I did find some spots talking about bridging (not the answer here) I will post them here:
Support - Don't Support Bridges
Speed - Bridge (mine was set to exactly the same speed as overhangs which I disagree with, should be faster)
Quality - Advanced - Bridge Flow and Thick Bridges
But because I did find some spots talking about bridging (not the answer here) I will post them here:
Support - Don't Support Bridges
Speed - Bridge (mine was set to exactly the same speed as overhangs which I disagree with, should be faster)
Quality - Advanced - Bridge Flow and Thick Bridges
Attachments
smithjohnj
Sr Member
The effectiveness of bridging can also depend on the print direction of the first "hanging" layer. If that layer is going in the "X-ish" direction the span (like between the front legs) might be small enough to work successfully. However going the same direction across the belly would be too far and fail as there is no where to attach the layer. Going in the "Y-ish" direction it would probably fail both between the front legs and the belly. Depending on the object, printing on the side, upside down, and other angles should be considered.
This opens a whole new research area for my newb 3d skills. It makes complete sense so now I need to go in and check my arrangements. I had been aligning everything front to back to avoid sling issues/aberrations but will need to rethink that now.The effectiveness of bridging can also depend on the print direction of the first "hanging" layer. If that layer is going in the "X-ish" direction the span (like between the front legs) might be small enough to work successfully. However going the same direction across the belly would be too far and fail as there is no where to attach the layer. Going in the "Y-ish" direction it would probably fail both between the front legs and the belly. Depending on the object, printing on the side, upside down, and other angles should be considered.
smithjohnj
Sr Member
You can also examine your "first" layer and "infil" patterns. For example imagine if the belly was being printed with "concentric". The lowest point is only in mid-air.
Supports were on.. Trees and Auto setting.
It's my default.
It prints larger objects flawlessly..
View attachment 1918312
II tried Imperial credits which worked OK to
View attachment 1918313
I've run a calibration.. Looks like - 10 will give best results?
View attachment 1918314
Bottom right?
Sorry, I didn't notice the z height pic because I was too focused on the issue with supports. The z height test is what would be considered raft/skirt/brim and 1st layer only. I would have jumped to saying yes to bottom right but it looks like it is not first layer but maybe 2nd or 3rd? Issues on layer one are different setting that issues on 2 and on. I will set up a sample on mine but currently have a 10 hour print going.
First layer adhesion or noodling does not seem to be your current issue but if I set aside the hippo belly and just look at these z height tests, the numbered tags look more like layer one than does the test block that goes with each and in that case -5 and -10 both look good but I would say it is somewhere between the two, like 8. When z height goes negative, beyond perfect, it begins to carve into its own print and build little sludgy piles of reheated 1st pass. This can be seen in the -10 and getting worse in -15-20. The -5 (number itself, not the test block below it) looks the least troughed by being too low and is pretty smooth. This setting resolves completely after layer one (no longer should even matter) unless the bed is not level and/or is warped and not mapped with the contact tip. Can you confirm for me if your black blocks are z height adjustments... and if they are layer one only?
OK, wow, yes. So, If I do concentric it isn't even bridging when it could be bridging with mono (while in the right direction). I will look into that as well. The hippo test is a bit of a misnomer because it really isn't a test of bridging due to it actually creating the belly in thin air regardless of the other settings. It really does have a section that will try to print when not in contact with anything at all other than supports (if working correctly and present).You can also examine your "first" layer and "infil" patterns. For example imagine if the belly was being printed with "concentric". The lowest point is only in mid-air.
finally found a good picture:

In sections of floating, not bridged, the bridging settings I posted earlier will not suffice. Only supports will fix this. Several things that will cause them to not work, when already turned on, is settings that reference minimum distances, "critical areas only", "on printbed only" and some others that define the minimum distance allowed between supports and the object (nearness) when the support is being laid but not yet supporting anything. In the right scenario you can need supports but have eliminate them due to a negative vortex of rules that eliminate their use in that area. Example: four curving poles hold up a saucer basin where the curves of the posts go into and then out of the area that supports will also be.
In these situation, if auto does not work, and no support is provided, you may need to custom draw in your own supports.
Last edited:
TazMan2000
Master Member
View attachment 1917936
Brims have crazy straight lines on them..
View attachment 1917937
That's a real mess!
It may be that the model wasn't positioned flat on the build plate. I'm not sure what slicer you have, but it's likely that you have the ability to maneuver the view around so you can see if the entire model is touching the build plate. If not, you'll never have the bond to the print surface and subsequent support layers won't have anything to adhere to.
Did you find extruded filament strewn about the build plate and on the sides?
TazMan2000
His feet actually came out fine (the build plate contact portion), it was at about layer 20 plus that the stranding started on that unsupported belly section.It may be that the model wasn't positioned flat on the build plate. I'm not sure what slicer you have, but it's likely that you have the ability to maneuver the view around so you can see if the entire model is touching the build plate. If not, you'll never have the bond to the print surface and subsequent support layers won't have anything to adhere to.
Did you find extruded filament strewn about the build plate and on the sides?
TazMan2000
Hi yes some supports broke off taking it off the bed, there was an almost non existent tree support under the chin and you literally would not see the print for all the trees round the legs, the first photo showed them bent back so you could see Brims..This totally begs the question, if supports were on but I see no supports were produced for the underbelly section, there seems to be a limit setting where it believes it is OK to bridge too far without supports. Of course, I am assuming you did NOT have supports that you removed from the belly before showing that picture of the no contact noodles? Can you upload the stl for me to test on mine to see if it creates supports there? (but after you confirm if it did or didn't create supports there?) I will try to find my bridge setting but I know mine allows me to say how far to bridge before adding supports and maybe that number can be reduced?
Obvious addition to this convo is I would prefer skiffy's solution either way but as a one and done run of small items, I would surely want to find out why a commercially proven printer like yours is doing this, it has to be a setting. It also does NOT look like wet filament issues nor does it look like too hot or too cold for nozzle. It presents exactly as supports needed on a bridge that is too wide to span.
I would love to test this one for bridge distance and bridge speed. Sometimes, bridge speed can be TOO slow which allows the filament to droop. I totally get this is nearly the opposite of commonly agreed upon logic on bridging and overhangs but I don't accept that a bridge is the same as an overhang and I think they need to be treated completely separately. Overhangs have nothing to grab, ever, and should be treated as slow and steady to produce and then cool with droop speed as part of that very exacting equation but Bridging:
Bridging can be improved with higher speeds because it keep the filament more taut while then attaching the other end like a rope bridge. It is a sketchy idea to begin with but one that works at shorter distance and can be extended to minutely longer distances with speed. Slowing down too much for bridges just ends in drooping. My personal take on it of course and would require testing.
Would love to hear your confirmation on whether it did or didn't produce supports in this area we are testing on the hippo.
The very first photo shows most of trees round feet but red doesn't photograph well.
I'll add the STL file
II can't seem to add an Stl, will a screenshot from Maker world suffice? Not many uploads and wonder if it's just too tiny a model..
Last edited:
That's a good point another thought was that sometimes I print direct from the Bambu Studio app on my phone which is a pretty much click and go experience where my computer has much more control and ability to check the bed adding multi pieces to the table etc...It may be that the model wasn't positioned flat on the build plate. I'm not sure what slicer you have, but it's likely that you have the ability to maneuver the view around so you can see if the entire model is touching the build plate. If not, you'll never have the bond to the print surface and subsequent support layers won't have anything to adhere to.
Did you find extruded filament strewn about the build plate and on the sides?
TazMan2000
The xeno print was printed via computer and had no issues and filled the whole plate, the capibara was printed using the phone app.
I will say the tree supports were crazy thin so maybe it needed thicker support they were prolly 1-5 mm in places.
I'm only One month into my 3D Printing journey and so far it's certainly been only the odd print that's gone weird..
smithjohnj
Sr Member
I have found that certain threads on the forum do not accept some file formats such as .stl. In those situations I first "zip" the file(s) and then attach the .zip file. That "seems" to have worked in the past. I had to double check but the prop-replica-stl-files-section-free-personal-use thread DOES accept them.
Last edited:
It might be because I'm on mobile RPF my options are only photos and videos.I have found that certain threads on the forum do not accept some file formats such as .stl. In those situations I first "zip" the file(s) and then attach the .zip file. That "seems" to have worked in the past. I had to double check but the prop-replica-stl-files-section-free-personal-use thread DOES accept them.
I've already zip filed will try on laptop later.
Similar threads
- Replies
- 3
- Views
- 1,593
- Replies
- 3
- Views
- 876
- Replies
- 52
- Views
- 5,588
- Replies
- 16
- Views
- 593