Alien / Nostromo Uniforms

I could believe that they are model windows Kane. They certainly have the right shape as far as I can tell. Still haven't found a great frame on the blu-ray yet. But I am going through that when I get off work this week. I did find out that Lambert has a different pin, which I didn't know about. Speaking of which, how many pins are there? I think it's Engineering for Parker and Brett, Executive for Dallas, Kane, and Ripley, Science for Ash, and a fourth for Lambert?

Charlie
 
Lambert wears the navigators insignia pin in red and gold, depicting a stylised star chart/planetary system.....

Here are all four department pins below!

Images from the excellent Harry Harris site..
www.harryharris.com/insignia/ainsig.htm

Don't think you can access it directly from here?
 
Last edited:
Just wanted to drop in and post to say how cool the stuff in this thread is and to thank everyone for all the info. I ordered stuff to build myself Kane's uniform and will get started this weekend (got the dickies **** and pants last night). I am ok on a sewing machine but if anyone that has used the dickies shirt and pants has any tips they would be appreciated.
 
Remember Kane has black leather tactical boots.

Kanes-Boots.jpg
 
Yes, I was going to hit the army surplus store this weekend up by me to see if i can find a similar set that were beat up, if not i will just buy a new set and scuff them up. I am also making a set out of the PF flyer modded up just for kicks.

I also already have a pair of combat style boots in tan, for another costume, that have that same look (patch over the ankle) that I was thinking about just dyeing black. You can't see them under the ghillie suit really anyway.
 
Last edited:
Anybody have any tips for adding the NOSTROMO lettering to the back of one of the RAF Nomex jackets? I bought one of the stencils from M Rush in the UK, but does anyone know what the best way to use it is, i.e. what process to use, what kind of dye/paint/whatever? (Or did others here prefer to iron on lettering rather than trying to dye or paint the material?)
 
Anybody have any tips for adding the NOSTROMO lettering to the back of one of the RAF Nomex jackets? I bought one of the stencils from M Rush in the UK, but does anyone know what the best way to use it is, i.e. what process to use, what kind of dye/paint/whatever? (Or did others here prefer to iron on lettering rather than trying to dye or paint the material?)

I also would like to know the same thing! :lol it's been a year with that stencil in my closet waiting to be used.
 
I went with screen printing for my lettering. I don't about the UK, but its possible you might have places to do it there as well. If you're going to stencil, I can recommend using paint over dye. The last few times I've done it I've basically traced the stencil in sharpie and then VERY carefully handpainted the lettering in. Doesn't look as crisp as transfers up close, but it's fine at distance of, say, 2 meters or further.

Charlie
 
Just wanted to drop in and post to say how cool the stuff in this thread is and to thank everyone for all the info. I ordered stuff to build myself Kane's uniform and will get started this weekend (got the dickies **** and pants last night). I am ok on a sewing machine but if anyone that has used the dickies shirt and pants has any tips they would be appreciated.

Hey Dotster, what style Dickies' clothes did you get? I've been doing some research about which style are the closest match. I was wondering what you came up with?

Charlie
 
Anybody have any tips for adding the NOSTROMO lettering to the back of one of the RAF Nomex jackets? I bought one of the stencils from M Rush in the UK, but does anyone know what the best way to use it is, i.e. what process to use, what kind of dye/paint/whatever? (Or did others here prefer to iron on lettering rather than trying to dye or paint the material?)

Couple of tips. First, rub the stencil down DAMN hard (regardless of what the instructions say!) - the last thing you want is the paint bleeding under the edges, and it will always peel off without trouble.

Second, use a very dry brush to stipple on the paint, building it up in layers. I used a mixture of white/black/turquoise Dylon fabric paints - load the brush then wipe off most of the paint before application. Hold the brush vertically and pat it on, then reload, wipe and repeat until the colour has reached the right intensity (I kept mine fairly subtle since I wanted a worn as opposed to factory-fresh look).
One result of this method (aside from an absence of brush strokes) is that it really picks up the honeycomb texture of the lining, just like the screen-worn jackets.

I just finished my second jacket today, and I'm pleased that it's as screen-accurate as I know how to make it - will post some pics once they're taken.
 
Second, use a very dry brush to stipple on the paint, building it up in layers. I used a mixture of white/black/turquoise Dylon fabric paints - load the brush then wipe off most of the paint before application. Hold the brush vertically and pat it on, then reload, wipe and repeat until the colour has reached the right intensity (I kept mine fairly subtle since I wanted a worn as opposed to factory-fresh look).
One result of this method (aside from an absence of brush strokes) is that it really picks up the honeycomb texture of the lining, just like the screen-worn jackets.

In school we use to apply the colour with this kind of instrument
brayer.jpg

Could be better than brush perhaps

I'm curious to see your results Jonno
 
When laying down the stencil there are a couple things you should do.

First: place something solid inside like a piece of Masonite or stiff (smooth) cardboard to have a nice solid flat surface to work on, cover this with aluminum foil in case of bleed through so the paint doesn't stick.

Second: use a hair drier over the stencil as you are squeegeeing it down this will get the edges to stick better then go over it again once the application paper is removed to help seal the edges down.
Don't over heat it as this will soften and possibly melt the vinyl.

Third: work from the edges lightly so there is no bleeding under the stencil, if using spray paint or airbrush do light coats so it doesn't saturate the cloth, if hand painting get a stencil brush (round short brush with a flat end) and carefully do the edges working away from the vinyl so there is no bleed.

You can also lay down a clear coat first to help seal the edges.

Take your time and let the paint set before removing the stencil.
 
Last edited:
Hey Dotster, what style Dickies' clothes did you get? I've been doing some research about which style are the closest match. I was wondering what you came up with?

Charlie

I got the stuff recommended earlier in the thread.

The shirt is "1574 Short Sleeve Work Shirt"
The pants are "1953 Painter's Pants"

I am figuring how much i am going to have to take them apart to get them sewn like the uniform. I don't really want to rip all the seams and then have to put it back together if i don't have to.

Use the coupon code "NEWS" and you will get quite a bit off your order.
 
Jonno & Division 6--thank you for the information about the painting of the Nostromo stenciling!
My friend is going to hand paint the lettering on; he is going to lightly trace the lettering with a pencil on the jacket back--then carefully hand paint in the letters. For those of us Stateside, I had a hard time finding Dylon fabric paint in USA retailers; however there are similar American brands available to a "google" shopping search.
 
Last edited:
Micheal's and JoAnn's carry fabric paint.

Even hand painting it put something solid with aluminum or wax paper on it to prevent bleed through.
 
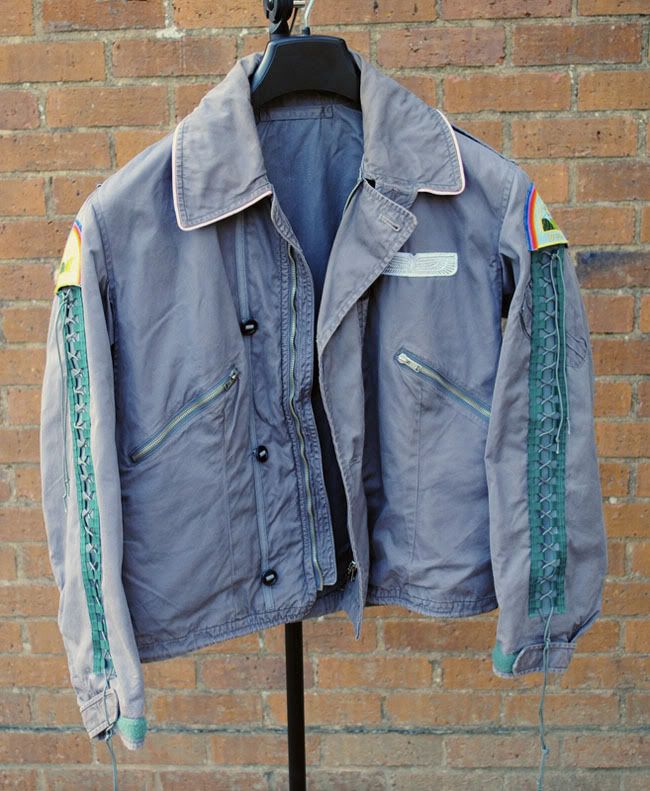
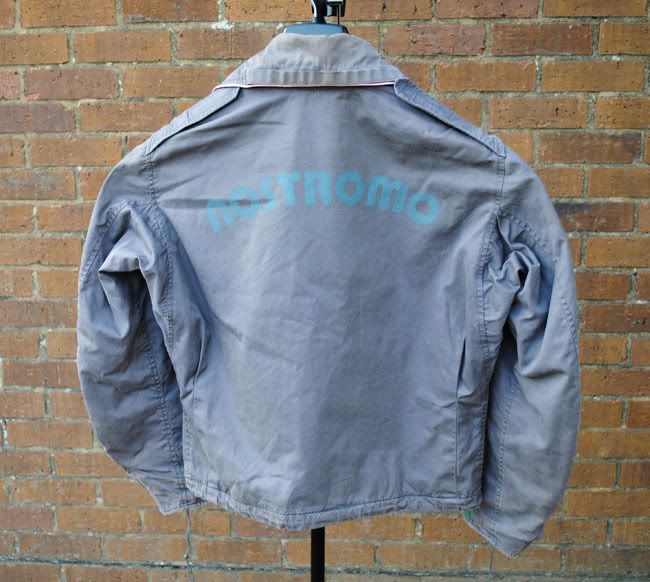
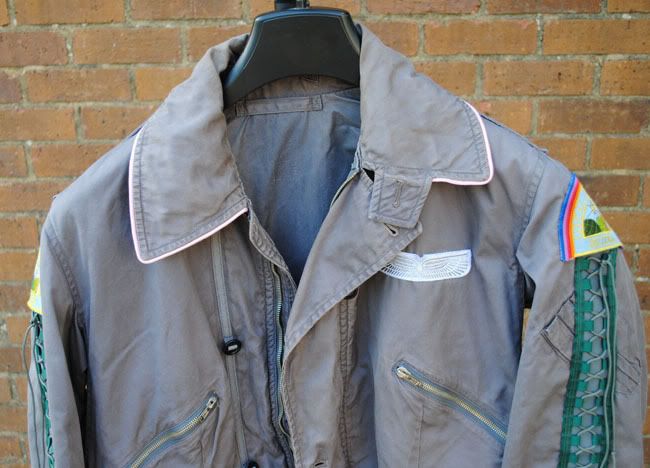
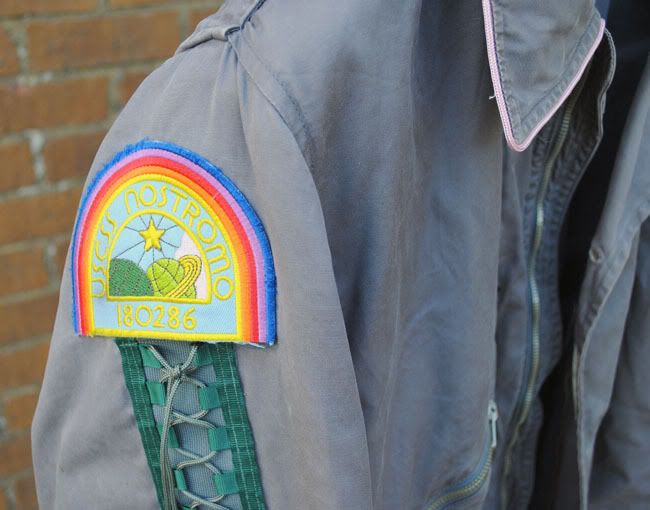
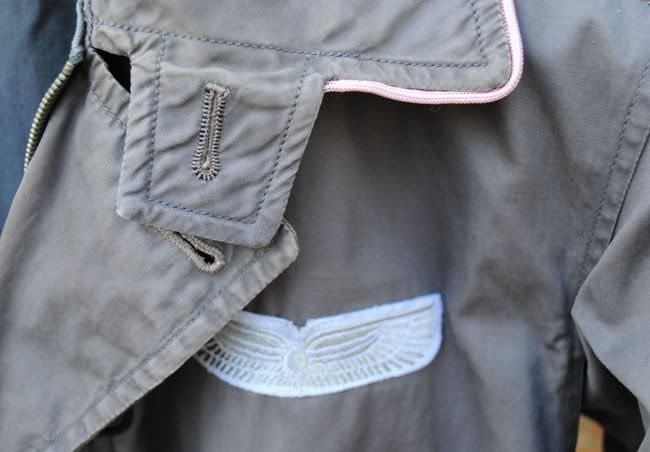
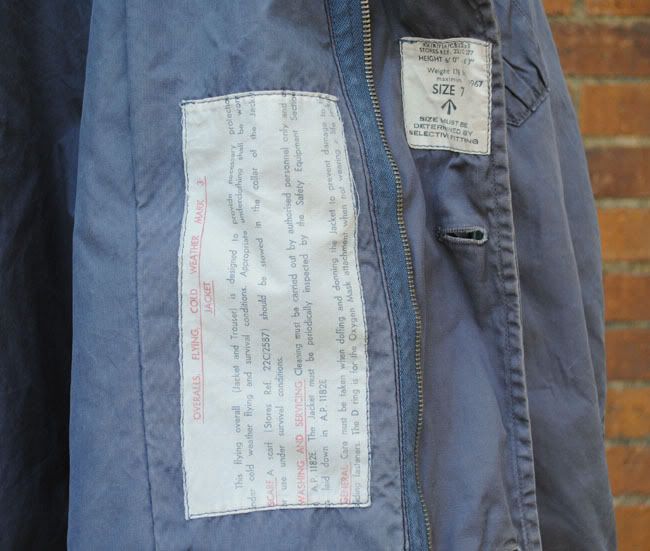
As promised (threatened?), here are the pics of my finished jacket. Recipe follows below:

full_front.jpg


full_back.jpg


upper_front.jpg


shoulder_closeup.jpg


cuff_closeup.jpg


piping_front.jpg


piping_detail.jpg


lettering_back.jpg


label_closeup.jpg


The jacket:
I got exceptionally lucky on Ebay a couple of months back, and snagged an authentic grey mk.3 in size 7 on Ebay. It's really no surprise that folks are having trouble matching this colour - it looks completely different in different lighting conditions. For what it's worth, those dyeing from khaki/green should just go for grey, grey and more grey - Dylon's antique grey (with perhaps a dash of lilac) will get you as close as you're likely to get.

The patches:
Only one option really - those made by Merliner (sometimes Montana). The sleeve patches from Intergalactic are fine (I used those on my prototype), but these are the real deal! I just weathered them a bit with a fine cheese grater and a touch of charcoal.

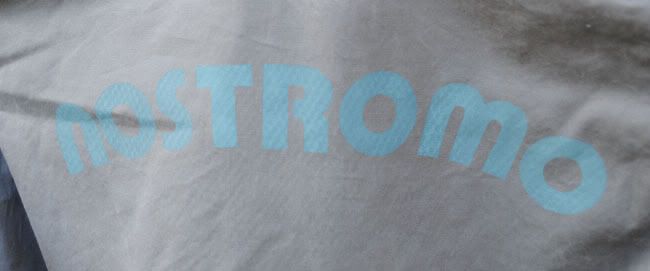
The back lettering:
As mentioned a bit earlier, I used Mike Rush's excellent stencil with Dylon fabric paints - a mixture of white, black and turquoise stippled on with a very dry brush. Note that you do need plenty of white pigment in the mix to keep the colour 'surfaced' (the darker parts of the mix just sink into the fabric otherwise).

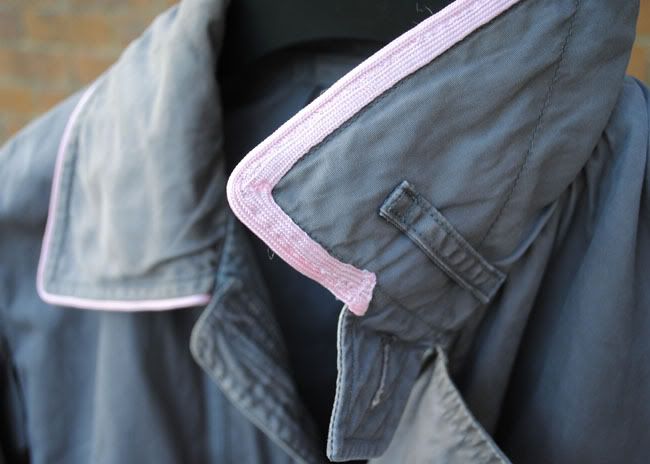
The piping:
Another lucky find - I found a few metres of the screen-accurate 'flanged' pink piping in a local fabric shop. Since photos of the original Kane jacket indicate that it was just stitched onto the back of the collar, I did the same (though a touch more carefully, if I might say so!)

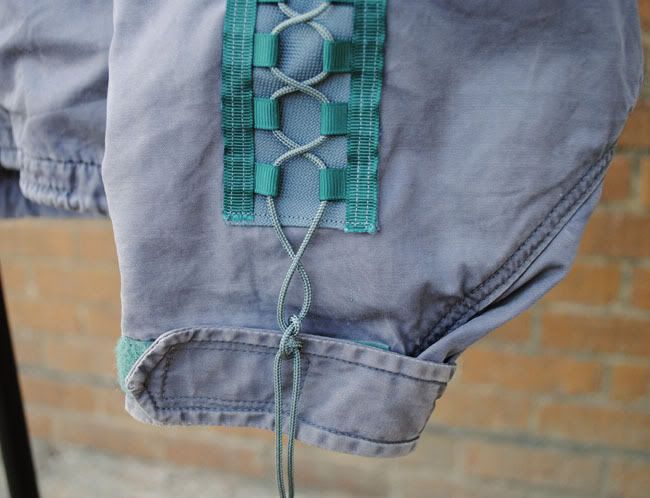
The lacing:
Source of most of my headaches over the last 3 months! I should first say a big thanks to Lancer if he's still reading this thread - his guide was invaluable in working out my own recipe.
I looked at various synthetic fabrics to use for the backing, before settling for a heavy nylon from some cheap backpack/rucksacks - it was just the right texture and colour, if not the right weight (not a big deal on a thin strip like this).

The grosgrain ribbon was a major challenge, and I probably bought and then discarded about five shades of green before settling on this 'Hunter' colour (due to its tonal match for the sleeve velcro). The ideal would have been foliage green as per the original flight suits, but I had to give up on obtaining that in the UK (unless I was prepared to spend over $100 on a bulk order from Jontay the US!)

The actual laces were another lucky find (so on balance I've done pretty darn well!) Having rejected a lot of shoelace and paracord options on grounds of either incorrect colour or thickness, I found an Ebay seller supplying something called 'survival vest cord' - just right, and a perfect match for the stuff on my Chinese pressure suit (which I'm relieved I don't have to cannibalise!)

I think that about covers it - hope it's been of interest, and feel free to ask any questions I haven't already answered!
 
The back lettering:
As mentioned a bit earlier, I used Mike Rush's excellent stencil with Dylon fabric paints - a mixture of white, black and turquoise stippled on with a very dry brush. Note that you do need plenty of white pigment in the mix to keep the colour 'surfaced' (the darker parts of the mix just sink into the fabric otherwise).

From the pictures I would say you could have done with more white. I like how the "net" shows up (exactly like the movie jacket). Colour shade aside I think the back lettering came out pretty neat. I might try to do that instead of continuing to track down silkscreens and similar techniques which require industrial steamers


Oh and yes, I'm very envious that you won that jacket lol
 
From the pictures I would say you could have done with more white.

Fair enough - I personally like the more subtle/faded look, but I concur that the screen worn jackets probably had a bolder (screen)print.
These are good stencils though, so as long as you get a paint mix you're happy with the result should be excellent.
 
Sorry if it has been said before but where do you buy these dylon colours in the UK? What shops sell them?

The lacing:
Source of most of my headaches over the last 3 months! I should first say a big thanks to Lancer if he's still reading this thread - his guide was invaluable in working out my own recipe.
I looked at various synthetic fabrics to use for the backing, before settling for a heavy nylon from some cheap backpack/rucksacks - it was just the right texture and colour, if not the right weight (not a big deal on a thin strip like this).

The grosgrain ribbon was a major challenge, and I probably bought and then discarded about five shades of green before settling on this 'Hunter' colour (due to its tonal match for the sleeve velcro). The ideal would have been foliage green as per the original flight suits, but I had to give up on obtaining that in the UK (unless I was prepared to spend over $100 on a bulk order from Jontay the US!)

Where did you buy the grosgrain ribbon then? And the nylon fabric?
 
Last edited:
Back
Top