You are using an out of date browser. It may not display this or other websites correctly.
You should upgrade or use an alternative browser.
You should upgrade or use an alternative browser.
4' (AKA 5 foot) Falcon build
- Thread starter RealDaveWinter
- Start date
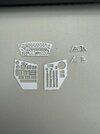
Thank you!!!For those with digital cutters, attached is the PDF for cutting masks. Thanks to manugu for helping with the starboard side panel.
View attachment 1864434
The circuit card is in place and all the lights work.
They may be too bright really as it sort of looks like this is Star Wars as directed by J.J. Abrams. I didn't use a lens flare filter, they just sort of happened. I might put some tissue in front of the LED's to act as a diffuser and tone things down a little.
Still need to make the panels that go on top of the sidewall consoles, but needed to test all the lights (10 times) before closing things up. All those wires hanging from below get tucked up into a space under the fan in the rear.
She looks BRILLIANT.
Oooookaayyy....
So I'm officially at the point in this build where I need to start to paint a few things, and I could use some advice from folks that have already done this bit.
Keeping in mind that the majority of spray paints used by others are not available in Canada I'm trying to make due with what I have, but honestly it's really p*ssing me off because I know there are better paints out there that I can't get, and it's ruining my build.
Anyway, I have started with the cockpit cone because why not start there. I primed the whole thing with Krylon Black primer.

Krylon White primer is banned in Canada, so I had to experiment with other options. I probably spent $100 just buying white primer that I will likely never use beyond the tests. But I found this to be the least bad of the bunch.

If anyone can recommend a better white primer, I'd appreciate it... assuming it's allowed in the country. Anyway, I tried using the ILM technique of light coats of white on black, but all the primers I try tend to come out splotchy, rather than even with thin/translucent coats.
I've wound up with this. It seems far to white to my eye, and I know you can't really tell via photos taken with a phone and displayed on an uncalibrated monitor, but is this even in the wheel house for the base coat? Tamiya AS-20 almost seems like the better choice, but again, can't get those paints in Canada anymore.


So if anyone with a finished build has suggestions, (t2sides maybe?) I'd appreciate it. thanks
So I'm officially at the point in this build where I need to start to paint a few things, and I could use some advice from folks that have already done this bit.
Keeping in mind that the majority of spray paints used by others are not available in Canada I'm trying to make due with what I have, but honestly it's really p*ssing me off because I know there are better paints out there that I can't get, and it's ruining my build.
Anyway, I have started with the cockpit cone because why not start there. I primed the whole thing with Krylon Black primer.
Krylon White primer is banned in Canada, so I had to experiment with other options. I probably spent $100 just buying white primer that I will likely never use beyond the tests. But I found this to be the least bad of the bunch.
If anyone can recommend a better white primer, I'd appreciate it... assuming it's allowed in the country. Anyway, I tried using the ILM technique of light coats of white on black, but all the primers I try tend to come out splotchy, rather than even with thin/translucent coats.
I've wound up with this. It seems far to white to my eye, and I know you can't really tell via photos taken with a phone and displayed on an uncalibrated monitor, but is this even in the wheel house for the base coat? Tamiya AS-20 almost seems like the better choice, but again, can't get those paints in Canada anymore.
So if anyone with a finished build has suggestions, (t2sides maybe?) I'd appreciate it. thanks
Last edited:
David3
Sr Member
Sean posted this on page 17 of his build thread -
"[Tamiya] AS-20 was too 'cool' of a color at this scale. Believe it or not, what really seemed to nail it was after the black primer, laying down Rustoleum Automotive Sandable Primer (This one is a warm white, other Rustoleum/Primers are too cool also). This stuff goes down very nicely and smooth, and if it does get rough (dry before contact), easily sands down without blemish. But, it's a really good base off-white.
The KEY to getting the overall warm color though is creating transparent layers, primarily lightly coating everything with Floquil Grime, heavier and lighter in appropriate places, then accenting with some other 'filters', like thinned down grays/gray-browns, etc. The red was using Floquil Reds, but needing to 'customize' them until the right hue was achieved.
Hope this helps."

That's not available in Canada
Okay, so I've had a thought, and I'm going to ask for help from one of the American members that has access to the correct Rustoleum primer shown in the photo above.
Would someone be interested in painting a 6" * 6" bit of evergreen plastic card with the correct white primer? And ship it to me? I'll be happy to cover the costs involved, but my plan is that I can take that colour into an automotive place in town that can "reasonably accurately" reproduce colours. I've used them before and their colours are really really close. My hope is that if I go in there with a really good colour sample, they can match it locally. And it's car paint, so it will go on quite thin.
Any volunteers, please shoot me a PM.
thanks
David
I swear, I only had the box open for a few seconds...

You could get Tamiya LP-35. It's their Insignia White in a jar, part of their newer lacquer line: Tamiya, 82135 Lacquer LP-35 Insignia White / Tamiya USAOooookaayyy....
So I'm officially at the point in this build where I need to start to paint a few things, and I could use some advice from folks that have already done this bit.
Keeping in mind that the majority of spray paints used by others are not available in Canada I'm trying to make due with what I have, but honestly it's really p*ssing me off because I know there are better paints out there that I can't get, and it's ruining my build.
Anyway, I have started with the cockpit cone because why not start there. I primed the whole thing with Krylon Black primer.
View attachment 1865331
Krylon White primer is banned in Canada, so I had to experiment with other options. I probably spent $100 just buying white primer that I will likely never use beyond the tests. But I found this to be the least bad of the bunch.
View attachment 1865332
If anyone can recommend a better white primer, I'd appreciate it... assuming it's allowed in the country. Anyway, I tried using the ILM technique of light coats of white on black, but all the primers I try tend to come out splotchy, rather than even with thin/translucent coats.
I've wound up with this. It seems far to white to my eye, and I know you can't really tell via photos taken with a phone and displayed on an uncalibrated monitor, but is this even in the wheel house for the base coat? Tamiya AS-20 almost seems like the better choice, but again, can't get those paints in Canada anymore.
View attachment 1865329
View attachment 1865330
So if anyone with a finished build has suggestions, (t2sides maybe?) I'd appreciate it. thanks
You'd definitely get more mileage from a spray can, though.
SB
The control panel mask document has been updated to include the two little panels that are on either side of the cockpit beside the seats.
Once again, for my build I used 0.4mm clear sheet styrene for the most part. The raised sections are made from the clear styrene cut from kit canopy sprue. The section that usually includes the sprue ID and company name is generally about 1mm thick. And when you trim off the lettering, you get a nice bit of clear plastic.
[Edit] - Files updated again. So please find the post on page 19.
thanks
Last edited:
joberg
Legendary Member
Upol is only available in the U.S. Amazon.com sells it and it can be shipped in Canada. Expensive for our Canadian builders ($30.00 CDN, shipping not included)How about Upol? They make some realy good spray paints, just test them first.
Last edited:
Tried the laser today. Beam is too big.
View attachment 1867587
Yeah, I'd imagine. The kerf from the laser is probably at least twice as wide as my cutting blade. Those drawings are really designed around a digital cutter, like a Cameo 4 or similar, and Tamiya masking sheet.
Well, Thanksgiving weekend so I have some extra time to finish up the cockpit and am calling it complete.
The fan is completely the wrong type, but I have found no information regarding the real fan. If anyone knows what one was used, they're not telling anyone because reasons. Clear photos of it seem to be non-existent. The way I've designed the cockpit though, the whole front end is mounted with 3 set screws, so if I ever do find out what fan is required, it's really easy to replace the one that's there.
All the functional wires are hidden. The visible wiring in the back is non functional and there just to replicate the real wires in the original. I've tried to replicate how the white, blue, black wires wrap around each other, but there are not many clear photos of that area. The fourth wire looks green in some photos, but then I have others that looks like they used clear insulated speaker wire. So that's what I went with. It's easy to change out if I get some better references.
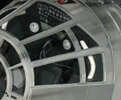
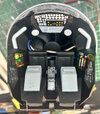
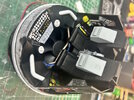
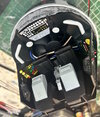
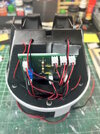
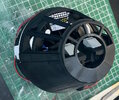
The fan aside, I'm very happy with the accuracy of everything else. I'd put this cockpit up against anyone's when it comes to accuracy. With no visible 3D Printed parts. Everything you see when the cockpit cone is on, is ether made from sheet styrene or kit donor parts.
The fan is completely the wrong type, but I have found no information regarding the real fan. If anyone knows what one was used, they're not telling anyone because reasons. Clear photos of it seem to be non-existent. The way I've designed the cockpit though, the whole front end is mounted with 3 set screws, so if I ever do find out what fan is required, it's really easy to replace the one that's there.
All the functional wires are hidden. The visible wiring in the back is non functional and there just to replicate the real wires in the original. I've tried to replicate how the white, blue, black wires wrap around each other, but there are not many clear photos of that area. The fourth wire looks green in some photos, but then I have others that looks like they used clear insulated speaker wire. So that's what I went with. It's easy to change out if I get some better references.


The fan aside, I'm very happy with the accuracy of everything else. I'd put this cockpit up against anyone's when it comes to accuracy. With no visible 3D Printed parts. Everything you see when the cockpit cone is on, is ether made from sheet styrene or kit donor parts.
Last edited:
t2sides
Master Member
Dave,
Overall the cockpit is looking very nice. Since you mention you're trying to get a model level of accuracy to the level of the original, here's a few things to keep an eye out that aren't quite right or missing details from the original on yours, but you are certainly on track and getting close in most areas of the cockpit.
Can't tell for sure due to lack of focus, did you use the headlight from the Morgan kit where the largest yellow circle is on the back port panel (see ref pic below, you can easily match the raised details to the headlight) - maybe it's just the background glue that obstructs the detail.
The 2 vent parts cut from the Morgan looks nice how you approached it, but those parts are too 'thick' compared to the actual armor kit part used there, which was not the Morgan but you've made a good substitute. I'd try to at least shave those down so they are not as tall as they currently are.
The area though that is missing quite a few details from the original is the back upper black control panel, there are a number of missing white 'cutout details' on the outer parts (edges) on both sides - what you have looks great really, but not quite accurate if you are trying to make the replica match the original. Not sure if you accidently painted over them, or maybe just didn't include those details (easy to overlook due to shadows in most refs)
Your fan is sitting too close to the back wall, you'll notice in ref pics it sits back farther, that's because it used the KoolShade vents in addition to the window to pull in the airflow and you don't see the blades so obviously with the correct set back, definitely recommend moving that back at least so you aren't seeing the shadows of the blade so close to the wall.
Assuming you will still be adding the orange coloring in some of the round openings on the Hurricane part on the back wall (all of yours are white right now)
The part just to the left of the 'clock' part on original protrudes out almost 3x what yours is (also ref the pic below of the yellow headlight, and you can see the 'pyramid' part protruding, where yours is just a little short block.
The Stug parts appears a little too far away from hurricane part (notice on original, aligns with the middle rib of the armor part (your Morgan cut part which is slightly oversized than actual kit part), on yours it's farther out and it should 'nest' under the armor part.
The center console as looking head on from should be tapered, not square. (ref pic below)
There are other little details for the cockpit that are missing - but I'm sure no one will really notice except the very few 'die hards' - so you are doing really quite well with what you have done here! Nice job.
In the end, no one will have an 'exact' replica, but we sure have fun along the way trying!
Here's a pic of the headlight lens died yellow:

Fan sits back farther

Stug part offset

Center console tapered

Overall the cockpit is looking very nice. Since you mention you're trying to get a model level of accuracy to the level of the original, here's a few things to keep an eye out that aren't quite right or missing details from the original on yours, but you are certainly on track and getting close in most areas of the cockpit.
Can't tell for sure due to lack of focus, did you use the headlight from the Morgan kit where the largest yellow circle is on the back port panel (see ref pic below, you can easily match the raised details to the headlight) - maybe it's just the background glue that obstructs the detail.
The 2 vent parts cut from the Morgan looks nice how you approached it, but those parts are too 'thick' compared to the actual armor kit part used there, which was not the Morgan but you've made a good substitute. I'd try to at least shave those down so they are not as tall as they currently are.
The area though that is missing quite a few details from the original is the back upper black control panel, there are a number of missing white 'cutout details' on the outer parts (edges) on both sides - what you have looks great really, but not quite accurate if you are trying to make the replica match the original. Not sure if you accidently painted over them, or maybe just didn't include those details (easy to overlook due to shadows in most refs)
Your fan is sitting too close to the back wall, you'll notice in ref pics it sits back farther, that's because it used the KoolShade vents in addition to the window to pull in the airflow and you don't see the blades so obviously with the correct set back, definitely recommend moving that back at least so you aren't seeing the shadows of the blade so close to the wall.
Assuming you will still be adding the orange coloring in some of the round openings on the Hurricane part on the back wall (all of yours are white right now)
The part just to the left of the 'clock' part on original protrudes out almost 3x what yours is (also ref the pic below of the yellow headlight, and you can see the 'pyramid' part protruding, where yours is just a little short block.
The Stug parts appears a little too far away from hurricane part (notice on original, aligns with the middle rib of the armor part (your Morgan cut part which is slightly oversized than actual kit part), on yours it's farther out and it should 'nest' under the armor part.
The center console as looking head on from should be tapered, not square. (ref pic below)
There are other little details for the cockpit that are missing - but I'm sure no one will really notice except the very few 'die hards' - so you are doing really quite well with what you have done here! Nice job.
In the end, no one will have an 'exact' replica, but we sure have fun along the way trying!
Here's a pic of the headlight lens died yellow:
Fan sits back farther
Stug part offset
Center console tapered
Dave,
Overall the cockpit is looking very nice. Since you mention you're trying to get a model level of accuracy to the level of the original, here's a few things to keep an eye out that aren't quite right or missing details from the original on yours, but you are certainly on track and getting close in most areas of the cockpit.
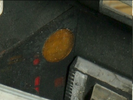
Can't tell for sure due to lack of focus, did you use the headlight from the Morgan kit where the largest yellow circle is on the back port panel (see ref pic below, you can easily match the raised details to the headlight) - maybe it's just the background glue that obstructs the detail.
I have no photos that show that as a headlight. They're all just plain circles. The one you have shown is interesting, but I've never seen it before. It's certainly not in any of the collections that are readily available. At least none that I'm aware of. I asked for photo references of these area several times, with few replies, and nothing clear.
The 2 vent parts cut from the Morgan looks nice how you approached it, but those parts are too 'thick' compared to the actual armor kit part used there, which was not the Morgan but you've made a good substitute. I'd try to at least shave those down so they are not as tall as they currently are.
Which armor kit is used here? There is no armor kit mentioned on any of the part maps for this area and I have seen no mention of it anywhere else. The two morgan parts, are an matched based on the photos I have, and what's called out on the parts maps.
The area though that is missing quite a few details from the original is the back upper black control panel, there are a number of missing white 'cutout details' on the outer parts (edges) on both sides - what you have looks great really, but not quite accurate if you are trying to make the replica match the original. Not sure if you accidently painted over them, or maybe just didn't include those details (easy to overlook due to shadows in most refs)
I have no photos that show the complete back panel. I've posted PDF drawings of what I'd come up with, multiple times, and nobody has mentioned any issues.
Your fan is sitting too close to the back wall, you'll notice in ref pics it sits back farther, that's because it used the KoolShade vents in addition to the window to pull in the airflow and you don't see the blades so obviously with the correct set back, definitely recommend moving that back at least so you aren't seeing the shadows of the blade so close to the wall.
My fan is completely wrong. I've never been able to get any information on the correct fan to use (or the engine deck for that matter either). It's probably also in the wrong spot, but nothing about the fan is correct.
The only photos I'm aware of that show the Hurricane panel on the back wall are from the Chronicles book. Those don't show any orange colouring in the dials. Actually, if anything, they're just black dots in those photos. If you have clear colour photos that show that area I'd be interested in seeing them.Assuming you will still be adding the orange coloring in some of the round openings on the Hurricane part on the back wall (all of yours are white right now)
Last edited:

