Limited Run SIGN UP CLOSED. PRODUCTION BEGINNING! Dewy and Anakin Starkiller's Obi-wan Episode 1 saber sign up!

I replied to the private message as soon as it arrived! I didn't know we were announcing to the world. So excited.

Payment sent, tracking received.
 
Netflix Money GIF by NailedIt

Now my PayPal just awaits Qui Gon!
 
Well I couldn't help myself.

Parts Breakdown & Replacement Screws/O-rings:
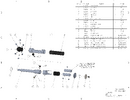
Firstly, here is a parts breakdown that has the McMaster part numbers for all fasteners/O-rings in case anyone needs to replace them. Note that there is a pin and a set screw that may or may not be included with the production sabers, they are 100% optional, but are included in this graphic:

Obi TPM Assy v10b.PNG

Replacement LEDs:
If anyone needs to replace the LEDs, I specifically designed the bezels to work with these:
5mm Flat Top Wide Angle Cool / Clear White LED - Wide Angle

These should also work, but the flat top ones above are easier to sand flush with the bezels:
5mm Round Top Cool / Clear White LED - Ultra Bright


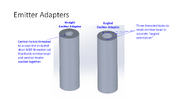
Emitter Insert Options:
Slide13.PNG

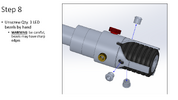
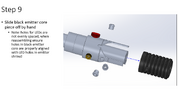
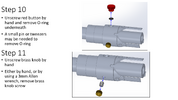
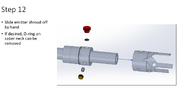
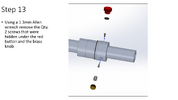
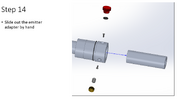
Disassembly Instructions:

NOTE
: this saber features several very small fasteners, DO NOT OVERTIGHTEN (tiny screw = tiny torque). Fasteners should only need a light hand tightening.

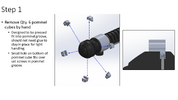
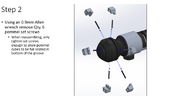
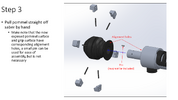
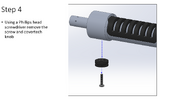
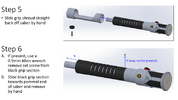
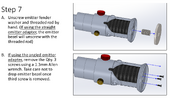
Assuming the saber comes fully or mostly assembled, I put together disassembly instructions:
Slide1.PNGSlide2.PNGSlide3.PNGSlide4.PNGSlide5.PNGSlide6.PNGSlide7.PNGSlide8.PNGSlide9.PNGSlide10.PNGSlide11.PNGSlide12.PNG

Purple Rivet Installation:
To assemble the brass knob & purple rivet:
  1. Grab the purple rivet by the stem using needle nose pliers
  2. Thread the head of the rivet in from the back side of the brass knob, until one or two threads are still showing from the front side of the brass knob
  3. Thread the set screw in from the backside of the brass knob such that the stem of the purple rivet sits inside the hex wrench element of the screw. Tighten screw until rivet is snugged up against threads of brass knob. Assuming light handling only, no glue should be needed.
BrassKnobAssembly.png
 
Last edited:
That is some cool engineering, but seeing these breakdown images just makes waiting that much harder. You really should restrain yourself. :p
 
If we choose to paint the black parts, I'm assuming we should use satin? Any recommendations on that? I think Dan mentions Rustoleum on Halliwax's video?
 
Back
Top