Limited Run SIGN UP CLOSED. PRODUCTION BEGINNING! Dewy and Anakin Starkiller's Obi-wan Episode 1 saber sign up!

As one of my very few posts on this forum, let me just say that this saber is absolutely beautiful. I just received mine this afternoon and it's definitely a childhood dream come true as I've been after this saber for 20 some years.

Thank you guys for all the hard work you put into the design and making of this prop. Really looking forward to the Qui-Gon Jinn saber next!

1685731422296.png
 
Dang, already! It’s every bit as beautiful as I thought it would be. Were you able to press fit the pommel cubes without glue?
 
Dang, already! It’s every bit as beautiful as I thought it would be. Were you able to press fit the pommel cubes without glue?
Yes actually the pommel cubes came already assembled. In fact, the picture you see here is exactly how it was shipped to me. The cubes are very well pressed in, not much risk of those falling out.

However, I will say that the purple rivet that goes inside the brass screw I very much think will need a tiny dab of glue because it falls out quite easily, almost lost it already actually.

I messed around with mine some and took some things apart and then just put it back together. I'm going to wait until we get a full installation video on this because otherwise I'll regret messing something up.
 
I got mine. I really regret this purchase, I should have bought two!!

This is the most beautiful replica prop I've ever seen!! I love this so much!! If there is a second run I may buy another one. One in a hermetically sealed archival case, and the second one to play with. It's too perfect to handle. I'm sure it's well engineered and rugged, but it would break my heart if I scratch it,

Thank you so much for this excellent run!! Anyone who's still waiting, it's worth the wait. Excellent, excellent, excellent!!!!!!!!!!!!!!!!!!!!!!!! I can't say enough about this gorgeous prop.

Great work Anakin and Dewy... Thank you, thank you, thank you!
 
I wouldn’t be exaggerating to say that I’ve been waiting for this prop for decades.

IMG_9796.jpeg


Thank you, Dewy and Starkiller for making a boyhood dream come true. It’s gorgeous :love:
 

Attachments

  • IMG_9800.jpeg
    IMG_9800.jpeg
    1.4 MB · Views: 179
  • IMG_9797.jpeg
    IMG_9797.jpeg
    1.5 MB · Views: 167
  • IMG_9799.jpeg
    IMG_9799.jpeg
    1.6 MB · Views: 175
  • IMG_9798.jpeg
    IMG_9798.jpeg
    1.4 MB · Views: 188
img_9798-jpeg.jpg
I wouldn’t be exaggerating to say that I’ve been waiting for this prop for decades.

Thank you, Dewy and Starkiller for making a boyhood dream come true. It’s gorgeous :love:
Remember to swap out this emitter plate & threaded rod for the other ones included in the package. The ones in the photo are the chamfered versions and not the accurate ones in the ziploc.

EDIT

Drew and Dan,
Thank you! Beautiful work, as always.
IMG_8870.jpeg
 
Last edited:
Remember to swap out this emitter plate & threaded rod for the other ones included in the package. The ones in the photo are the chamfered versions and not the accurate ones in the ziploc.

Dan,
Thank you! Beautiful work, as always.
View attachment 1707185
So actually that is the replacement rod, just not the replacement washer
 
I would also like to add my thoughts. I don’t have pictures right now, and I haven’t disassembled everything (friend of mine messaged me to make sure I remember to rotate the black emitter correctly because the LEDs have a tiny distance difference)

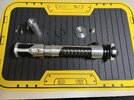
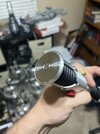
This is honestly the most beautiful replica kit I’ve held yet in this hobby. It’s assembled like the original, with the correct feel and weight because of the assembled parts. You’re aware of the cores as you hold it, and the emitter plate threads on. I’m stunned.

I have got to applaud the two of you, I haven’t been able to stop looking at the machining profile of the emitter window edges, the interrupted bevel on the choke, the pommel cubes, etc.

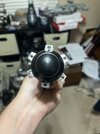
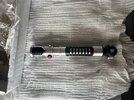
I had a hard time squishing the red button back into place, maybe it’s my hands, so I swapped the tiny O ring in there for a tiny black nylon washer.

They are thick enough to add enough height to keep the red button up, to a degree. I didn’t want to force any threading.

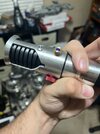
And yeah, my red button threads in perfectly, as does my hand made brass part too. I only found two red buttons so I gave the other one to, who else, redbutton for his Obi Wan kit. I will use this replica on my cast clan saber.

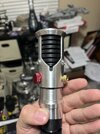
I’m going to use some Ep 1 acrylic lacquer on the black parts I’m pretty sure. Worked well for my battle droid blaster cast ;)
 
Follow-up.
I filled the grub screw’s female alignment holes in the cubes with a good drop of Gel (control) loctite each and now they won’t budge! (Yay) I’d recommend using that hole instead of trying to douse the male threads in the pommel.

Also pushed the purple rivet into position and filled the underside with the same gel glue and threaded on the lower set screw to make a complete assembly. Holds great and is a solid unit now.

I opened the legs of the LEDs so they act as a bit of a spring contact inside the bezel and then glued the underside, and cut the excess legs off.
Besides the little bit of wobble in the shroud (I’m sure comes from using the tilted emitter base) the whole thing feels solid!
Really beautiful
 
Back
Top