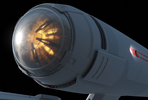
1/350 TOS Enterprise "Blasphemer's Edition"

Apologies for the long delay. I've been working on this constantly but there's been very little to show. Grinding out the hull behind the windows, sanding, and an endless parade of printing 3D tests for rooms and corridors. Which, alas, are really not going to work the way I wanted, so they are going to go by the wayside.

But I did get the bridge mounted into the kit part. Lit up it looks really good but I have it covered now for painting so pics will have to wait a bit for that. However, I did make a few decisions.
  1. I'll be using Tamiya Fine Gray primer as the base coat for the kit
  2. Tamiya Sky Gray will be the primary accent/aztec color
  3. Tamiya Light Gray will be a third (and sparingly used) aztec color
Here's the bridge with some aztecing on it based loosely on the Hunter G reimagined Enterprise paint pattern. I've also been experimenting (finally!) with with my Silhouette Cameo 4 Pro to create paint masks. I'm now in the process of creating masks for the deflector dish housing.

Some things to note on the bridge and B and C decks:
  1. I filled in the large red light openings on the left and right sides of the bridge because I think those lights are stupidly large. I redrilled them for 0.5mm fiber optic which you can see sticking out. They are lit with a red LED but will be more in scale, or at least more preferable to my eye.
  2. I've filled and sanded the two hatches along the rear slope of the part. I may add some red pin striping of some kind but almost certainly won't be using the kit decals.
  3. I will be adding a double-flash strobe to the top of the turbo lift housing. The hole is drilled out for the fiber optic, I just haven't inserted it yet.
  4. The windows are made with Micro Krystal Klear. That ended up being the best solution after an interminable amount of experimentation. I do have slide films mounted inside that I glued to very thin pieces of styrene to make it easier to attach them and also create some separation from the windows to provide a real sense of space.
This is an odd curve to mask but I'm pretty happy with how it came out. I'll get a coat of satin on it sometime tomorrow to seal it up, but I need to mask the windows first.
fDq0rwQl.jpg


JoiUHwEl.jpg


ZnApEZil.jpg


0cbfRJdl.jpg

…Charlton Heston has entered the thread…

IMG_8899.jpeg


Love everything about this build!

Looking forward to seeing where you go with this.
 
Another minor update. I'm hoping that with (most) of my major issues out of the way (until I get to the Bussard collectors and what I have planned for those!), things will really start moving.

I finished the deflector and housing. I sort of don't like how far the inner portion protrudes, but it's glued in now and I'm not sure I want to wrest it apart. We'll see. But overall I'm pretty happy with it, and I really love the happy accident of the blue lighting on the dish stem.

KDfOXCXl.jpg


uTrWQ1Ql.jpg


Windows films in the neck. The windows are made with Micro Krystal Klear. I'm pretty happy with them, though there is some waviness in the "glass" that's unavoidable with using MKK and openings this large. The window at the top of the vertical column has a mask on it. These pics are just with the neck held in front of one of my work lamps. When I put the two halves together and did a test lighting with the actual interior LEDs it was a lot brighter. I'll take some pictures of that later and post them. I took these shots after finishing one side.

I bought the slide films that are on Etsy and mounted them on very thin white styrene before gluing them in place. The window films by themselves looked too transparent without the backing. It also gives the film some separation from the window surface which creates a bit of nice parallax.

PtPke3Dl.jpg


9JgKAi7l.jpg
 
As for my insane Bussard collector idea, I want, as much as possible, to recreate this look:

Screenshot 2025-03-17 at 9.03.24 AM.png

I've already got the lighting more or less done as much as I can, using NeoPixel rings and a custom Arduino lighting program. (There's a short video of that elsewhere in this thread.) I can't light the center, unfortunately, which would be the best for the effect I want, but the fan motor will be there so I don't see how that will happen.

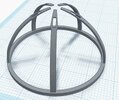
I made these in Tinkercad and printed off several versions with slightly different sizes to be the larger blades shown above. These will be stationary while the inner ones will rotate.

Bussard blades.jpg

They fit really well inside the outer dome. The problem is going to be the mounting ring at the bottom. It jut gets in the way of the inner dome. There's really no way to make it work. There's not enough space. I think the solution is going to be getting the blades glued into the ring without gluing the ring, and once they're set I can just clip off the ring, leaving the blades. I think (hope!) that will work.

For the inner fan blades that rotate, I'm planning on creating paint masks that match the shorter ones shown in the first image. I'm not quite ready to test that yet, but soon. I'd really like to get the saucer more or less done before moving on, and I'm close. I have all of the saucer windows and films in place and most of the lighting wired up. I've also been playing with paint masks for the pie wedges.
 
Quick and dirty light test of the chiller grille lights just to check the diffusion. This is pretty much perfect for what I'm after. The diffuser (sheet styrene) is just taped in place which is why it's uneven at the edges but that will go away in the final version.

L0qdF33l.jpg


First test of the revised Bussard collector fan blades. I'm really happy with how this turned out. I'm printing new inner fan blades without the holes. I'm hoping to get some paint on them this weekend and test everything with lights. Not sure yet what I'm going to do with the outer dome.


I am planning to mount the stationary fan blades to the inside of the dome. The ring at the bottom will hold them in place. They are not actually touching the inside of the dome, which is how I want it. There's a decent amount of separation.

9za4l9Ul.jpg


More soon!
 
I finally created an aztec design (both colors and pattern) that I like. I've redone the bridge and B&C decks about three times now. The deflector housing shown above has been re-primed so I can use this new scheme. This is it, promise!

I may add one or two very pale blue-gray panels to the actual bridge section on top, but that's still TBD.

Lots of masking tape.
a1KTYY1l.jpg


tfiishGl.jpg


And the finished result. There were a lot of vinyl masks I cut for the more subtle patterns on the B&C decks. They almost disappear at some angles, but I'm good with that. Window masks are still on.

WmBWW1Il.jpg


2C49EEdl.jpg
IMO, she looks great! From a distance, the B-deck Aztecing has a bit of a Death Star II vibe (not in a negative way).
 
Help! I'm stuck in an Aztec repaint loop! Make it stop! Do I have to let Edith Keeler die to escape?

This is not a repost, this is once again a repaint of the aztecing on the deflector housing. But this is it! I'm finally happy with it! This has larger panels, more colors, and (most importantly), it is up/down and left/right symmetrical in design.

qaOIBjil.jpg


58cmJN7l.jpg


I'm just holding it in place to see how I like the alignment with the saucer section.

EKhMXeql.jpg


Pj1PnAOl.jpg


xl6UWs9l.jpg


The saucer is sealed up and I've done two rounds of puttying along the seam. Nothing to really show here yet. One more round of sanding later today and then I'll hit it with some primer to see what's left to clean up.

I swear the hangar bay is the bane of my existence. I am growing to hate this damn thing and how it fits into the model. And this is the one I designed to fit better! (No pics yet, I'm still working on it and the fantail).

More soon.
 
Last edited:
There is no way I'm going to finish this for Wonderfest so I canceled my hotel room and decided to slow down the build so I don't wreck something because I'm hurrying. I don't have any other models to take and it's too far to drive just to hang out without having something to show.

Looks like Imgur is following the natural progression of all image sharing sites and going down the shitter. They no longer support links the way they did so you're stuck with what's below. Sorry.

This was a test to see if red or orange worked best for the domes. For the lighting scheme I decided upon, red ended up being best.

A quick test shot with the domes sitting on top. They are not pushed down all of the way and the fastener parts have not yet been painted (I decided on a copper color).

This is the initial design for the saucer aztecing. I haven't even printed these yet, but this is the look I'm going for. This will be in different shades of gray and will be very subtle. At least that's the plan!

Overhead shot of the nacelles. The five outer blades—what I'm calling the hydrogen intake alignment spars—are stationary while the inner blades spin. The colors pulse between blue and orange (though this may be an earlier test where the lights were orange and yellow).

A shot of the hydrogen intake alignment spars.

I painted the radiators on the nacelles in two tones. Because why not?

Glueing the photo etch grills to these pieces was a major pain, but it's done, and when lit they look pretty great!

Close up.

The saucer has been sealed up for a while but I'm still working on the seam between the upper and lower halves. I think I finally have it and will be putting the final primer coat on soon. Nothing to really show yet.

More soon(ish)!
 
Here's a short video of the Bussards in action. Yes, it's blown out on my phone but it still looks okay, and vastly better in person. I have since fixed the light leak at the top. Even inserted into the nacelle it's still very quiet.

 
Back
Top