Let's dive again into the mystery around the lever and the rivet ...
There are 3 possible options (regular Inc.-style rivet, obscure version, repaired lever). I'd rate them from least probable to most probable like this:
1. Obscure variation with a factory installed bigger than "Inc."-style rivet.
After all these years that the entire community is chasing the perfect graflex flash - nobody has seen one. I'd agree that chance of this is very minimal.
2. Repaired Lever.
Now, I'm just kidding here, but only based on numbers - chance of fixed lever vs obscure variation is 50:50 - we've seen the same number of examples for both - 0. But that's not how it is in reality. The vintage levers do break and I personally broken two of them unfortunately. I guess less likely to happen when using the flash with a camera as there the parts are designed to fit well together, but when try to close the clamp with an oversized clamp card or bubbles sometimes it breaks. In both cases it was not the first time I tried to close the clamp but after I've taken apart the build for some reason and then tried to reassemble it.
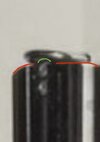
I think I've seen at least 2 posts by other forum members and they all were broken the same way. Not the rivet, not the lever, but the screw part. Here's the last one that I broke, I tried to fix it somehow but it is still visible how the damage was done:
View attachment 1768304
Something I could not have guessed looking from the outside, but turns out that loop is very thin and is the weakest point.
(That also makes the theory of the V2 lever being installed on a graflex screw because the original graflex lever broke quite unlikely in my opinion.) It is still a possibility is that corrosion in the lever weakens the rivet or the lever more than the other parts and it is the one that breaks, but based on the experience so far this looks less likely.
So if you fix the lever like this or if you just get some screw that fits (I think that's more likely, also looks like the lever is sometimes turned at an angle that you can't do with the original screw, unless the rectangle hole on the clamp bar is enlarged), cut it to size and drill a hole in it - next step will be to attach the lever. But the original rivet is still in there and you’ll have to remove it first. As you don't care to preserve the look, but just the functionality the easiest is to cut it in two, throw it away and use something like a nail in its place.
I think it is a realistic scenario, just not very probable because it is too much of a hassle to fix it that way.
I've seen several repaired clamps on ebay and they all have been repaired the same way - the lever was missing completely, and some sort of unmodified screw was in its place (so that you need a screwdriver to open and tighten the clamp). In one case the clamp bar was missing because they used a screw with a bigger thread size, so they had to put a matching nut on the other side.
Another very good example is the Ranch Saber - it is fixed exactly the same way like those I've seen on ebay , but on top of that I guess because they wanted to preserve the look - they found it easier to drill and tap a hole into the lever and the bar to put the lever back on the prop than trying to fix the whole thing with a nail.
3. Just a regular Inc.-style rivet.
Here are the highest resolutions of the toe pic that I could find in the forum. They are still very blurry, but especially on the lower side there's enough of the outline of the rivet visible that if you follow it and complete the circle it does not appear to me to be larger than a normal rivet:
View attachment 1768265
I know there are other references where it looks somewhat bigger but they are also quite blurry and it could be due to highlights and the lever being slightly out of focus.
My own build is peacefully collecting dust on the shelf for a long time. If I move the focus point slightly off the lever - here's what I get:
View attachment 1768270
Kind of looks like there's a huge rivet there. But it isn't
View attachment 1768271
Here's another famous picture compared. First is kind of blurry and the rivet looks quite big. Second is a more sharp copy of the same (probably somebody sharpened it, but that's how I found it). There the shape of the rivet is just a little bit more defined and starts to look almost normal to me. Compare to few shots that are in and out of focus... even in the focused ones sometimes depending on the angle and light the rivet looks bigger than it should be and I think quite comparable in size to the hero picture:
View attachment 1768275
(I painted the black rectangle to simulate the rust patch on the original as I wanted to showcase another interesting comparison, but while I was taking the pictures I forgot what it was

)
Here's another set of the hero pictures mixed with mine:
View attachment 1768277