-
Welcome to the Project Runs Forum!
This forum is intended for interest gauging and active runs. Due to the transient nature of this forum, please keep all research and ongoing discussion in one of our main forums so your information is not lost.
Only Premium Members can start a new run.
You are using an out of date browser. It may not display this or other websites correctly.
You should upgrade or use an alternative browser.
You should upgrade or use an alternative browser.
Limited Run Star Wars - Jedi training remote SFX aluminium box base
- Thread starter eethan
- Start date
Ah, that is awesome, that seem like a very precise tool, thank you so much!best I can do with my amatuer tools
Awesome David, thank you! You guys are a great teamI just got a caliper and I’ll take some measurements tonight if I can since I have a vintage unit that is very similar to the one used.
")
qcfoundry
Sr Member
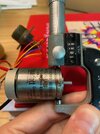
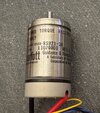
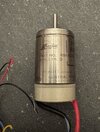
Not sure how uber-accurate you want to get Danny. But the branding of the company name changed over the years, as well as where it was manufactured. Likely the same guts, just the shell can have a few different "looks".I don’t own one yet… been fighting with eBay… otherwise I would have contributed
Not sure how uber-accurate you want to get Danny. But the branding of the company name changed over the years, as well as where it was manufactured. Likely the same guts, just the shell can have a few different "looks".
Yes, I learned this the hard way. I found a random industrial parts company with two units of RS921-3A in stock….it only took me almost two years to track this specific model down. No photos were provided. I figured it was worth the risk.
Well, they arrived. And they were RS921-3A, but produced after 1968. Same model, but the outer logo and labeling is completely different.
Luckily I found an RS931-3E which has the classic logo and is a great stand in until I find the correct one.
Attachments
Hey there,
quite a bit of progress to show, small things, but moving forward nicelly.
I cleaned up the motor holes, and put a step there of the size needed for the motor (thanks guys for the measurements!)
that way, the motor will have a depth stop like I think they did, then the screw with washer pushes on it and maintain it correctly.

I then did the slots on the brass tubes, with the tool of death:


and drilled and threaded the holes for the lower ball bearing part:

there we are currently, getting closer looking forward to put the boxes together.

quite a bit of progress to show, small things, but moving forward nicelly.
I cleaned up the motor holes, and put a step there of the size needed for the motor (thanks guys for the measurements!)
that way, the motor will have a depth stop like I think they did, then the screw with washer pushes on it and maintain it correctly.
I then did the slots on the brass tubes, with the tool of death:
and drilled and threaded the holes for the lower ball bearing part:
there we are currently, getting closer
looking forward to put the boxes together.Hey there,
lots of small things today, not going to show how I can drill holes and stuff all the time, so here are a few choice items
coolest part was putting those together, press fit again:

I reproduced the small line visible 1mm above the ball bearing but it's hard to see on the pics. Here is a test assembly of the whole lower system. it's a test as it needs to be assembled inside the box later on. But that looks cool
system works by the way everything holds by itself when you push the split clamp, without even tightening it

other than that, you can't do a project without running into some unforeseen issue... Everything looks spot on on my 3D model and i'm relatively sure of all the size and positions as the refs are pretty good. However, I didn't notice at the time that my gear and left foot were inter-penetrating a bit, I only realized when building it:

so, I don't know what is going on exactly, I have a pretty good ref of the gear, so I'm pretty sure of the size, same for the hole positioning, it's perfectly clear on the refs, so I don't know what is wrong somewhere, or if they had the same issue on the real prop as well when they added the base later on...
so I had to find a solution with what was already done and I machined a notch in the left foot so the gear would fit. Same if you want to replace it, I tried to make the notch as big as possible to get some margin for error.

it's as good a fix as I could make, it won't really be visible under the box, and I think I'm just going to think in my head they did the same on the real prop and live with it
cheers all
lots of small things today, not going to show how I can drill holes and stuff all the time, so here are a few choice items
coolest part was putting those together, press fit again:
I reproduced the small line visible 1mm above the ball bearing but it's hard to see on the pics. Here is a test assembly of the whole lower system. it's a test as it needs to be assembled inside the box later on. But that looks cool
system works by the way
everything holds by itself when you push the split clamp, without even tightening it other than that, you can't do a project without running into some unforeseen issue... Everything looks spot on on my 3D model and i'm relatively sure of all the size and positions as the refs are pretty good. However, I didn't notice at the time that my gear and left foot were inter-penetrating a bit, I only realized when building it:
so, I don't know what is going on exactly, I have a pretty good ref of the gear, so I'm pretty sure of the size, same for the hole positioning, it's perfectly clear on the refs, so I don't know what is wrong somewhere, or if they had the same issue on the real prop as well when they added the base later on...
so I had to find a solution with what was already done and I machined a notch in the left foot so the gear would fit. Same if you want to replace it, I tried to make the notch as big as possible to get some margin for error.
it's as good a fix as I could make, it won't really be visible under the box, and I think I'm just going to think in my head they did the same on the real prop and live with it
cheers all
Hey guys,
big step done today, the scary step for me as i'm not a fan of the airbrush and Dikem is not such a fun product to use (smelly cancer in a bottle...)
also, this is my wife's aribrush, so I better give it back spotless if I want to keep having a roof over my head

then comes the more fun part, scribing and weathering this nicelly
I hope you guys will like it, I'm personally super happy a bit sad that I'm not keeping one for myself now


this is a more realistic rendition of the real color of the part, with the lights off in the workshop. Dikem on aluminium is really nice

alright, yeah, I hope you'll like the result!
honestly, I'm now way over my time budget and can't really ask you guys for more than I announced, so I'm just having fun with it now, trying to be the most accurate and detailed as possible, just to be happy with my work at least.
big step done today, the scary step for me as i'm not a fan of the airbrush and Dikem is not such a fun product to use (smelly cancer in a bottle...)
also, this is my wife's aribrush, so I better give it back spotless if I want to keep having a roof over my head
then comes the more fun part, scribing and weathering this nicelly
I hope you guys will like it, I'm personally super happy a bit sad that I'm not keeping one for myself now
this is a more realistic rendition of the real color of the part, with the lights off in the workshop. Dikem on aluminium is really nice
alright, yeah, I hope you'll like the result!
honestly, I'm now way over my time budget and can't really ask you guys for more than I announced, so I'm just having fun with it now, trying to be the most accurate and detailed as possible, just to be happy with my work at least.
Hey there,
alright! to me, this is the most exciting update, like closing the box of an accoustic guitar when you build it
I have been looking forward to this since the begining of the project, took more than a day to prepare and drill the 88 countersunk holes and the 88 threaded holes and being sure that they were lined up, but the assembly went pretty smoothly then very happy with the result!
ignore the front (and back) of the boxes as they will be machined cleanly again now that everything is together


I hope you like it
you know guys, I think this is a pretty special run and I guess I was the first crazy enough to accept doing it, and it was a difficult and long process, much more than I anticipated! There will only be 11 of you in the entire world that will have one of these, I hope you'll like them!
cheers all
alright! to me, this is the most exciting update, like closing the box of an accoustic guitar when you build it
I have been looking forward to this since the begining of the project, took more than a day to prepare and drill the 88 countersunk holes and the 88 threaded holes and being sure that they were lined up, but the assembly went pretty smoothly then
very happy with the result!ignore the front (and back) of the boxes as they will be machined cleanly again now that everything is together
I hope you like it
you know guys, I think this is a pretty special run and I guess I was the first crazy enough to accept doing it, and it was a difficult and long process, much more than I anticipated! There will only be 11 of you in the entire world that will have one of these, I hope you'll like them!
cheers all
Now I wish I had a Jedi Training Ball…
Trooper trent BYOB kitNow I wish I had a Jedi Training Ball…
I’ll be using his kit with my eethan box setup.Hey ya, where is Tripper_trent? I'd think he would be all into this run.
Similar threads
- Replies
- 22
- Views
- 2,802
- Replies
- 10
- Views
- 2,166