You are using an out of date browser. It may not display this or other websites correctly.
You should upgrade or use an alternative browser.
You should upgrade or use an alternative browser.
Revell 1/2700 Imperial Star Destroyer
- Thread starter Moska
- Start date
Moska
Sr Member
Many thanks, modelerdaveAbsolutely brilliant work, as usual.
Thank you very much, Carlb.The plastic template of shapes is genius....fantastic work!
The truth is that I did not expect it to give such a good result. It has been a pleasant surprise.
Moska
Sr Member
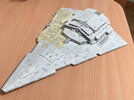
For the “patching” of the upper part I have used Tamiya XF-19 gray color and another blue-gray tone, avoiding using warmer colors because they do not look good in this finish. As with the bottom, I have also used the template I made to enrich the texture with Tamiya white.
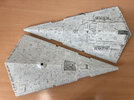
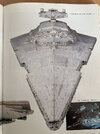
Once I reached this point, I focused again on the bottom and decided to apply a general white filter to further reduce the color contrasts. My goal is to achieve a finish that looks as close as possible to the photograph of the original model that appears in the book “From Star Wars to Indiana Jones. “The best of Lucasfilm Archives.” I think it is one of the most reliable photographs I have seen of the original model.
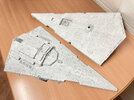
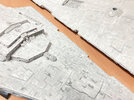
Then I went over all the panel lines one by one using a ruler and a hard-pointed pencil, always very sharp. I don't need to tell you that this job is boring and that it takes a few hours, but if the model asks me, I am at his service.
After going over all the lines, I ran a soft eraser over the entire surface to reduce the effect and eliminate any lines that had left the bas-relief.
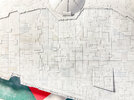
Finally, I used powdered graphite, applied with a short bristle brush, to lightly shade around the main volumes and outline some areas. For example, the side bands. It is still possible that I decide to apply a last very light general white filter.
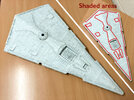
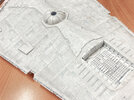
Returning to the top, at this point, I have already applied a first general white filter and I am starting the paneling with a pencil. Taking note of previous work, I'm trying to make it even more subdued to maintain scale.
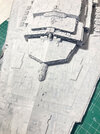
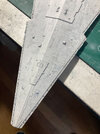
You see, many steps and a lot of painting work to give a good finish to a model that, according to some, is simply “white”.
Thanks for looking.
Rafa


Once I reached this point, I focused again on the bottom and decided to apply a general white filter to further reduce the color contrasts. My goal is to achieve a finish that looks as close as possible to the photograph of the original model that appears in the book “From Star Wars to Indiana Jones. “The best of Lucasfilm Archives.” I think it is one of the most reliable photographs I have seen of the original model.


Then I went over all the panel lines one by one using a ruler and a hard-pointed pencil, always very sharp. I don't need to tell you that this job is boring and that it takes a few hours, but if the model asks me, I am at his service.
After going over all the lines, I ran a soft eraser over the entire surface to reduce the effect and eliminate any lines that had left the bas-relief.

Finally, I used powdered graphite, applied with a short bristle brush, to lightly shade around the main volumes and outline some areas. For example, the side bands. It is still possible that I decide to apply a last very light general white filter.


Returning to the top, at this point, I have already applied a first general white filter and I am starting the paneling with a pencil. Taking note of previous work, I'm trying to make it even more subdued to maintain scale.


You see, many steps and a lot of painting work to give a good finish to a model that, according to some, is simply “white”.
Thanks for looking.
Rafa
Last edited:
Moska
Sr Member
Hello friends.
At last!! At the cost of losing a few hours of sleep, I have finished going over all the panel lines with a pen. It was worth it. I'm VERY happy with the final result and I think I'm going to call it a day with the paint job. Just go over some details with a dry brush.
I couldn't resist the temptation of making a little video. I hope you like it.

Thanks for watching.
Rafa
At last!! At the cost of losing a few hours of sleep, I have finished going over all the panel lines with a pen. It was worth it. I'm VERY happy with the final result and I think I'm going to call it a day with the paint job. Just go over some details with a dry brush.
I couldn't resist the temptation of making a little video. I hope you like it.
Thanks for watching.
Rafa
Moska
Sr Member
Hello friends.
I'm sorry for these months of silence, but life has kept me busy with other things.
The last stages of building my Star Destroyer consisted of lighting.
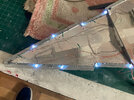
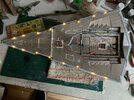
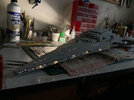
Before closing the two halves of the fuselage, I placed 16 micro LEDs 0402, which have a size of only 1x0.5 mm. I placed them on the top of the fuselage, on the protruding tab on both side trenches. I placed 8 on each side, following the references of the original model, and to avoid their light being too direct and obvious when looking at the model from the side, I glued some small pieces of styrene that block the side light.
These LEDs were cold white and I didn't like the way they looked. So I painted them with Tamiya transparent orange and got a light temperature much closer to that of the original IL&M model.
As for the optical fiber, I will tell you that the installation process is a long and monotonous job. But a modeler must be prepared to face these tasks, which are less fun than others, but very important to achieve the final result.
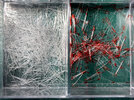
I cut about 1,200 pieces of fiber Ø0.25 mm and 15 mm long. To do this I followed a discipline in which I first took 15 strands of fiber and cut them to 15 cm long. I then made a simple template that allowed me to cut this 15-strand skein into 15mm long sections. In this way, I obtained 150 pieces of fiber of the necessary length from each skein.
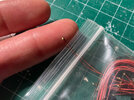
I also devised a procedure for coloring, with a red permanent marker, the ends of the fibers in groups of 25 or 30 units at a time. In the end, I estimate that there will be more or less 70% white fibers and 30% red.
In order not to make this work too tedious, I cut 300 pieces of fiber, colored 30% of them red, and placed them on the model. This continued in four batches until the entire model was finished.
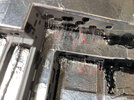
I glued the fiber to the model with white glue. I first insert the pieces of fiber halfway along their length, then soak them with white glue, push them until they are fully inserted, and to finish, clean the area well with a damp brush.

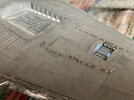
In my opinion, the technique of using general interior lighting and inserting small pieces of fiber works perfectly. And I think it is just as valid as using large skeins of fiber that take all the light from a few LEDs. Let everyone choose which one they prefer.
Advantages and disadvantages of the technique of small pieces of fiber versus the technique of large skeins of fiber:
In favor:
- Many meters of optical fiber are saved.
- For me it is more comfortable to do it this way than to manipulate and install large skeins of fiber inside the model.
- The fiber can be installed when the model is already completely finished and painted.
- More light points can be added at any time. Even with the model finished.
Against:
- The entire model must be sealed very well to avoid light leaks.
- A greater number of LEDs are used and more energy is consumed.
- Although it is hardly noticeable, there are some areas where the light received by the fiber does not have “exactly” the same intensity as in other areas. Although this can be solved by planning the interior lighting very well.
Lastly and VERY IMPORTANT!!
Just as modellers take care of all the details and paint to respect and represent the scale of the model, the same is equally necessary with the lighting. Both the size of the light points and the intensity of the same are two crucial factors to maintain the correct scale sensation. That is why I have used the thinnest optical fibre I could obtain (Ø0.25 mm) and, above all, I have carried out many tests, using different resistor values in my circuits, to achieve the appropriate light intensity for this scale. And, if the above were not enough, I have also placed a potentiometer that allows me to regulate this intensity even more and adapt it to the ambient light conditions of each situation.
I finished my model in mid-July. And I made its corresponding display case in August. Until now, I've been waiting for an opportunity to move the model to my studio and be able to do a good photo shoot.
I always like to take good photos of my finished models because I think it's a way to get more out of so much dedication and so many hours of work.
I will not go on any longer. I hope you like the result. This is the gallery of the finished model.
Best regards.
Rafa

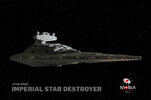
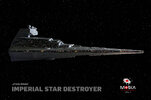




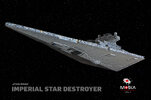

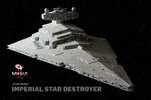


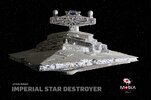
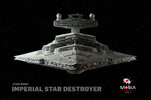
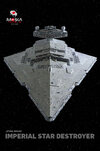
I'm sorry for these months of silence, but life has kept me busy with other things.
The last stages of building my Star Destroyer consisted of lighting.
Before closing the two halves of the fuselage, I placed 16 micro LEDs 0402, which have a size of only 1x0.5 mm. I placed them on the top of the fuselage, on the protruding tab on both side trenches. I placed 8 on each side, following the references of the original model, and to avoid their light being too direct and obvious when looking at the model from the side, I glued some small pieces of styrene that block the side light.
These LEDs were cold white and I didn't like the way they looked. So I painted them with Tamiya transparent orange and got a light temperature much closer to that of the original IL&M model.


As for the optical fiber, I will tell you that the installation process is a long and monotonous job. But a modeler must be prepared to face these tasks, which are less fun than others, but very important to achieve the final result.
I cut about 1,200 pieces of fiber Ø0.25 mm and 15 mm long. To do this I followed a discipline in which I first took 15 strands of fiber and cut them to 15 cm long. I then made a simple template that allowed me to cut this 15-strand skein into 15mm long sections. In this way, I obtained 150 pieces of fiber of the necessary length from each skein.
I also devised a procedure for coloring, with a red permanent marker, the ends of the fibers in groups of 25 or 30 units at a time. In the end, I estimate that there will be more or less 70% white fibers and 30% red.
In order not to make this work too tedious, I cut 300 pieces of fiber, colored 30% of them red, and placed them on the model. This continued in four batches until the entire model was finished.


I glued the fiber to the model with white glue. I first insert the pieces of fiber halfway along their length, then soak them with white glue, push them until they are fully inserted, and to finish, clean the area well with a damp brush.


In my opinion, the technique of using general interior lighting and inserting small pieces of fiber works perfectly. And I think it is just as valid as using large skeins of fiber that take all the light from a few LEDs. Let everyone choose which one they prefer.
Advantages and disadvantages of the technique of small pieces of fiber versus the technique of large skeins of fiber:
In favor:
- Many meters of optical fiber are saved.
- For me it is more comfortable to do it this way than to manipulate and install large skeins of fiber inside the model.
- The fiber can be installed when the model is already completely finished and painted.
- More light points can be added at any time. Even with the model finished.
Against:
- The entire model must be sealed very well to avoid light leaks.
- A greater number of LEDs are used and more energy is consumed.
- Although it is hardly noticeable, there are some areas where the light received by the fiber does not have “exactly” the same intensity as in other areas. Although this can be solved by planning the interior lighting very well.
Lastly and VERY IMPORTANT!!
Just as modellers take care of all the details and paint to respect and represent the scale of the model, the same is equally necessary with the lighting. Both the size of the light points and the intensity of the same are two crucial factors to maintain the correct scale sensation. That is why I have used the thinnest optical fibre I could obtain (Ø0.25 mm) and, above all, I have carried out many tests, using different resistor values in my circuits, to achieve the appropriate light intensity for this scale. And, if the above were not enough, I have also placed a potentiometer that allows me to regulate this intensity even more and adapt it to the ambient light conditions of each situation.
I finished my model in mid-July. And I made its corresponding display case in August. Until now, I've been waiting for an opportunity to move the model to my studio and be able to do a good photo shoot.
I always like to take good photos of my finished models because I think it's a way to get more out of so much dedication and so many hours of work.
I will not go on any longer. I hope you like the result. This is the gallery of the finished model.
Best regards.
Rafa


Last edited:
modelerdave
Sr Member
Absolutely brilliant work, Rafa! The lighting is perfectly in scale in your photos. I love it.
Moska
Sr Member
Hello friends.
Thank you very much for your kind comments.
My final assessment of this Zvezda/Revell kit
The good:
The kit is really good. I like the quality, cleanliness and sharpness of its details. And also its size.
The quality of the plastic also seemed good to me. It is easy to work with and responds perfectly to glue and other products that we modellers usually use. Much better than the type of plastic that this same brand, Revell, uses in its Razor Crest kit.
The bad:
Above all, the incorrect and insufficient height of the different steps of the superstructure and the side trenches. If you don't take the trouble to correct these problems, you will always see your Star Destroyer "squashed". And I can't live with that.
It also fails in the detailing of the left side of the bridge, and in the rear part of the "neck".
The base of the domes on the bridge should be improved to be faithful to the original model.
Finally, it is also necessary to correct the angle of inclination of the bridge so that your model does not “look up”.
For me, who has spent “years” correcting and improving the old Star Wars kits from the Airfix, MPC, AMT/ERTL brands, it has been relatively easy to correct the defects of this kit.
I encourage all modelers to undertake these improvement works on any kit. That is the best school of modeling you can find.
Thank you very much for following my thread. I look forward to seeing you in my next project. Just a “whim” in the form of a rocket.
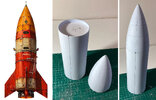
I leave you with a last photograph of my finished model.
Greetings.
Rafa

Thank you very much for your kind comments.
My final assessment of this Zvezda/Revell kit
The good:
The kit is really good. I like the quality, cleanliness and sharpness of its details. And also its size.
The quality of the plastic also seemed good to me. It is easy to work with and responds perfectly to glue and other products that we modellers usually use. Much better than the type of plastic that this same brand, Revell, uses in its Razor Crest kit.
The bad:
Above all, the incorrect and insufficient height of the different steps of the superstructure and the side trenches. If you don't take the trouble to correct these problems, you will always see your Star Destroyer "squashed". And I can't live with that.
It also fails in the detailing of the left side of the bridge, and in the rear part of the "neck".
The base of the domes on the bridge should be improved to be faithful to the original model.
Finally, it is also necessary to correct the angle of inclination of the bridge so that your model does not “look up”.
For me, who has spent “years” correcting and improving the old Star Wars kits from the Airfix, MPC, AMT/ERTL brands, it has been relatively easy to correct the defects of this kit.
I encourage all modelers to undertake these improvement works on any kit. That is the best school of modeling you can find.
Thank you very much for following my thread. I look forward to seeing you in my next project. Just a “whim” in the form of a rocket.

I leave you with a last photograph of my finished model.
Greetings.
Rafa
this looks so amazing!! Great work, and thank you for sharing all your research and strategy how to properly "scale" lighting...from your pictures: did you take them in layers (like miniature photography at ILM) or was all achieved in camera? I ask because seeing your magnificent paint job in room lighting conditions it looses alot of shading in your studio photography: what do you estimate, to achieve proper studio conditions contrast should you have made the shading more intense?? or could you consider another photographic pass in changed lighting?
Moska
Sr Member
Hi Manolo.this looks so amazing!! Great work, and thank you for sharing all your research and strategy how to properly "scale" lighting...from your pictures: did you take them in layers (like miniature photography at ILM) or was all achieved in camera? I ask because seeing your magnificent paint job in room lighting conditions it looses alot of shading in your studio photography: what do you estimate, to achieve proper studio conditions contrast should you have made the shading more intense?? or could you consider another photographic pass in changed lighting?
Thanks for your comment.
I haven't used layers. All you can see is what I took out of the camera.
What I did do was take 8 or 9 photos of each "pose" of the model. But I've been changing the focus point little by little, from the closest point of the model to the furthest. Photoshop then takes care of combining all those shots to get a single perfectly focused image.
I've simply "cheated" by intensifying the light in the lower bays a bit so that they wouldn't be too dark.
It's difficult to faithfully show the paint finish in these images. Either because of the angle from which they are taken or because of the high contrast lighting needed to show the ship "in outer space."
This doesn't worry me. What's important is the general lighting and appearance of the model in the photos.
Thanks for looking.
Rafa
Similar threads
- Replies
- 21
- Views
- 1,401
- Replies
- 0
- Views
- 205
- Replies
- 36
- Views
- 3,930
