It is. I just checked. I recognized it from the probe dispatch pod.I will have to check. if it was from the Karl.
You are using an out of date browser. It may not display this or other websites correctly.
You should upgrade or use an alternative browser.
You should upgrade or use an alternative browser.
Let's Build An "Empire" AT-ST!
- Thread starter Boxcar Bret
- Start date
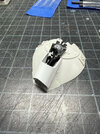
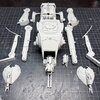
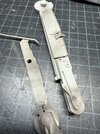
This whole area with this part in particular has been stumping me. The plate behind the wheel that isn’t from the Gepard. If I could just find out what that one part is I feel like I could unlock everything.Here is what I was working on over the weekend.
View attachment 1881267View attachment 1881268View attachment 1881269View attachment 1881270View attachment 1881271
Muzza
Sr Member
I will take a photo of the Merlin models kit part that might help.This whole area with this part in particular has been stumping me. The plate behind the wheel that isn’t from the Gepard. If I could just find out what that one part is I feel like I could unlock everything. View attachment 1881623


I stand corrected. It wasn't. The search continues.It is. I just checked. I recognized it from the probe dispatch pod.
November 23, 2024
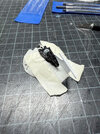
Time to get on the the good foot! Little did I know that when I bought the Vader TIE kits for the TIE bomber that I got a free AT-ST foot in each one.

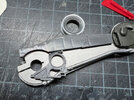
I took a Dremel to the part to cut the good stuff out of it so that I could have a better look at what I was working with. From there I trimmed away a little more and started roughing in a cut line.
.jpg")

From here I needed to figure just how in the hell I was going to make this bisecting cut evenly and cleanly. The cleanly part I wasn't worried about because I knew once I had the rough cut I could sneak up on the final shape by sanding. What was stumping me was the evenly part. How to mark my cut line.
I hit up fellow RPFer, qcfoundry for a suggestion and he proceeded to snap my brain in half! I give all credit for the following to qcfoundry because there's no way I would've come up with this solution.
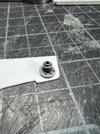
I took a blob of clay and stuck it to the bottom of a plastic container.

Next, I stuck the part on top and filled the container with water. Using the waterline as guide, I adjusted the part until it was close to the angle that I needed to make the cut. This took a little trial and error, adding and subtracting water, but eventually it looked right.

Here's where the REAL mindblowing happened. The part was given a couple of spritzes of paint and carefully lifted out. The water acted as a mask leaving an evenly bisected line. I KNOW, RIGHT?!!!


Because I didn't throughly shake the paint I also made it look like a bad art piece from the 80's.

From here it was just a matter of carefully sanding and cutting it to get each the final form.


With a perfect fit happening all I needed to do was do it again make a matching one. Great. I took a different approach for the second one. I used the first one as a template and traced the shape onto the kit part.


This proved to be a genius move (I get one a build) because I was able to knock it out in no time. Where the first one took about three hours to perfect, the second one happened in 40 minutes! (The lens is distorting the shape but they do match.)


And with that the foot shells were done! Thank you again to qcfoundry for stretching my mind and adding a new technique to my skillset. Time to add the details.
Time to get on the the good foot! Little did I know that when I bought the Vader TIE kits for the TIE bomber that I got a free AT-ST foot in each one.
I took a Dremel to the part to cut the good stuff out of it so that I could have a better look at what I was working with. From there I trimmed away a little more and started roughing in a cut line.
From here I needed to figure just how in the hell I was going to make this bisecting cut evenly and cleanly. The cleanly part I wasn't worried about because I knew once I had the rough cut I could sneak up on the final shape by sanding. What was stumping me was the evenly part. How to mark my cut line.
I hit up fellow RPFer, qcfoundry for a suggestion and he proceeded to snap my brain in half! I give all credit for the following to qcfoundry because there's no way I would've come up with this solution.
I took a blob of clay and stuck it to the bottom of a plastic container.
Next, I stuck the part on top and filled the container with water. Using the waterline as guide, I adjusted the part until it was close to the angle that I needed to make the cut. This took a little trial and error, adding and subtracting water, but eventually it looked right.
Here's where the REAL mindblowing happened. The part was given a couple of spritzes of paint and carefully lifted out. The water acted as a mask leaving an evenly bisected line. I KNOW, RIGHT?!!!
Because I didn't throughly shake the paint I also made it look like a bad art piece from the 80's.
From here it was just a matter of carefully sanding and cutting it to get each the final form.
With a perfect fit happening all I needed to do was do it again make a matching one. Great. I took a different approach for the second one. I used the first one as a template and traced the shape onto the kit part.
This proved to be a genius move (I get one a build) because I was able to knock it out in no time. Where the first one took about three hours to perfect, the second one happened in 40 minutes! (The lens is distorting the shape but they do match.)
And with that the foot shells were done! Thank you again to qcfoundry for stretching my mind and adding a new technique to my skillset. Time to add the details.
")
Bravo! ESB version never got the love it deserved.
I’m going in a different direction. It looks faster now!


February 15, 2025
Happy New Year everybody! We have a lot to cover so take your seats and let's get started.
I began working on the most challenging part for me: the thighs. Those of you that have been following this build know that I really hit a wall with them.
I start on the inside pieces. I studied the shape of the styrene part by studying photos of what others had done before. Once I got a sense of the shape I made a template from cardstock and after some trial and error I settled on a shape. I traced it onto a piece of styrene, cut it out, tweaked it a little and one Flak 88 part later I was in business.


Enough time had passed for me to revisit the outer thigh with a clear approach. I realized that I was relying too much on what I was seeing others had done before. When I looked at the actual model versus other's builds I was seeing different things but in my brain I couldn't separate the two. In an act of bravery I decided to take the road less traveled and try to create/interpret what I saw in the original and not recreate what others had done before. This was a big step for me.
I began by sanding down the City Truck rims to a height that looked right and then sanded the inside to better accommodate the Flak 88 part that goes inside.


The Morser Karl piece was something that I had been studying and, again, with some trial and error landed on something that looked and felt right. Fortunately I have a bunch of these kits so I had plenty of room on the error side.


The Plastruct lamp shade was too tall so it needed to be sanded to fit comfortably in the truck rim.

This is where I started "part pushing". I gathered up all the known parts and started experimenting with different configurations and layers until I was pleased with the results. At that point I quickly locked everything down with a piece of take and took a photo for insurance because it was late and I knew I'd have to get back to it later.


I added some Tamiya Putty to simulate the texture on the original.


That piece of styrene under the truck rim was scratch made based off nothing in particular but the shape I saw on the original.

The Ferrari exhaust pipe needed to be carefully heated with a lighter before being bent to conform with the shape of the thigh and trimmed to tuck under the other part. (Sorry, I can't remember what kit it's from).


And with that the hardest part of the build for me was finished. I can't describe the sense of accomplishment I felt but I can say it did a lot for my confidence and I proved to my self that I can trust my instinct and be happy with the results. That meant the only thing left to finish were the feet.
I had originally planned on using the B-29 wing parts but opted instead to make them from styrene since I had the template. Once again I used transfer paper with the pattern and cut them out.

I measured off the dimension for the width of the cowling (.5") on the foot and drew guidlines in pencil.

Bending the styrene turned out to be more challenging than I anticipated. At first I tried to bend it carefully by hand and it cracked. Then I tried to heat it, again, carefully, around a small mandrel but it melted. In the end I went with a slightly thinner styrene that allowed me to loosely form the bend by hand.


The F1 and Vosper parts were trimmed and glued on top. I apologize for the lack of detail/documentation of some the steps like the trimming of the parts or the cut out of the notch for the armature in the back. There were times when I was just in the zone and was moving by sheer momentum.
Any way, with the parts on top it was time to glue the cowlings in place. I put tape down a guide allowing for the thickness of the styrene. The thickness of the tape also gave an ever so slight edge to put the part against.

I put a bead of CA along one edge of the cowling, carefully put it in position, added another bead of CA and gave it a blast with kicker.


Once I felt it was good and dry I very carefully bent it over the rest of the way and repeated the steps on the other side. That was it! It worked! The talons were then added using the M5, F1 and SU-100 parts all trimmed accordingly. Seriously though, they're pretty easy to figure out from the reference photos.

I freestyled/eyeballed the leg shields using sheet and angle styrene.


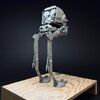
With the assembly finished the next stop was primer town!


As on most of my builds I used Mr. Hobby's Mr. Finishing Spray 1200 Grey. Its amazing!


I went back and forth on what color for the base and which paint to use. I shot some styrene with the primer and did some swatches of Archive-X colors and some formulas I had based on Tamiya colors of which I have a drawer full. In the end I went with my own recipe that had the warm tone I wanted.


A test spray on my trusty MPC X-wing paint mule proved that I made the right choice.

Nailed it and I couldn't be more pleased.

The next step was to determine what colors I would use for the shading in the recesses and torso. I wanted something dark but with a warmer tone. Again, I assaulted the mule with paint testing different Tamiya and AX colors before landing on my go to favorite... Tamiya German Grey.


Although I had a set of decals from Moffeaton, I wanted to push myself and try my hand at, well, painting it by hand. "Paint mule! Front and center!"

In the end I ended up scanning the decal, tracing it on, and then painting it.


It looked great! Until I started looking at screen caps and it started going all internet dress on me. Was it grey or red?
Happy New Year everybody! We have a lot to cover so take your seats and let's get started.
I began working on the most challenging part for me: the thighs. Those of you that have been following this build know that I really hit a wall with them.
I start on the inside pieces. I studied the shape of the styrene part by studying photos of what others had done before. Once I got a sense of the shape I made a template from cardstock and after some trial and error I settled on a shape. I traced it onto a piece of styrene, cut it out, tweaked it a little and one Flak 88 part later I was in business.
Enough time had passed for me to revisit the outer thigh with a clear approach. I realized that I was relying too much on what I was seeing others had done before. When I looked at the actual model versus other's builds I was seeing different things but in my brain I couldn't separate the two. In an act of bravery I decided to take the road less traveled and try to create/interpret what I saw in the original and not recreate what others had done before. This was a big step for me.
I began by sanding down the City Truck rims to a height that looked right and then sanded the inside to better accommodate the Flak 88 part that goes inside.
The Morser Karl piece was something that I had been studying and, again, with some trial and error landed on something that looked and felt right. Fortunately I have a bunch of these kits so I had plenty of room on the error side.
The Plastruct lamp shade was too tall so it needed to be sanded to fit comfortably in the truck rim.
This is where I started "part pushing". I gathered up all the known parts and started experimenting with different configurations and layers until I was pleased with the results. At that point I quickly locked everything down with a piece of take and took a photo for insurance because it was late and I knew I'd have to get back to it later.
I added some Tamiya Putty to simulate the texture on the original.
That piece of styrene under the truck rim was scratch made based off nothing in particular but the shape I saw on the original.
The Ferrari exhaust pipe needed to be carefully heated with a lighter before being bent to conform with the shape of the thigh and trimmed to tuck under the other part. (Sorry, I can't remember what kit it's from).
And with that the hardest part of the build for me was finished. I can't describe the sense of accomplishment I felt but I can say it did a lot for my confidence and I proved to my self that I can trust my instinct and be happy with the results. That meant the only thing left to finish were the feet.
I had originally planned on using the B-29 wing parts but opted instead to make them from styrene since I had the template. Once again I used transfer paper with the pattern and cut them out.
I measured off the dimension for the width of the cowling (.5") on the foot and drew guidlines in pencil.
Bending the styrene turned out to be more challenging than I anticipated. At first I tried to bend it carefully by hand and it cracked. Then I tried to heat it, again, carefully, around a small mandrel but it melted. In the end I went with a slightly thinner styrene that allowed me to loosely form the bend by hand.
The F1 and Vosper parts were trimmed and glued on top. I apologize for the lack of detail/documentation of some the steps like the trimming of the parts or the cut out of the notch for the armature in the back. There were times when I was just in the zone and was moving by sheer momentum.
Any way, with the parts on top it was time to glue the cowlings in place. I put tape down a guide allowing for the thickness of the styrene. The thickness of the tape also gave an ever so slight edge to put the part against.
I put a bead of CA along one edge of the cowling, carefully put it in position, added another bead of CA and gave it a blast with kicker.
Once I felt it was good and dry I very carefully bent it over the rest of the way and repeated the steps on the other side. That was it! It worked! The talons were then added using the M5, F1 and SU-100 parts all trimmed accordingly. Seriously though, they're pretty easy to figure out from the reference photos.
I freestyled/eyeballed the leg shields using sheet and angle styrene.
With the assembly finished the next stop was primer town!
As on most of my builds I used Mr. Hobby's Mr. Finishing Spray 1200 Grey. Its amazing!
I went back and forth on what color for the base and which paint to use. I shot some styrene with the primer and did some swatches of Archive-X colors and some formulas I had based on Tamiya colors of which I have a drawer full. In the end I went with my own recipe that had the warm tone I wanted.
A test spray on my trusty MPC X-wing paint mule proved that I made the right choice.
Nailed it and I couldn't be more pleased.
The next step was to determine what colors I would use for the shading in the recesses and torso. I wanted something dark but with a warmer tone. Again, I assaulted the mule with paint testing different Tamiya and AX colors before landing on my go to favorite... Tamiya German Grey.
Although I had a set of decals from Moffeaton, I wanted to push myself and try my hand at, well, painting it by hand. "Paint mule! Front and center!"
In the end I ended up scanning the decal, tracing it on, and then painting it.
It looked great! Until I started looking at screen caps and it started going all internet dress on me. Was it grey or red?
Attachments
Was I being influenced by Luke's helmet, what others had done before, the Kenner toy? We'll talk about the missing blast mark later.
I began weathering by doing the airbrushed streaks along with a little sponge and brush work.
In a moment of independence I painted over the insignia and went grey.
I began the process of doing some light shading and misting with the German Grey on the head and contiued the shading on the rest of the parts. A mist coat of a color that has long slipped from my brain tied everything together.
At this point I couldn't resist putting everything together to see what it looked like and instantly knew I was on the right track.
YES!! I went back to the red insignia. For the record I've now painted it three times!
Remember I said the blast mark would come back? Here's the deal, in it's first appearance in the movie, no blast mark. In its second appearance, blast mark. The logical deduction would be that since there was only model the blast mark was added for the second shot to make it look like there was more than one. Who knows. If only there was a string of computers across the globe linking people together in a weblike manner for people to debate such things at nausea. Maybe someday. Anyhoo, I went for the blast mark.
I used my tried and true palette of oils and went to town. this also included adding weathering streaks. I added some bright rust spots for pop and used my old armor modeling technique of flicking a highly diluted mix on it to create another layer to the mist coats.
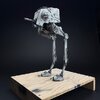
For the base I decided to go lowbrow and recreate the base we know from the reference photos. I used screws an it's not going anywhere!
It was finished except for one thing. SEXY TIME PICS!!!!
Thank you for coming along on this ride. This has been a bucket list build and something I never thought I would be able to do. I pushed myself and I feel I've really grown as a model builder. Thank you to everyone that motivated and inspired me along the way.
If any of you are going to WonderFest in May the Chicken and I will be there making our debut. Be sure to introduce yourself and say "Hi!"
Cheers!
Attachments
Nothing less than magnificent! Reminds me of the stance this had, it STRUTS proudly when it walks, it doesn't lumber about like the later ones. I think maybe it was too tall to make a full size prop for ROTJ, maybe that's why they brought the height down.
Superb build and excellent documentation! Way to go!!!
Similar threads
- Replies
- 17
- Views
- 1,938
- Replies
- 5
- Views
- 787
- Replies
- 0
- Views
- 1,114