You are using an out of date browser. It may not display this or other websites correctly.
You should upgrade or use an alternative browser.
You should upgrade or use an alternative browser.
Kevin's scatter build thread
- Thread starter kevin926
- Start date
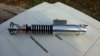
Added some more.i have to agree. throw a big blue capacitor in there and call it done! :darnkids

I'm calling this complete. Really not much to it because for the most part, it already came assembled. Just paint and detail. This will also be the cleanest build I do. Very little to no weathering on this project. Of course I had to do just a tad! Not really noticeable from photos.
Attachments


Last edited:


Before I was so rudely interrupted by the hero saber, I was working on my sandtrooper bucket. Lol
Ok, here is the internal shot of what I have been working on. Originally I was thinking about using plasti dip and cheese cloth to line the inside however quickly decided to go with a fabric. Glad I did. Looks better and if I ever need to remove it, I can. I also installed some of the internal parts.


Ok, here is the internal shot of what I have been working on. Originally I was thinking about using plasti dip and cheese cloth to line the inside however quickly decided to go with a fabric. Glad I did. Looks better and if I ever need to remove it, I can. I also installed some of the internal parts.


Wow that looks good. I like that you felt lined it, may go that route, but not POSITIVE how to get it in nice and clean (not bunching up)
I've been on a little break from the helmet... my side projects (work wise) suddenly went crazy, but not crazy enough to ditch my day job. SO TWO JOBS NO PROP FUN.
I think the most I've done is shave the teeth and eyes down a bit.
I DID meet a guy with the anavos helmet at a Halloween party, made me want to get this thing DONE.
As you know, when you're holding the helmet halves, the whole thing feels cheap and hard to imagine it every feeling like a helmet.... But man, when put together these things are great.
Wow that looks good. I like that you felt lined it, may go that route, but not POSITIVE how to get it in nice and clean (not bunching up)
I've been on a little break from the helmet... my side projects (work wise) suddenly went crazy, but not crazy enough to ditch my day job. SO TWO JOBS NO PROP FUN.
I think the most I've done is shave the teeth and eyes down a bit.
I DID meet a guy with the anavos helmet at a Halloween party, made me want to get this thing DONE.
As you know, when you're holding the helmet halves, the whole thing feels cheap and hard to imagine it every feeling like a helmet.... But man, when put together these things are great.
Thank you and I agree all the way. Feels flimsy until assembly however don't forget these are true to form of the original props used in the movies. Nothing about them are symmetrical like the other helmets we see.
As far as the lining goes, it is cut into 4 parts so it doesn't bunch up. The felt look is actually a heavy grade closer to the old car and truck carpets but with a felt feel. I used a glue gun to hold it in place. I didn't keep a photo journal but I should have. I just cut a chunk of fabric and used a white crayon to draw and trace. Then I placed the fabric and began to lift, glue, tuck. Until it was neat and looked good. I bought 2 yards from hobby lobby for 6 dollars a yard, plenty for all my helmet builds.
Can you link to Hobby Lobby? or is it an "in store only"... I have to order from there soon, so figure I'd just grab then. Could you take an interior shot with more light? I'd like to see how it's all sitting. They more I think about it, they more I want to do it this way. Also, did you end up putting pads inside for fit?
Can you link to Hobby Lobby? or is it an "in store only"... I have to order from there soon, so figure I'd just grab then. Could you take an interior shot with more light? I'd like to see how it's all sitting. They more I think about it, they more I want to do it this way. Also, did you end up putting pads inside for fit?
No pads, it will never fit my melon. I'm 6'3 200 plus. To make it fit the span would look funny. Besides, this was always made with the sole intention of only being a display prop.
I will take better shots outside tomorrow of the inside. It definitely is the best way to make it look more finished and the added benefit is the removal if need be.
- - - Updated - - -
Here are some freshly weathered shots. Trying not to go overboard on it. Just going for that right amount.


i agree with Neo, i love the felt lining inside! that helmet came out great. idk, i would have a hard time weathering that beauty
Thank you, the best part about not painting the bucket is it already being white hard ABS. If I ever choose to change it, all I need to do is buff it out with some polishing compound.
Here is the final shot. I just added the last touch of weathering

Tomorrow I will take it outside with his blaster and take some family photos for fun as well as take some better interior shots as promised for NeoRutty


Can you link to Hobby Lobby? or is it an "in store only"... I have to order from there soon, so figure I'd just grab then. Could you take an interior shot with more light? I'd like to see how it's all sitting. They more I think about it, they more I want to do it this way. Also, did you end up putting pads inside for fit?
Um... it's called "Dressew" in our parts

Um... it's called "Dressew" in our parts
My wife used to live there... I know it well...Dressew doesn't carry awesome wood boxes that are perfect for making into lightsaber gift boxes. Also Dressew is overwhelming with the amount, so a quick link would save me time and dragging that HUGE Role down the aisle to get cut up.
My wife used to live there... I know it well...Dressew doesn't carry awesome wood boxes that are perfect for making into lightsaber gift boxes. Also Dressew is overwhelming with the amount, so a quick link would save me time and dragging that HUGE Role down the aisle to get cut up.
just sent you 2 links. 1 for the fabric and the other for the padding I was interested in
here is a link for fabric.
http://www.hobbylobby.com/Fabric-Se...Fabric/Black-Solid-Plush-Felt-Fabric/p/109533
I cant list a link for the pads because they are on ebay
Thanks! I shall look into the fabric! Pads are pretty much what I was looking at as well, just worried about MY giant head.just sent you 2 links. 1 for the fabric and the other for the padding I was interested in
here is a link for fabric.
http://www.hobbylobby.com/Fabric-Se...Fabric/Black-Solid-Plush-Felt-Fabric/p/109533
I cant list a link for the pads because they are on ebay
Similar threads
- Replies
- 64
- Views
- 1,868
- Replies
- 9
- Views
- 730
- Replies
- 18
- Views
- 1,148
- Replies
- 23
- Views
- 897