Red Dead Redemption 2 - Arthur's Journal

It is around 457 pages. I think you miss many entries.
You asked how many pages are in my PDF file. And my PDF has 288 pages.

I think what you mean with I missed many entries is, that there are more side quests and places to find in the game. But as I stated before, I replicated the journal as it was after my play trough. I never wanted to make a "complete" journal. I wanted to have a memory of my own story through the game.

So I missed nothing ;)
Sorry I thought you want to make a complete diary.
 
Sorry I thought you want to make a complete diary.
no worries!

One thing I forgot to say: I think with a bit of formatting on the pages, like I showed in my screenshot, even a complete journal could be stripped down quite a lot.

My guess would be that in the "original" journal from the game, almost every 5th page is empty.

So if you want to do a complete replica, maybe you could make it a bit less pages also. (If you wanted to)
 
I have to figure out how to make these into signatures that can be printed on both sides during print command.

how are you guys printing these out. any help will be much appreciated, thank you.

this thing is great. thanks again
 
Reordering all the pages into signatures, especially for two-sided printing can be a bit complicated.

If you open my "6pages per signature" PDF, you could print that out already. Just set it to horizontal and two sided.

If you want to reorder the pages yourself, or for another PDF, I would suggest the free program "PDFbooklet" for windows.
 
I must be doing something wrong because it prints both right side up and upside down.
This happened to me with the grail diary as well so I believe it's something I'm doing wrong or not doing a step.

Any help would be appreciated.
 
Last edited:
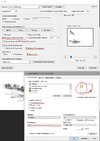
kevin926 I checked my printer settings. Since It is all in German, a screenshot would not help very much, I guess. I will write it down. I would suggest testing everything with one or a few pages before printing the whole thing. Also check if the pages line up when you fold them in half. I think they will not fit if you don't enable "resize oversized pages".
- use landscape format
- turn on duplex (printing on both sides)
- mirror pages on the short edge
- enable resize oversized pages
- make sure quality is set to "high" printSettings.JPG


TuckerMan I tried that also. But it will put all pages into one booklet. What you will need for binding a book is creating multiple signatures (booklets). There is no way of exporting the whole document as multiple booklets as far as I know.
Edit: of course you could use that multiple times to create one booklet for every 12 print sheets. (in my case, I used 6 sheets of paper for every signature)
 
Reordering all the pages into signatures, especially for two-sided printing can be a bit complicated.

If you open my "6pages per signature" PDF, you could print that out already. Just set it to horizontal and two sided.

If you want to reorder the pages yourself, or for another PDF, I would suggest the free program "PDFbooklet" for windows.
I was finally able to print this out however ,new issues

How are the page signatures to line up. 6 pages or 6 printed pages? the issue is neither line up. The tell tale is the half horse after the 6th page doesn't line up

edit--I figured it out for the most part. You fold backwards and not fold towards you, but away.
 
Last edited:
I was finally able to print this out however ,new issues

How are the page signatures to line up. 6 pages or 6 printed pages? the issue is neither line up. The tell tale is the half horse after the 6th page doesn't line up

edit--I figured it out for the most part. You fold backwards and not fold told you but away.
did you figure it out? the first printed sheet of paper should have page one on its backside, page two on its front left and then page 21 and 22 on the right sides. They make the "cover" of the small booklet (signature) so to say. The other sheets are folded and sit inside that first one.

I hope that explanation was more or less understandable.
 
Thanks for the replies :)
I am glad to share more about the process!

The whole process can be divided into a digital and an analog part.

Digital:
  • Firstly, I captured a video from the game, where I went through the whole journal to have a reference of the order and layout. (OBS is a great free capture program)

  • After learning of the possibility to data mine, I found the program "OpenIV" that lets you get into the game files and extract them.

  • Journal textures are here: "....\textures_1.rpf\textures\ui\ui_journal_textures.rpf\"
    Most insert textures are here: "....\textures_1.rpf\textures\ui\ui_itemviewer.rpf\"
    Cigarette cards are in here: "....\textures_1.rpf\textures\ui\ui_pausemenu.rpf\"

    There are also textures for the newspapers and shop catalogs, maybe for the future ;)

  • After I got all the necessary material, I started to put everything together in Adobe InDesign. I went with A5 as journal size, maybe it is not 100% accurate, but the easiest to work with. Since I could just print out A4 pages and fold them without the need to cut to a different size.

    I took the liberty to change the layout on some pages to use the space a bit better. I will upload an example.

  • After finishing the journal layout, I wanted to print it. But I was baffled to find out that it is somehow not easy to reorder the pages for printing. I had a hard time finding a good solution to that problem. At the end, I was really happy to find the program "PDFBooklet", that lets you reorder the pages depending on how many you want to put into each signature before binding.

    I uploaded the PDF I created in two variants. Before and after reordering.
    Here is the link to the files:
    I will give access individually, because I so often heard about Etsy resellers and all that.

Analog:
Now into the real world:

  • Over in the grail diary threat, I found a great link to the following how-to: Make Your Own Moleskine-Like-Notebook
    That is all I needed for the binding of the book, and I followed the instructions almost exclusively.


  • For the paper, I went with 120g in cream color. It was way too thick and did not feel good after getting wet and dry again from weathering.
    But it gave me the chance to do the whole bookbinding process once, and have more faith in myself the second time around.


  • After binding everything together, I started weathering it with black tea and coffee. I soon realized that this was my second mistake, as it took forever to dry (because it was bound together) and created big waves in the paper.

  • Now that I had my lessons learned, I went with 80g creme paper and did the weathering on each page individually before binding.
    Weathering in my case meant distressing the edges with a razor blade and then using black tea and coffee to make it look old.
    I also retouched a few pages with a coal marker to emulate the "original" drawings and writings.

  • Note on printing: I went with ink, because I have an ink printer at home. The quality is amazing, but it meant that I had to be careful with the weathering, because the ink will run when getting wet.

  • Another note on printing: It can be worth trying to reduce the opacity of everything a bit to have the effect of coal/graphite. I had it at 100% at first, and it looked like ink. For my final prints, I put the opacity to 85%, but I still feel like it could be less in some cases.

  • So after having all this figured out the hard way, I weathered each page individually like I said, dried them out and then begun the process of binding. After that, I cut a piece of leather to size and just glued it on. I used shoe polish on the leather and then scraped it with various tools, different types of old cloth, threw it around my house a bit and put it in my backpack for a while to make it look used.
I think that is all there was to it, but please let me know if there are any more questions.


View attachment 1597346View attachment 1597345
Wow! That's an amazing job! Awesome results, too, congrats!
 
Hi AliKarimi, I'm exploring these textures in the ui_itemviewer.rpf, they seem stretched when I view them, and in the resulting export. Was this your experience? And did you try to skew them back into proportion when you laid them out into your InDesign file?
 

Your message may be considered spam for the following reasons:

If you wish to reply despite these issues, check the box below before replying.
Be aware that malicious compliance may result in more severe penalties.
Back
Top