Lightning
Master Member
I regret to say that I have never seen the movie
It's streaming for free on Tubi
I regret to say that I have never seen the movie


I always loved this style of bootsMy boots will be from my current costume collection and will require a bit of color wash. I believe I have the full strap set already and will attach them permanently.


That is awesome. I at first thought this gound rifle may have been a later kit gun but now everything is pointing to it being a legitimate used and abused original. For my pose I am taking advantage of making my parts look like the rifle from the movie but when done, we will take this to the local muzzleloader smith and put the right parts back into it. The very very small backplate looks too close to pistol size to not actually be one so I think this is definitely a smith built one-off gun made with what was available when it was ordered.Very cool!!
It's so interesting seeing things 3D printed which, as a youth, I spent hours filing and sanding and polishing in Brass.
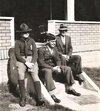
That's due to my father being an avid Kentucky Rifle builder and shooter. Here he is shooting a rifle he made.
We were born in the hills of West Virginia where our ancestor, born in London, settled in the late 18th century.
He came to the Virginia Colony in 1763, joined the Virginia Militia pre-war, then fought in George Washington's Continental Army throughout. He was one of "500 picked backwoodsmen" which were formed into the Corps of Rangers under Colonel Daniel Morgan in 1777.
With that family history it's little wonder my father was fascinated with flintlock rifles and pistols.
That would be so cool if they had used an original.That is awesome. I at first thought this gound rifle may have been a later kit gun but now everything is pointing to it being a legitimate used and abused original. For my pose I am taking advantage of making my parts look like the rifle from the movie but when done, we will take this to the local muzzleloader smith and put the right parts back into it. The very very small backplate looks too close to pistol size to not actually be one so I think this is definitely a smith built one-off gun made with what was available when it was ordered.
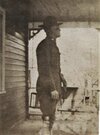
I just recently got a copy of the hat your dad is wearing.
Double down on that request Dr Jones SrGreat family history Dr Jones Sr
First side painted!!!!
View attachment 1935845
It is already much more red than this picture but the oil over stain will be very cherry to add to it.
View attachment 1935846
I am very likely enjoying this waaaaay too much. I ride a pure joy wave when painting props..... could be the fumes........hahahahahaha