You are using an out of date browser. It may not display this or other websites correctly.
You should upgrade or use an alternative browser.
You should upgrade or use an alternative browser.
Building The Death Star - PRODUCTION
- Thread starter PHArchivist
- Start date

PHArchivist
Master Member
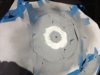
Bare spot...
The yellow strip is (obviously) a test of the adhesive vinyl I have from REL


The yellow strip is (obviously) a test of the adhesive vinyl I have from REL
vaderdarth
Master Member
looking good
PHArchivist
Master Member
Even though its a ot of work, I think I'l be much happier using the adhesive vinyl. Looks much more in scale.
And if its TOO thin, I couild double it up.
Also, I'm thinking it will be best to paint its first coat before I apply it so I have minimal paint to apply once its done, and to minimize paint build-up where the micro milimeter-high vertical edge of the vinyl meets the model's surface...
And if its TOO thin, I couild double it up.
Also, I'm thinking it will be best to paint its first coat before I apply it so I have minimal paint to apply once its done, and to minimize paint build-up where the micro milimeter-high vertical edge of the vinyl meets the model's surface...
PHArchivist
Master Member
Working towards a clean slate (or plate, as it may be).
I'd post photos, but the new RPF SUCKS when it comes to posting images.
I'd post photos, but the new RPF SUCKS when it comes to posting images.
PHArchivist
Master Member
I may have got it figured out...

pennausamike
Sr Member
Looks like the one eyed invisble monster from Jonny Quest!
Mike
Mike
PHArchivist
Master Member
Looks like the one eyed invisble monster from Jonny Quest!
Mike
Maybe I'll paint it green and do a life-sized version of Mike Wazowski...
My trick to posting images is I type
 three times then do a copy paste to get a bunch of them
I had problems in the beginning until i figured this out, you should give it a go
This build of yours is just outstanding sir
Obviously you're next build is going to be DS2, right
Beautiful stuff
Gag
I had problems in the beginning until i figured this out, you should give it a go
This build of yours is just outstanding sir
Obviously you're next build is going to be DS2, right
Beautiful stuff
Gag
PHArchivist
Master Member
Close to finished with "cleaning" the dish...
This is the hard part. Redoing the (almost) entire dish was intimidating.
But I'm looking forward to a fast and relativiely easy process of applying the self adhesive vinyl moving forward. Cutting the strips and applying them will move far faster the the previous method of glueing styrene strips in place.
PHArchivist
Master Member
So what kind of an ETA are you looking towards for completion? is the dish the last major item?
Scott
I'd be afraid to even try to guess at an ETA.
After the dish, the only remaining hurdle is the lights in the trench. Still haven't mastered a technique to create rectanular lights.
Most (80%) of the upper dome still needs lights drilled too.
PHArchivist
Master Member
All the lights in the lower dome are done. It was just a matter of drilling the upper dome, plus the trench lights.
But I realized that the detail on the dish was too robust, so I committed to re-doing the dish.
Challenge with the trench lights is that on the original, they are 1mm-2mm rectangles and are pretty uniform. Not sure yet how I'm going to do that. Just doing slightly larger circular holes would not be right.
PHArchivist
Master Member
Ever closer...

PHArchivist
Master Member
The dish is clean...
PHArchivist
Master Member
Clean dish

Look closely and you can see a small bit of primer and some of the original detail pieces (stubs) just around the inner disc. Got to get this cleaned up.
Then its back to the reference pics.
Plus I have to weigh the various methods of applying the new detail. For example:
--I feel I should primer and sand the dish first to get it as light-proof as possible before I add the detail, since I don't want to bury the detail in primer and paint.
--But the vinyl strips would probably stick better t the raw plastic right?
--Should I use the Avery masking material I received from REL, or Pactra Trim Tape, or something else?
--I think I want to paint the detail vinyl before cutting them out so I have a sharp edge
Thoughts? Comments?
Last edited:
PHArchivist
Master Member
Remember this project...?
Not dead yet!
Got the cleaned off dish painted and did a bit more testing with the vinyl strips.
Note two things in hte image:
--First, the surface paint has a bit of texture. The original does too, but I'm not sure if I want it.
--Second, of the two strips, the one on the left represents on layer of vinyl. The strip on the right is two layers of vinaly stuck to each other.
Thoughts?
PHArchivist
Master Member
The original hi-res images of this shot are best to compare my test to:

Similar threads
- Replies
- 7
- Views
- 1,144
- Replies
- 14
- Views
- 1,712