Thanks man!!! I'm printing that one out and sticking it on my workshop wall!Best Blade Runner Blaster display stand, EVER!
Wait, let me correct that.
Best Blaster display stand, EVER!
Wait, nope. one more time.
Best display stand, EVER!

This forum is intended for interest gauging and active runs. Due to the transient nature of this forum, please keep all research and ongoing discussion in one of our main forums so your information is not lost.
Only Premium Members can start a new run.
Thanks man!!! I'm printing that one out and sticking it on my workshop wall!Best Blade Runner Blaster display stand, EVER!
Wait, let me correct that.
Best Blaster display stand, EVER!
Wait, nope. one more time.
Best display stand, EVER!
I purchased mine a few years back and attempted to take nice pics - and this may sound silly, but it's not an easy thing to photograph.I think this stand is really awesome!! Congratulation!
But I noticed one thing: In many user pictures (especially without or low ambient light) the LED light is blinding, so that the outer frame (the beautiful pattern) doesn't really come into its own. Maybe it's just a camera thing and doesn't look as strong in real life.
Nevertheless, I thought about whether it might not be a good enhancement if the pattern could somehow be (passively) illuminated on the outside. Just very subtly.
Perhaps you could enlarge the acrylic panel a few mm over the edge and then mount a reflective border on the outside so that the LED light from the inside is automatically reflected slightly downwards on this border. This would illuminate the pattern slightly from above. (Without active lighting)
What do you think? Is that worth a test? It would only be a very small change. I think the (inward) reflective border could be very narrow. The point is that the pattern would still be easily recognizable in very dark environments.
Of course I don't have a clue if this really works...
Thanks RDeckard, it's great to hear you're liking the stand!I think this stand is really awesome!! Congratulation!
But I noticed one thing: In many user pictures (especially without or low ambient light) the LED light is blinding, so that the outer frame (the beautiful pattern) doesn't really come into its own. Maybe it's just a camera thing and doesn't look as strong in real life.
Nevertheless, I thought about whether it might not be a good enhancement if the pattern could somehow be (passively) illuminated on the outside. Just very subtly.
Perhaps you could enlarge the acrylic panel a few mm over the edge and then mount a reflective border on the outside so that the LED light from the inside is automatically reflected slightly downwards on this border. This would illuminate the pattern slightly from above. (Without active lighting)
What do you think? Is that worth a test? It would only be a very small change. I think the (inward) reflective border could be very narrow. The point is that the pattern would still be easily recognizable in very dark environments.
Of course I don't have a clue if this really works...
Thank YOU for a high quality product and trouble free transactions. Great communication, fast shipping and the smoothest transaction you can find.I had a bit of an anniversary recently, it's been 2 years since I sold my first Blade Runner Blaster Display Stand. Since then I've made and supplied 138 stands to customers all over the world. To mark the occasion I put together these collage images of some of the photos customers have shared of the stands in their collections.
Thanks so much to all those that have purchased a stand. I'm looking forward to making them for many more collectors in the future!
Luke
View attachment 1835491
View attachment 1835492
View attachment 1835493
You are so welcome Tom. Would be an absolute pleasure to build you another, look forward to hearing from you soon.Thank YOU for a high quality product and trouble free transactions. Great communication, fast shipping and the smoothest transaction you can find.
I’ll be getting a second one soon.
Tom
You're very welcome Shotty, thanks so much!Thanks again for continuing to make this awesome stand. It is an amazing companion piece to the blaster itself. Highly recommended!
ORDER DETAILS POST
I'll keep this post updated with the latest information on the ordering process.
Pricing
The stands are priced at
£120 each for the original Walnut stained version.
Custom paint finishes such as concrete or black are more involved so cost a bit more, details available on request.
Postage is an additional cost and varies dependent on the destination.
Please note that any customs or import duties will be the responsibility of the buyer.
I'm happy to post to most places around the world and will keep a list of costs here as a guide.
Bear in mind these are intended as a guide only, if the postage will cost me more then that will be passed on.
Postage Costs
Australia - £28 via Royal Mail International Tracked(est. 6-12 business days)
Canada - £23 via Royal Mail International Tracked (est. 6-12 business days)
Europe - £16 via Royal Mail International Tracked (est. 3-5 business days) - PLEASE NOTE: Sadly due to Brexit, buyers based in the EU are very likely to have additional import fees applied by their local customs authorities. Please bear this in mind when ordering.
Singapore - £28 via Royal Mail International Tracked (est. 6-12 business days)
UK - £6 via Royal Mail 1st Class Signer For (est. 1-2 business days)
USA - £28 via Royal Mail International Tracked (est. 6-12 business days)
I do ship to other countries, these are just example costs of places I've already sent stands to.
How to order
Check out the section below about sizing first, then send me a private message with the following details:
I'll then add your name to the list and start building your stand.
- Your full name
- Postage address
- Email linked to your PayPal account
- Grip plate and Magazine dimensions if they differ from below (if you don't give these then the stock parts will be supplied)
Once your stand is ready for dispatch I'll send you a PayPal invoice.
If you have any questions at all before ordering then please don't hesitate to ask.
Will your Blaster fit?
Absolutely! I've supplied stands to customers with many different makes of blaster.
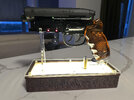
The stock stand is designed to fit my build of the Tomenosuke 2049 Assembly Kit precisely; so if your blaster is a different model then you just need to check a couple of measurements as detailed below.
If your Blaster, Tomenosuke or otherwise, differs from these dimensions then let me know and I'll cut revised parts for your stand at no extra cost.
Please note though that I can only revise the widths of the cutouts so they fit the width of your Blaster's grip plate and mag housing. If the overall geometry of your blaster is considerably different then I cannot guarantee they will meet your blaster at the same points pictured here.
View attachment 1636371
Turnaround time
Each stand is made to order so please allow approximately 2 weeks for dispatch for a standard walnut stand and up to 3 weeks for any custom finishes.
Delivery time will be dependent on the destination.
Please note
Due to the natural variations in grain and colouration of the wooden parts the finish on these will vary from piece to piece.
EDIT TRACKING:
06/06/2023 - Increased overseas shipping price from £26 to £28 to cover costs.
03/07/2023 - Price increase to £120
I had a bit of an anniversary recently, it's been 2 years since I sold my first Blade Runner Blaster Display Stand. Since then I've made and supplied 138 stands to customers all over the world. To mark the occasion I put together these collage images of some of the photos customers have shared of the stands in their collections.
Thanks so much to all those that have purchased a stand. I'm looking forward to making them for many more collectors in the future!
Luke
View attachment 1835491
View attachment 1835492
View attachment 1835493
Hi rdeckard1969, I've sent you a private message to get the ball rolling on your stand order.Are you still preparing these stands I would like to buy one I just bought a FX Paragon Hero Elite blaster 2049 I would like to display on the stand. mikebphf@gmail.com
)Hi Hirohawa! I currently charge an extra £60 for the concrete finish version of the stand, so £180 plus delivery costs.How much extra is the concrete painted one?
Thanks for sharing the experience with your stand RDeckard! Great pics of the unboxing process, it's always a pleasure to see a customer's blaster displayed on the stand!Hi
I received my custom paint (concrete) display stand yesterday and as expected it is simply brilliant!
Thanks Luke for the great work! (Yes, it's quite a lot of money, but it's worth if you want to present your blaster nicely).
During assembly, I only had a little difficulty fitting the acrylic base plate into the corresponding holes. (Especially in the middle, but this is mentioned in the instructions).
My Paragon Blade Runner Blaster fits perfectly.
Here are a few pictures of the unboxing and the completed assembly. As the final location is not ready yet, I just took the pictures in my kitchen. (Sorry...)
The LED lighting of the stand is a warm light, but not quite as yellow as it appears in the photos (especially at the edges).
I can highly recommend it!
(Blaster is not included
Hi Luke! Hope all is well with you? Thank you for featuring my review pic (first 9; top row middle with Steel Series mouse pad) of your wonderful and awesome BR blaster stand. 'Tis been a while and I sometime frequent your post and see others review and pics. Wish you all the best and more stand orders coming in your way! Much ahead for you my good sir!I had a bit of an anniversary recently, it's been 2 years since I sold my first Blade Runner Blaster Display Stand. Since then I've made and supplied 138 stands to customers all over the world. To mark the occasion I put together these collage images of some of the photos customers have shared of the stands in their collections.
Thanks so much to all those that have purchased a stand. I'm looking forward to making them for many more collectors in the future!
Luke
View attachment 1835491
View attachment 1835492
View attachment 1835493
Hi Henry! I'm doing great thanks, hope all's well with you too. You're very welcome, it's a pleasure to look back over the last couple of years with all the great images that people have shared. I hope there will be many more to come! All the best, Luke.Hi Luke! Hope all is well with you? Thank you for featuring my review pic (first 9; top row middle with Steel Series mouse pad) of your wonderful and awesome BR blaster stand. 'Tis been a while and I sometime frequent your post and see others review and pics. Wish you all the best and more stand orders coming in your way! Much ahead for you my good sir!