Tales From The Loop - Stasis Device

I had an entire can of this once. Was a navy paint that would cure even if it got wet. Pretty sure it was one of those paints that gave VOCs their identity for rapid cancer causing can of green color. I opened the can only once, vomited, closed the lid, continued to vomit and turned it in the next time our dump had a hazard-day free dropoff event. It was the coolest shade of WWII shell casing contrast letters to green base (base was that standard dark green, but this was the yellowish letters on top of the casing green). I think it is the same color they used to paint civilian submersible craft.

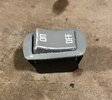
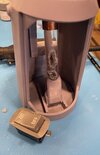
Just searched using those terms, Found one good example: Military Vehicle Paint - 1 x 500ml Yellow Inflatable Dinghy Paint. Boat, Rib, Fishing Raft. but could be the shading on their web page so pics are never a guarantee of color match:

View attachment 1668881View attachment 1668882

Late to the build, so apologies if you already have your paint.

That website is a treasure house for historic military paint colors.
I do have the paints in hand but I really appreciate you taking the time to post!! Seems these days that if it’s not a product of The Mouse the RPF has little to no interest. Trying to share more in hopes to be a part of the change that I’d love to see.

The paints that I landed on are almost spot on to the dark, forest green and chromatic yellow. Again though, thanks for following and contributing. All feedback is good!!
 
Thanks! If anyone ever tells you that rocker switches are easy to disassemble, they are pulling your leg. I’ve broken 3 of these in an attempt to get them apart for painting. I ended up sacrificing two with a dremel to cobble parts from each to make one. It was successful but not without a fair amount of cursing. ;)
 
I remember it took you a while to find just the right ones too!
It did! And when I broke the one I had I ordered more from digi-key using the link I had. Nope! They don’t have this switch anymore and I had to buy a couple on eBay. If you are planning to make this I’d source the rocker soon. It’s a Tyco T85 on/off rocker switch. Don’t get the momentary version, just a normal on/off.
 
Getting these rockers apart is a HUGE pain. Super nerve racking because you can break the tabs on the button or the mounting plate as you pry things open. And the internals have to be put in place just right or the switch won't function and you have to tear it all back apart again. An exercise in patience, to say the least.

The process for painting this ON/OFF rocker switch involved layering primer, flat white, matte clear, top coat grey. The clear over the white allows a level of forgiveness when removing the top coat before going through to the primer and below. I still need to add many layers of "grime" via dry brushing to make it look like decades of fingerprints and grease, but I wanted to post a before pic. I gorram earned it with this damn button :)
 

Attachments

  • IMG_1076.jpg
    IMG_1076.jpg
    417 KB · Views: 86
  • IMG_1075.jpg
    IMG_1075.jpg
    447.8 KB · Views: 88
Last edited:
Looking good! You probably didn’t expect this switch to be the part needing so much effort. That being said it’s paid off - you nailed it!(y)
 
You are correct! Honestly, I thought that the switch challenges were behind me. There was already quite a bit of work just to get it to sit in place on the device. All kinds of modeling inside the stasis to reinforce it to house the rocker. But once I realized how the prop creators put the copper clamp in place that the acrylic rod fuse snaps into, it made sense. Seems like such a simple little device but there really is a lot going on.

Next I’m researching the possibility of having the internal circuit boards custom made. I don’t think that it is terribly expensive. Will post my findings.
 
Yup, there’s a lot going on here under the hood! And more to come I bet. This prop just excites me no end! Something magical about this idea transports me right back to childhood. A device that has the power to completely halt time for everyone but me? Oh yeah! ;) (y)
 
Right down to the musical score, this show was so well thought out and put together. Enjoy this piano cover:

 
Update 3-5-23

Been waiting on a really nice set of dremel grinding bits to pull off the "burnt fuse" look in the stasis. I'm very pleased with the results
 

Attachments

  • IMG_1126.jpg
    IMG_1126.jpg
    1.9 MB · Views: 123
  • stasis_screencap_13.jpg
    stasis_screencap_13.jpg
    457 KB · Views: 116
Agreed! Great rotary work for this. I totally forgot that detail of the electrical short-out and you captured it beautifully.
 
Very well done. Did you throw some heat at it after? It looks like you added some good crispiness as well.

Thank you for the kind words and continuing to follow this ride :)

No heat applied. I started by tracing the general shape and then went at it with a couple of different burring bits. Once I had the shape and depth I used mothers polish and a pointed buffing bit to remove all of the grinding marks. Then added clear gloss coat to everything ground out to smooth the look. Dry brushed a little flat black for burn marks and then used a super pointed pencil looking burring bit to grind a thin outline around the areas. The white outline makes it look like an acid type burn.
 
First coats of the zinc chromate. Base color is rustoleum camo 279178. Then I applied Vallejo liquid mask with a small sponge. Next coat was rustoleum Caribbean sand textured spray paint. Then the testors zinc chromate. Love the color, but there's no way I can airbrush the entire middle section of this prop this color and expect it to look good. So, I'll reapply the liquid mask and use a rattle can of zinc chromate. Also, I'm super pleased with the rustoleum textured paint that I put on after the rusty brown base coat.
 

Attachments

  • IMG_1188.jpg
    IMG_1188.jpg
    833.2 KB · Views: 91
And you should be super pleased! Oh, that chippy chromate (y) All your layering really adds deep dimension and the color match looks spot-on! The Rustoleum texture spray application over the other layers really produced an authentic-looking industrial/military "powder-coat" finish! I am loving this prop. Again.:love: I can’t wait to see how the main body looks after you hit it with the rattle!
 
Back
Top