Limited Run SIGN UP CLOSED. PRODUCTION BEGINNING! Dewy and Anakin Starkiller's Obi-wan Episode 1 saber sign up!

And, for the next two films, they made the leap to chrome-plated resin props, which did the job of perfectly simulating metal props onscreen while also being convenient and lightweight.
pears much more pristine, and also with properly-chromed grooves.
Not just that. Even produced chrome-plated rubber stunt sabers for EP3. 20 years later and I still have not seen any company do that.

Effects people really do produce movie magic(!). :eek:
 
Oh yes, I remember the BTS footage from ROTS when they take an Anakin hilt and bend it and it squeaks like a rubber toy. While still looking like chrome plated brass. Cool stuff !
 
I received mine! I had it forwarded to a friend and recently got it! I love it!

Has anyone done a kind of...how to? What steps to go. I want to make sure I tackle this correct from the get-go.
 
Not far ! Halliwax not far. Patience. Soon you will be with him.

Star Wars Meme GIF
 
Last edited:
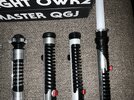
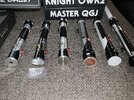
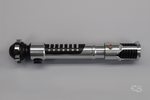
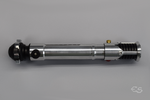
Here’s the Starkiller/Dewy TPM compared with the KR Knight OWK2:


View attachment 1717538View attachment 1717539

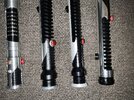
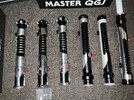
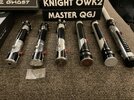
I wish I had one of these too, if anyone has an extra let me know, but also just for anyone wanting comparisons, left is Shadowfoil’s OWK-TPM, it has a sorta satin/polished alu finish, but not mirror and not brushed, middle is KR OWK2 and right is a brushed KR OWK1:

IMG_3371.jpeg
IMG_3370.jpeg
IMG_3365.jpeg

IMG_3366.jpeg
IMG_3367.jpeg


Admittedly, I have no idea how the accuracy actually is, but the differences I have notice:

OWK-TPM - It’s a bit of a hybrid.
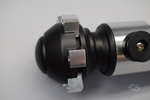
  • The pommel is the same style as OWK1
  • Holes in blocks are bigger
  • The black grip part is a glossy finish, so paint or powder coat or something, similar to OWK2 grip.
  • The ribs at the emitter are also the same glossy finish.
  • The silver under the grip is a little thin alu sleeve with a partial cutout.
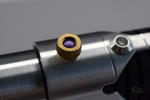
  • Pre installed with the ruby color gem (which is quite dark) in the brass button.
  • Brass button has larger diamond knurling and entire actuator threads into the hilt (vs the red button where half is inside and half is outside and only the stem goes through.
  • Red button has a thicker stem as it has a screw in plunger inside, which may be less accurate but it feels nicer cause the button doesn’t get stuck.
  • Came with rubber inserts for the 3 rivet windows that have to be glued in.
  • The outer alu/brass/silver colored part of the hilt is thinner than the KR variants and the grips are more shallow.
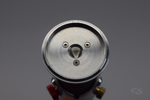
  • Blade plug is polished and has a cutout for fx.
  • The plug is set into a ring (the end of the emitter has a bezel which the disk part of the plug fits inside.
  • The cover tech is the head of a screw to hold the chassis together, which makes opening it REALLY easy.
  • Two retention screws at the top ring of the emitter.

OWK1 Brushed - Heavier and more accurate, but perhaps less easily used as an FX hilt
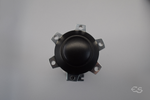
  • Sound venting is through gaps around the pomel cog rather than openings in the little cover dome, only relevant for FX.
  • Smaller holes in the blocks.
  • Blocks are rounded on the outside face of both KR while flat on the OWK-TPM. Again I dunno which is accurate.
  • Knurling on both buttons but seems to be square/pyramid shaped not is one.
  • Red button is thicker but with a thinner stem and shorter throw.
  • Brass button has your choice of ruby or clear inserts.
  • The black for grip and up at the emitter is matte and seemingly black anodized.
  • The silver part under the grip is just a small partial door that is screwed into the black grip part (so easily removable, not sure if the OWK-TPM sleeve serves any functional purpose since it changes the ID of that part).
  • The windows are preinstalled and seem to have some sort of press fit retention instead of glue (the metal part can unscrew on all 3 sabers).
  • Also 2 retention screws, but 1 is for blade, the other is in the little U at the lowest part of the black emitter section and is to hold the upper chassis in place (the KR both use split chassis with the 2 crystal parts attaching with magnets between em.
  • Brushed steel display only blade plug (oddly enough it still uses a CNC poly part down the shaft despite having no way to let a glow out.
  • The metal part of the plug like a super short fat screw with a thin wide head, and the screws are interchangeable between both OWK and QGJ.
  • The brushed finish is nicer to me than the normal one, but the brushed finish on the QGJ which was factory vs the KR aftermarket brushing on OWK1 is much nicer still, or at least more uniform, better isn’t a good descriptor here. Plus I would expect a factory finish to be better. Even if KR has a lathe, it will never match the machines in the big fab shops. They both look good tho.
  • Covertec is a normal screw in one and seems metal like all the sabers, aIl but Force Ghost have flat covertech (FG uses a curved one so it mounts flush to the hilt).
  • ~1cm longer than OWK-TPM

OWK2 (Chromed Brass) - More different than I expected, and chunky. Seems like a similar situation to DV6 where they lost the other Vader hilts (someone took em home im sure lol) so they converted a graflex into a Vader hilt.

  • Most obviously its Chromed brass so shiny.
  • Blade plug is flush rather than set into a ring/wall. It’s also polished and has a little brass divot.
  • The black grip and emitter parts are more glossy than the OWK1, tho still less than OWK-TPM.
  • Pommel is shorter and slightly different shape and the little dome is smaller and taller.
  • Brass button has no knurling and a little brass dome already inside.
  • Windows are replaced with solid metal rivet style screw.
  • No holes in pommel blocks.
  • Shorter/same as OWK-TPM length.
I need to get me the Saberz version and a fixed one like this (Again if you got an extra let me know) for more comparisons, but as said before since the props were usually resin or similar, they are all interpretations.

I am curious if new hilts going forward might be actual metal tho just based on that EFX BoBF Luke prop that has the TCSS connector inside. It’s possible they use CFX with Omnisabers or even proffie for base functionality. But I’d guess they use something like this: GitHub - swiss6th/ossia-dmx: Wireless DMX control for LEDs in stage props or Omnisabers that connects through DMX, and probably records the gyro data and syncs it to time code. I’d love to see one opened up. Perhaps something like this: MoonLite - LumenRadio

One of these days I’m gonna try building a “proffie” from an Arduino and stuff and see what I can manage. Cause my red Komodo has gyro data and time code embedded in the footage, so combine that with saber/blaster gyro data as well as clashes and stuff and record/sync the metadata to timecode and it would probably be really easy to clean up the effects in post. That said, indoors pixel blades are bright enough that they already look brighter and more like a laser than in real life anyway. The main reason they use the functional props now tho is the lighting. It’s 100x easier to make a shot look real if you record it where the blade actually lights up the set an actors. All they gotta do is color grading, clean up the blade look and add some sparks/flashes w/e.

I do wanna try making an Obi wan ep4 style hilt with the spinning blade just to see what kinda visual effects you can create and how having gyroscopic effect impacts swinging it around.

Anyway, enough rambling, I just thought it was fascinating to compare the differences. If anyone wants to sell their hilt from this release let me know.
 

Attachments

  • IMG_3369.jpeg
    IMG_3369.jpeg
    4.1 MB · Views: 114
  • IMG_3368.jpeg
    IMG_3368.jpeg
    4.6 MB · Views: 124
  • IMG_3362.jpeg
    IMG_3362.jpeg
    4.9 MB · Views: 105
  • IMG_3363.jpeg
    IMG_3363.jpeg
    3.5 MB · Views: 117
  • IMG_3364.jpeg
    IMG_3364.jpeg
    4.8 MB · Views: 96
Great comparison, very detailed and useful (y)

What irks me the most is that each and every one of these replicas don't bother making the blade retention screw less conspicuous. I hate blade retention screws (except when they can be made part of the design). Same with sound venting holes, i'd much prefer having a whole separate vented pommel rather than sound vents, even if they are well integrated.

Obviously the Dan/Dewy run being static, it has none of these problems and is virtually perfect. But the Saberz version managed to make the hilt FX compatible while still offering a seamless exterior. The sound venting is done via a different pommel cap and the blade retention screw is hidden away under the emitter plate. It may not seem like much to a lot of people, but it shows true attention to detail and ingenuity.

With that being said, the Saberz hilt is twice the price of the others... Which has to be taken into consideration as well. But aside from the Dan/Dewy interpretation, Saberz's Project O1 seems to be the absolute best FX-ready replica.

As a matter of fact, wouldn't it be nice to have a "name" for Dan's and Dewy's exceptional replica? I've been calling it the "ASD" version (for Anakin Starkiller / Dewy) when talking about it with my friends.
 
Last edited:
Finished my kit (for now).

3EXSObiTPMcomp3.png


1EXSObiTPMcomp1.png


2EXSObiTPMcomp2.png


6EXSObiTPMright.png


10EXSObiTPMemitter.png


11EXSObiTPMcutin.png


12EXSObiTPMpommel.png


4EXSObiTPMgapcomp.png


16EXSObiTPMoring.png


Made the following mods:
-painted with Rustoleum primer, Rustoleum 2X Ultra Matte Black and Rustoleum 2X Flat Black
-accurate weathering, including scotch-brite finish with rougher brushed marks from sandpaper; sanding the LED bezels, brass barb; simulated paint chips on the emitter core, etc.
-sanded edges of emitter "windows"
-lathed in a groove for the o-ring to sit down into to create the correct gap (see comparison pic)
-hand-filed the lower grip cut-in for a more accurate look
-re-profiled the pommel on my lathe to my own tastes
-used some older clear 5mm LEDs I had on hand

Construction-wise, I used masking tape within the hilt to tighten things up. I used blue loctite in a few spots, as well as superglue and E6000. I installed the pommel cubes by putting a dab of E6000 in each of the holes, then pressed them straight into place over each screw. I also used E6000 to hold the pommel onto the inner aluminum core more securely. For the overall finish of the hilt I used ultra fine scotchbrite, mildly polished it, then allowed it to weather in slightly from handling. There are other things I did but I don't need to get into every single detail (unless someone is curious).

Many thanks to Drew and Dan for your work in bringing us this saber!

Full-res photo album available here:
EXS Starkiller Obi TPM Lightsaber Build

Video overview of the build available here:
Starkiller Obi TPM Lightsaber Review
 

Attachments

  • 13EXSObiTPMcubes.png
    13EXSObiTPMcubes.png
    10 MB · Views: 164
  • 14EXSObiTPMbottom.png
    14EXSObiTPMbottom.png
    9.8 MB · Views: 159
  • 15EXSObiTPMemitterplate.png
    15EXSObiTPMemitterplate.png
    9.1 MB · Views: 179
  • 9EXSObiTPMbarb.png
    9EXSObiTPMbarb.png
    9.1 MB · Views: 180
  • 8EXSObiTPMleft.png
    8EXSObiTPMleft.png
    8.9 MB · Views: 177
  • 7EXSObiTPMback.png
    7EXSObiTPMback.png
    9.4 MB · Views: 160
  • 5EXSObiTPMfront.png
    5EXSObiTPMfront.png
    9.3 MB · Views: 174
Last edited:
Finished my kit (for now).

View attachment 1722851

View attachment 1722849

View attachment 1722850

View attachment 1722854

View attachment 1722858

View attachment 1722859

View attachment 1722860

View attachment 1722852

View attachment 1722864


Made the following mods:
-painted with Rustoleum primer, Rustoleum V2 Ultra Matte Black and Rustoleum V2 Flat Black
-accurate weathering, including scotch-brite finish with rougher brushed marks from sandpaper; sanding the LED bezels, brass barb; simulated paint chips on the emitter core, etc.
-sanded edges of emitter "windows"
-lathed in a groove for the o-ring to sit down into to create the correct gap (see comparison pic)
-hand-filed the lower grip cut-in for a more accurate look
-re-profiled the pommel on my lathe to my own tastes
-used some older clear 5mm LEDs I had on hand

Construction-wise, I used masking tape within the hilt to tighten things up. I used blue loctite in a few spots, as well as superglue and E6000. I installed the pommel cubes by putting a dab of E6000 in each of the holes, then pressed them straight into place over each screw. I also used E6000 to hold the pommel onto the inner aluminum core more securely. For the overall finish of the hilt I used ultra fine scotchbrite, mildly polished it, then allowed it to weather in slightly from handling. There are other things I did but I don't need to get into every single detail (unless someone is curious).

Many thanks to Drew and Dan for your work in bringing us this saber!

Full-res photo album available here:
EXS Starkiller Obi TPM Lightsaber Build

Video overview of the build available here:
Starkiller Obi TPM Lightsaber Review

One thing I did notice when attempting to make my own resin stunt saber, is that the casting process inflates the size of the O-ring. Here’s my metal master with the smaller 1mm O-ring that came with the kit, and the resulting casting with a much thicker looking O-ring:

IMG_1093.jpeg


Casting process documented here: Obi-Wan Kenobi Episode 1 Resin Stunt Lightsaber Research
 
One thing I did notice when attempting to make my own resin stunt saber, is that the casting process inflates the size of the O-ring. Here’s my metal master with the smaller 1mm O-ring that came with the kit, and the resulting casting with a much thicker looking O-ring:

View attachment 1722876

Casting process documented here: Obi-Wan Kenobi Episode 1 Resin Stunt Lightsaber Research
Great comparison! Which is better? The original one that came with the kit or the larger second one?
 
Great comparison! Which is better? The original one that came with the kit or the larger second one?
That’s really hard to say. The smaller one leaves the correct gap as was pointed out, but it does look maybe a hair too small. I think the reality is they used a larger one that was then stretched when put on the saber resulting in a smaller cross section. As Excelsior pointed out, there may have also been a groove or step down in diameter so the O-ring was sitting low.

For what it’s worth I plan to keep the smaller 1mm O-ring on my display saber.

My comparison to the resin casting was just to show that the resin stunt sabers cannot be relied upon 100%. The casting process naturally introduces all kinds of unexpected variation.
 
The bigger O-ring in the kit helps keeping everything nice and snug with no rattle but it definitely looks and feels a bit too big. On the other hand the smaller O-ring looks too small and easily gets lost beneath the emitter shroud. The idea of a machined groove to keep it in the right spot is interesting but not easily done without a lathe. Maybe using a second O-ring under the shroud could help.
 
Finished my kit (for now).

View attachment 1722851

View attachment 1722849

View attachment 1722850

View attachment 1722854

View attachment 1722858

View attachment 1722859

View attachment 1722860

View attachment 1722852

View attachment 1722864


Made the following mods:
-painted with Rustoleum primer, Rustoleum 2X Ultra Matte Black and Rustoleum 2X Flat Black
-accurate weathering, including scotch-brite finish with rougher brushed marks from sandpaper; sanding the LED bezels, brass barb; simulated paint chips on the emitter core, etc.
-sanded edges of emitter "windows"
-lathed in a groove for the o-ring to sit down into to create the correct gap (see comparison pic)
-hand-filed the lower grip cut-in for a more accurate look
-re-profiled the pommel on my lathe to my own tastes
-used some older clear 5mm LEDs I had on hand

Construction-wise, I used masking tape within the hilt to tighten things up. I used blue loctite in a few spots, as well as superglue and E6000. I installed the pommel cubes by putting a dab of E6000 in each of the holes, then pressed them straight into place over each screw. I also used E6000 to hold the pommel onto the inner aluminum core more securely. For the overall finish of the hilt I used ultra fine scotchbrite, mildly polished it, then allowed it to weather in slightly from handling. There are other things I did but I don't need to get into every single detail (unless someone is curious).

Many thanks to Drew and Dan for your work in bringing us this saber!

Full-res photo album available here:
EXS Starkiller Obi TPM Lightsaber Build

Video overview of the build available here:
Starkiller Obi TPM Lightsaber Review
"Impressive, most impressive" job very well done. Ive been using the scotch Brite pads on my KR sabers too, does a great job. You seem to have even replicated the lines and everything!! Awesome
 
Finished my kit (for now).

View attachment 1722851

View attachment 1722849

View attachment 1722850

View attachment 1722854

View attachment 1722858

View attachment 1722859

View attachment 1722860

View attachment 1722852

View attachment 1722864


Made the following mods:
-painted with Rustoleum primer, Rustoleum 2X Ultra Matte Black and Rustoleum 2X Flat Black
-accurate weathering, including scotch-brite finish with rougher brushed marks from sandpaper; sanding the LED bezels, brass barb; simulated paint chips on the emitter core, etc.
-sanded edges of emitter "windows"
-lathed in a groove for the o-ring to sit down into to create the correct gap (see comparison pic)
-hand-filed the lower grip cut-in for a more accurate look
-re-profiled the pommel on my lathe to my own tastes
-used some older clear 5mm LEDs I had on hand

Construction-wise, I used masking tape within the hilt to tighten things up. I used blue loctite in a few spots, as well as superglue and E6000. I installed the pommel cubes by putting a dab of E6000 in each of the holes, then pressed them straight into place over each screw. I also used E6000 to hold the pommel onto the inner aluminum core more securely. For the overall finish of the hilt I used ultra fine scotchbrite, mildly polished it, then allowed it to weather in slightly from handling. There are other things I did but I don't need to get into every single detail (unless someone is curious).

Many thanks to Drew and Dan for your work in bringing us this saber!

Full-res photo album available here:
EXS Starkiller Obi TPM Lightsaber Build

Video overview of the build available here:
Starkiller Obi TPM Lightsaber Review
I totally missed the video link! Watched it yesterday, I appreciate the kind words and the care and attention to detail you’ve given the saber that Dan and I spent so much time on!
 
"Impressive, most impressive" job very well done. Ive been using the scotch Brite pads on my KR sabers too, does a great job. You seem to have even replicated the lines and everything!! Awesome

Thank you! I did actually try to replicate the lines and machining marks! It's amazing how much of a difference that made. I do need to source an original fender washer and reattempt that part of the hilt. I can do better there with getting the sanding lines going in the right direction and replicating the hook-shaped gap at the top of the threaded rod.

Yes I found that the ultra fine scotch brite puts a nice brushed finish on it, which makes a nice base for polishing. I didn't go overboard on the polishing either--I tried to keep it light and then just let the metal wear in naturally from handling.
 
I totally missed the video link! Watched it yesterday, I appreciate the kind words and the care and attention to detail you’ve given the saber that Dan and I spent so much time on!


Oh cool I'm glad you saw it! Yes, for sure, it wouldn't have been possible without you guys! This is one of the most accurate replicas made of any saber prop to date. You made the right choice in not idealizing away the asymmetries. This saber cannot look "right" without them!
 
Back
Top