-
Welcome to the Project Runs Forum!
This forum is intended for interest gauging and active runs. Due to the transient nature of this forum, please keep all research and ongoing discussion in one of our main forums so your information is not lost.
Only Premium Members can start a new run.
You are using an out of date browser. It may not display this or other websites correctly.
You should upgrade or use an alternative browser.
You should upgrade or use an alternative browser.
Limited Run SIGN UP CLOSED. PRODUCTION BEGINNING! Dewy and Anakin Starkiller's Obi-wan Episode 1 saber sign up!
- Thread starter Anakin Starkiller
- Start date
Vedor
Active Member
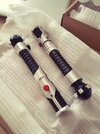
Received my sabers here in the Netherlands as well!
It's like holding the real prop in your hands, they're absolutely stunning.
Thank you very much Anakin Starkiller & Dewy for all the hard work you put into this project!
I'm only missing a small O-ring under the red button, but that's easily solved.
It's like holding the real prop in your hands, they're absolutely stunning.
Thank you very much Anakin Starkiller & Dewy for all the hard work you put into this project!
I'm only missing a small O-ring under the red button, but that's easily solved.
Attachments
Received my sabers here in the Netherlands as well!
It's like holding the real prop in your hands, they're absolutely stunning.
Thank you very much Anakin Starkiller & Dewy for all the hard work you put into this project!
I'm only missing a small O-ring under the red button, but that's easily solved.
Sorry that was missing! Here are the specs for the O-ring:

McMaster-Carr
McMaster-Carr is the complete source for your plant with over 595,000 products. 98% of products ordered ship from stock and deliver same or next day.
It certainly doesn’t have to be an O-ring though. You just want something 1.5-2mm thick that can fit in the hole to have the red button bottom out.
Vedor
Active Member
Sorry that was missing! Here are the specs for the O-ring:
McMaster-Carr
McMaster-Carr is the complete source for your plant with over 595,000 products. 98% of products ordered ship from stock and deliver same or next day.www.mcmaster.com
It certainly doesn’t have to be an O-ring though. You just want something 1.5-2mm thick that can fit in the hole to have the red button bottom out.
No problem! And thanks for the info/link!
")
How'd the black parts turn out? What paint you go with?Painted my black parts, and, upon putting everything back together . . . no more rattle.
For now, I've decided to run with the bare delrin on mine. I kind of like the machined look of them especially the sheen on the pommel part.
I finally got mine too . I must say, this has been one of those few times in my 20+ collecting years that a replica hilt instantly brings a smile to my face every time I hold in my hand. It just feels amazingly authentic . My most sincere appreciation to both Dewy and Anakin Starkiller for making this happen.
These two guys are now just waiting for the Anakin and the Qui-Gon, and then maybe some V3's? I really look forward to whatever comes next.

I still haven't decided yet if I want to paint the delrin parts or not, because I already like the way it looks and feels. In the meantime I'll just wait for Halliwax's video and maybe try to smooth out some surfaces. On that matter, any tips on how to get rid of these spots without changing the finish too much? Steel wool? Scotch brite? A combination of both? Any tips will be greatly appreciated. Thanks.

. I must say, this has been one of those few times in my 20+ collecting years that a replica hilt instantly brings a smile to my face every time I hold in my hand. It just feels amazingly authentic . My most sincere appreciation to both Dewy and Anakin Starkiller for making this happen. These two guys are now just waiting for the Anakin and the Qui-Gon, and then maybe some V3's? I really look forward to whatever comes next
.I still haven't decided yet if I want to paint the delrin parts or not, because I already like the way it looks and feels. In the meantime I'll just wait for Halliwax's video and maybe try to smooth out some surfaces. On that matter, any tips on how to get rid of these spots without changing the finish too much? Steel wool? Scotch brite? A combination of both? Any tips will be greatly appreciated. Thanks.
Slave1
Sr Member
I went with the advised Painter's Touch Rustoleum Canyon Black. I hate Rustoleum as a general rule, but I have loved Painter's Touch.How'd the black parts turn out? What paint you go with?
For now, I've decided to run with the bare delrin on mine. I kind of like the machined look of them especially the sheen on the pommel part.
Like you, I did kind of like the natural sheen on the black, however, there was a good size flaw on my pommel that sort of required the paint, if only to touch that up.
Ironically, I also considered buffing out the machine marks on the cubes, but in the end decided against it, since I imagined the modelers not going to the trouble of doing so for something not seen in extreme closeup. If someone has good pics that show otherwise, though, you can bet that's another step I'll be taking.
I have not added the LED's yet, as I'm not certain if the flat surface should be sanded to give it a frosted look, or left shiny. And I'm not sure if they should be flush with the bezel opening or recessed a bit.
Also haven't added the purple rivet yet. It's so small it slips right past the threads, so I may end up using a dab of E6000 in behind it to give it something to sit into. And of course E6000 can be peeled away if I screw it up.
Ironically, I also considered buffing out the machine marks on the cubes, but in the end decided against it, since I imagined the modelers not going to the trouble of doing so for something not seen in extreme closeup. If someone has good pics that show otherwise, though, you can bet that's another step I'll be taking.
The pommel cubes on the hero prop do not have visible machining marks like you see on this replica. There were maybe some light sanding marks, but in general the way IronDestinyProps finished them is accurate.
I have not added the LED's yet, as I'm not certain if the flat surface should be sanded to give it a frosted look, or left shiny. And I'm not sure if they should be flush with the bezel opening or recessed a bit.
They should be sanded flush and slightly cloudy:

If a scotch brite pad doesn't get out the scuff marks, try using 600 grit sandpaper and then come back with the scotch brite pad to polish it and see if that removes them.I still haven't decided yet if I want to paint the delrin parts or not, because I already like the way it looks and feels. In the meantime I'll just wait for Halliwax's video and maybe try to smooth out some surfaces. On that matter, any tips on how to get rid of these spots without changing the finish too much? Steel wool? Scotch brite? A combination of both? Any tips will be greatly appreciated. Thanks.
Slave1
Sr Member
That confirmation is all I needed. I'll buff up my cubes a bit this weekend.The pommel cubes on the hero prop do not have visible machining marks like you see on this replica. There were maybe some light sanding marks, but in general the way IronDestinyProps finished them is accurate.
They should be sanded flush and slightly cloudy:
View attachment 1711008
I thought I recalled the LEDS being finished that way, but it's been so long since I did any research. Easily done. Thanks for posting the pic.
Sa1yan5pirit
Active Member
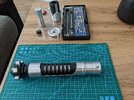
What part comes off next? Don't see any screws anymore, so twisting is the only option. I don't want to damage anything. I guess the pommel? Just doesn't move at all.
See post #314 in this thread.
GhostOfThrawn
Active Member
I simply love this saber. Dewy and Anakin Starkiller made something truly amazing.
Inspired by IronDestinyProps's sanding I went and did the same. I used wet sanding paper in two different coarse (P400, P800).

Left factory finish, right sanded.
Inspired by IronDestinyProps's sanding I went and did the same. I used wet sanding paper in two different coarse (P400, P800).
Left factory finish, right sanded.
What part comes off next? Don't see any screws anymore, so twisting is the only option. I don't want to damage anything. I guess the pommel? Just doesn't move at all.
You’re almost there…
Remove the black covertech knob and screw…followed by removing the additional set screw (if present)….
Last edited:
Sa1yan5pirit
Active Member
Thx I just finished it. However my question was about the pommel. Have not taken the pommel off for now. Didn't know that I probably just have to pull.You’re almost there…
Remove the black covertech knob and screw…followed by removing the additional set screw (if present)….
View attachment 1711129View attachment 1711130
Thx I just finished it. However my question was about the pommel. Have not taken the pommel off for now. Didn't know that I probably just have to pull.
Nothing should be hard to remove. Did you pull off the 6 pommel cubes and remove the 6 set screws? Take a close look at the instructions.
Thx I just finished it. However my question was about the pommel. Have not taken the pommel off for now. Didn't know that I probably just have to pull.
Make sure you completed Steps 1 through 3 in the instructions in post #314.
Limited Run - SIGN UP CLOSED. PRODUCTION BEGINNING! Dewy and Anakin Starkiller's Obi-wan Episode 1 saber sign up!
I replied to the private message as soon as it arrived! I didn't know we were announcing to the world. So excited. Payment sent, tracking received.
 www.therpf.com
Twinsen
Sr Member
Got the package today. Took forever to clear customs… But it’s there. Can’t wait to take a closer look when I have the time but it’s a big moment. The look, weight, feel, materials, colors. Everything is breath taking. Thank you Drew and Dan !
Note : The LEDs and purple rivets are not installed

Note : The LEDs and purple rivets are not installed
Last edited:
Similar threads
- Replies
- 417
- Views
- 40,192
- Replies
- 11
- Views
- 2,454
- Replies
- 12
- Views
- 2,195
- Replies
- 38
- Views
- 2,950
- Replies
- 4
- Views
- 787