danzig
Well-Known Member
I personally like it without. You should get some brown material close to that of OWKs robe, distress and dirty it up and then wrap it in some of that. That would look cool.
Hey now thats a great idea!Seriously
I personally like it without. You should get some brown material close to that of OWKs robe, distress and dirty it up and then wrap it in some of that. That would look cool.
")
I can finally add to this thread! After stalking here for a while I'm happy to finally share my latest acquisition! Some simple re-weathering so far and I still have some to go but I'm happy so far. I love this hilt! And it pairs so nicely with my TGS Gen2 ANH Graflex. View attachment 1065383View attachment 1065384View attachment 1065385View attachment 1065386View attachment 1065387
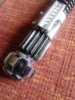
I decided to redo the booster weld...I like it much better now...also dinged and rusted the clamp more.
That’s so cool! I’m going to be welding in the shop next week, I want to do this. Can you help me find the orientation?
I can finally add to this thread! After stalking here for a while I'm happy to finally share my latest acquisition! Some simple re-weathering so far and I still have some to go but I'm happy so far. I love this hilt! And it pairs so nicely with my TGS Gen2 ANH Graflex. View attachment 1065383View attachment 1065384View attachment 1065385View attachment 1065386View attachment 1065387
Nice! Hey,your that guy that does those in depth reviews,right?
I just want to say thank you to all who have contributed to this thread.
I'm a newbie to Star Wars props and costuming (except for the scratch-built Vader costume I made for Halloween 1977) and I didn't know about Roman props sabres or weathered sabres or any of it until reading this thread. It's amazing, the work he and all of you do.
I took inspiration from this thread to paint the 3D printed sabre I bought. I know it's all wrong! But for my first attempt I wanted to embrace that 1977 grunge:
View attachment 1072807
What what you did to the emitter!! How did you achieve that finish?!?!
It was an easy 2-step paint job:
1) full coverage with a dull olive colour representing grunge that had gathered in the low places
2) hitting the high spots with drybrushing using a pewter colour.
Simple but I had to get that prop ready in a couple hours for a Con (my debut as a Jedi). I'm actually surprised how effective it came out, considering how quickly the paint job went.
I'm considering going over the Graflex clamp and the tap knob with sea-sponge stippling in silver, to suggest old chrome plating which has mostly come off. Never done that before, but then again I'd not done a lightsabre before this one.
I like that! Looks like one of my projects that I’m in the middle of. Weathering to come later.
View attachment 1054368View attachment 1054370View attachment 1054373