Hey all,
All my life - I've loved film props. Particularly items from films that are McGuffins - and other props that have some sort of power/supernatural, or just things that look damn cool. I only own a handful of replicas (The Mask, various Indiana Jones, Maltese Falcon, Letters of Transit, Batman Returns grapple, etc.).
Recently, with John Wick: Chapter 4 - the John Wick series has ascended into my top film franchises of all time, now. Each film is one I love almost equally. And I've recently made a small collection of John Wick prop items: the gold coins, Adjudicator coin, Santino D'Antonio's marker, Sophia's marker, Killa's playing cards, and the Russian Orthodox Rosary. These items are very small, so I don't mind having them around.
But I've always loved one prop, but nobody makes it.
In John Wick: Chapter 3 - Parabellum, John goes to the New York Public Library in the opening of the film. He goes there to find his copy of Russian Folk Tales by Alexander Afanasyev. It's meant to be an antique book.
In the book, it's hollowed out and contains several items that he keeps for emergency: his 'ticket' Russian Orthodox Rosary, 5 gold coins, Sophia's Arabic Marker, and a photo of him and his wife.
I've never, ever...done a prop build. But I figured this one might be fun, after my other project (the Baba Yaga house) and easy to do for someone like me without much experience.
Hoo boy, it wasn't easy!
First, trying to source the book was a nightmare. The dimensions required - let's just say, modern books are much smaller. Most all modern books are 6" wide and maybe 8" tall, generally. It took 7 book stores for me to find a book that was the dimensions I needed for accuracy - and it necessitated that I use an antique book.
I used a 1925 copy of Correspondences of William Hickling Prescott - it was $5 and going to be thrown out.
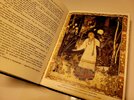
Then I had to gather materials - leather, velvet, etc. And I had to source all the pages for the interior - which was easy due to a 4K set of the first three John Wick films releasing in February, and it is a box set based on the very book I was making. It had the front and back cover for me to scan, and a handful of pages inside, and the Baba Yaga painting that hides the goodies.
I scanned the cover, the inner lining, and all the pages in. I took the cover and back cover design into Photoshop and isolated the gold detailing, and printed it out and scaled it to my book. I was intending to iron it on with laserjet ink, but that only partially worked. I printed the book's pages at FedEx Kinkos on this really amazing paper that was like high-end book paper, and it was the perfect colour to match the aged book's pages.
Then I glued all the pages together for the compartment together. This was tedious as could be. I went through 9 glue-sticks.
Once that was done, I cut out the compartment. This was tough and a shame - as this is an old book, too.
I used thick cardboard to make the spine ridges and glued them on - and then wrapped the book in black leather, glued it on - and sanded it to age it significantly. This was my first time binding a book cover, and it worked somehow.
Now it was time to do the front and back cover. Ironing the design on...didn't work. I tried it so many times. Only the lettering came off.
I also looked into getting the designs professionally stamped onto the front and back - but I was quoted at $700-$1,000 depending on which company did it - and a six month period of them doing it.
I was 100% sure that because the iron-on failed a lot, it was beyond my ability. And then I figured out I could print on translucent paper, tape the designs to the book, and carve it in with an Exacto-Knife. Then I could trace it in gold paint-pen.
Bingo! It worked!
Then it was time to do the compartment. I glued the back of the book to the cut pages. Then I went to 6 fabric stores - none had dark red velvet. Some didn't have any red velvet...at all. So I had to special order some. So annoying. Who knew red velvet was so hard to find?!
I used the thick cardstock again, measured and cut them out, wrapped them in velvet, and glued each side and bottom in.
After several attempts to do a perfect square to glue onto the top for a clean look, I glued in all the pages to the book including the lining of the inner cover, aged the barcode and taped it on...and done!
It's not perfect...but it'll do for a first prop build attempt. And I'm happy it was made all by hand.
Anyway, thanks for looking!
")