I'd paint it all white first then mask the gaps and do the orange metallic colour last.
This is exactly what I plan to do if I have a little time between now and when I fly out of town in a couple days. I'm just trying to find a clean way to do it without masking parts of the inner walls as well (and without going crazy trying to perfectly mask the gaps)

I tried to make a silicone coating then cut the pieces up to make some silicone inserts for those gaps, but unfortunately the silicone did not cure correctly. The paint I used wasn't done curing, and caused cure inhibition. :/ Going to scrub it off with a brush and try a few more things.
 
This could be a viable option for the metallic parts of the Pumpkin Bomb.
I thought about doing that! I don't have the funds at the moment to get that equipment, but it's on my wishlist of maker items. Once I get around to making a version that has electronics, I hope to try copper plating the petals with this method.


Unfortunately did not have a lot of time to work on this these last couple months (my printers were completely rented out for October) but it gave me time to think of better ways to paint the stunt. I'm trying these little stencils I made tonight or tomorrow (whenever the wind dies down.) Crossing my fingers these do the trick.
Screenshot 2023-10-29 at 5.42.16 PM.png
 
The printed stencils DID NOT work... too stiff/brittle and wouldn't fit in the gaps right. But what they did work as were STAMPS. I covered the inside with ink and pressed some paper to it. Scanned it, printed 16 of them, and then cut them all by hand. Took a little more effort, but it worked perfectly
.
IMG_0950.JPG
IMG_0952.JPG
IMG_0954.JPG
pumpkin-bomb-4.jpg
pumpkin-bomb-5.jpg
 
Sorry for the lack of updates, this has been slow going now that I have a full-time job rather than being purely self-employed, and all my free-time has been dedicated to raptor claws, BUT i've been working at this while waiting for claw castings and paint to draw, and during lunch break at work, and so now I have finally assembled all the pieces (sans the vacuum formed parts).
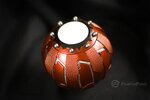
I designed and printed an inner chassis, and while it broke in two due to some print-errors, after some hot-glue action I was still able to assemble the petals onto it.
View attachment 1539881View attachment 1539879View attachment 1539880View attachment 1539882View attachment 1539883
and here it is next to the original:
View attachment 1539887

The petals aren't perfect, one of the sets broke in two and I don't think I did a great job glueing it back together, so some of the petals sort of stick out farther than they should as a combination of a bad glue-job, and because the water-washable resin sort of warped in the cleaning/curing process. The chassis helped straighten most of them out, but some resisted. It's good enough for a prototype and to test out some painting techniques.

I'll have to save up a bit more funds before I test out some electronic bits, it's not terribly expensive but until I work a few more weeks my wallets not terribly stable.

I'll post an update either once I test some more vacuum forming or after I install some electronics— the later might be a while, so until then!


PS: Does anyone have a for-sure measurement for the original prop? I feel like this might be a bit big, but the circumference is juuuuust over 10 inches, which seems about right??
Did u ever finish this build?
 
Did u ever finish this build?
I made progress but it will never be finished haha

Here's the photos I took for a posting (with a paint job that is NOT good. I got better at it) and I'm currently working to make the knurling more accurate (noticed an interesting detail on the prop I have)
pumpkin bomb-07.jpeg
pumpkin bomb-08.jpeg
pumpkin bomb-04.jpg
pumpkin bomb-05.jpeg


I'm still working on a multi-park one that can be assembled and makes sound/lights up, but I need to learn how to wire an arduino board and I have to model a chassis that can hold that plus a battery and lights.
 

Attachments

  • pumpkin bomb-06.jpeg
    pumpkin bomb-06.jpeg
    3.4 MB · Views: 20
Back
Top