Full Afterburner Firefly............................

Status
Not open for further replies.
I can't find the pic I was looking for of Serenity over the Altrans hovertrain with Jayne hanging out the bottom, but this is close.

Trainjobtrainandfirefly.jpg


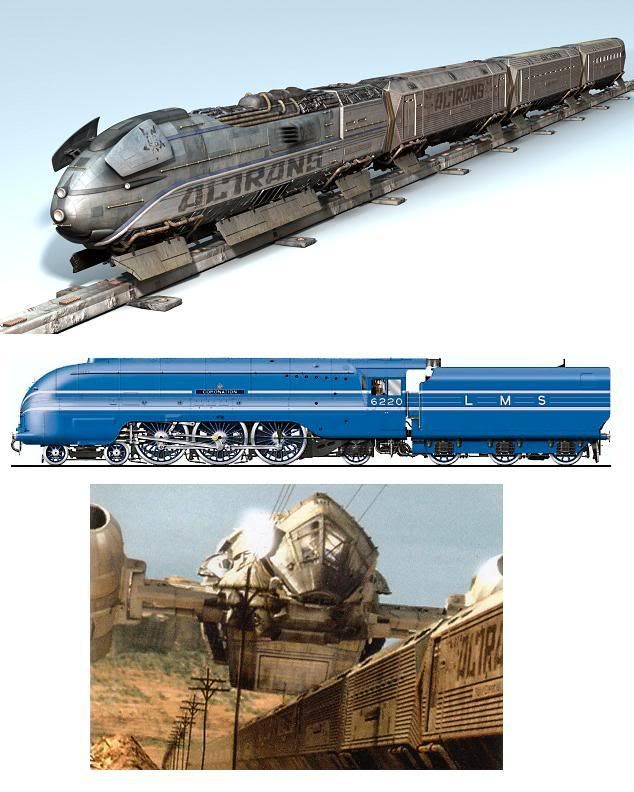
The British Coronation streamliner is pretty close to the Altrans and I managed to buy two lightly damaged bodies off eBay a while back.

Far as a lot of electronic features, I'm not looking for the kit to become complicated to build.
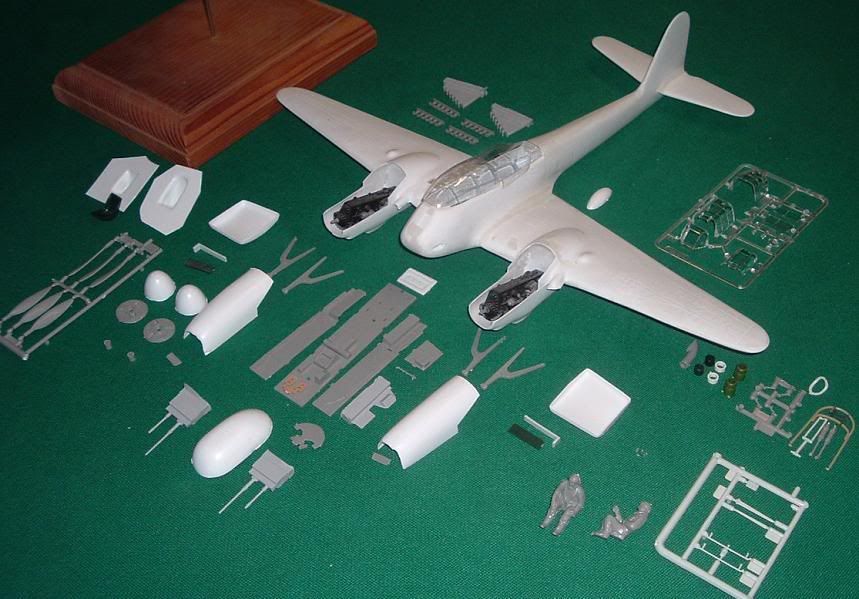
My experience is mostly with 1/32nd scale vac aircraft like the Me-410 below.

GerMe410jpeg.jpg


I don't mind the basic fit and finish, but I'm not looking to have too many moving parts.
Cost is also an issue.
Anything over $350 starts to go over my, "I-can-work-some-overtime-to-buy-it" capability.

And finally, I won't be super-detailing my Serenity.
I'll put in a basic cockpit because the windows are big, but there won't be any HO scale toy dinos on the dash.
I have SOOO many current projects that I am not looking for a life absorbing Firefly model to take all my free time for a year.
Not sayin' I want to slap 'er together, but I'm going to want to finish my Firefly, not have it take up long term residency on my "To-Do" List.

If I can find or screencap the Serenity over the Altrans hovertrain with Jayne hanging out the bottom, I'll put it on this thread as a display idea.
 
It looks like they took an ME 410 and fitted jet engines to make the 262?
Is this true? Cool kit. Interesting.
I like your thinking about getting it done. I'm the same way, and the cockpit is a good idea. I'll try to make at least a drop in cockpit section.
I'm wondering about the HO scale being too small.
I have some "N" guage men, and they are 3/8" tall. This seems to be about the right size for the doors in the side of the firefly in front of the wing scoops, and on the dome top.
How tall is a HO scale man? I think N guage is smaller than HO?
A 1/2" tall man would work.
I forgot that the train was a monorail. There is a hatch on the underside of the ship for capers to be conducted from.
Here is a few more research pictures.

009.JPG


006.JPG
 
Last edited:
I am curious why you're posting so many pictures of the movie version of the ship if you're doing a TV version. The pic of the ship on the Firefly DVD box I think is the alternate version used in the series. There are some shots throughout the series where a wierder looking version of the ship is used. If I remember correctly it was the first 3D model built but some of the shots were recycled.
 
Ron, the DVD player program you're using on your computer should have a framegrab feature, so you shouldn't need to be taking photos of your screen. Dig around in the menus....
 
Here is a site that has some truly great screencaps from the series:

http://still-flying.net/site.php

The site owner notes:
"These screencaps and pictures are provided here for your browsing pleasure and for use in layouts, fan art, and icons.
Please note that direct linking is disabled to save bandwidth. If you'd like to make a text link to a particular cap, link to
the entire page the cap is on or those trying to view it may have to copy and paste the URL to see the image."

Basically, I save the image in my computer and then upload it to my photobucket account for web linking.

Far as the vac kit, the Me-410 was a twin-engined prop job; a heavy fighter designed to replace the Me-110. Good against the American heavy bombers like the B-17 and B-24 until the American P-47 and P-51 escort fighters could range deep enough into occupied Europe to protect the bombers. Then the German heavy fighters were easy kills for the faster, more agile American fighters.
The kit looks kinda like a jet cuz its un-finished.
 
Thanks, I'll look into it. So far it has been faster to just snap a pic.
I accumulated about 50 shots of the Firefly showing different angles including the movie version, since some details of the hull are visible only on some of the movie's scenes. It is a job just getting documentation, and since I want an accurate ship, I use the pics in addition to the plans I had printed up full size.
I'm working on the shuttle docking section, and getting the fuselage done.
The shuttles nestle in their spots and rest on the small tracks that pull the shuttle into place.
The shuttles are 5 inchs long.
 
For my Serenity I used a PICAXE to make a chase circuit for the rotating engine section. With the right timing it looks like it is rotating. I like it because there are no moving parts and the PICAXE is easy to program for a guy like me who is not good at electronics. I even added flashing lights for the various naviagtion lights.

I am using 3mm 15000mcd super bright LEDs

For the bee hive section I origianlly had 4 LEDs but it was nowhere near bright enough. I upped that to 16 LEDs and it is much better but still not bright enogh for a proper afterburn.

I think the only option would be the 5W LEDs but I hear they are HOT HOT HOT. I have never tried one so I can not comment.
 
The 5w LEDs will run pretty hot. However, if you can find some way to mount on a scrap of aluminum, that will significantly reduce the heat output.
 
HO Scale is 1/87. A typical HO Figure runs 6 scale feet.

So, a little math (6 x 12 = 72. 72 divided by 87) and I come up with...

.82756" or you can just say .83"

Using a lot of math, I can take over the universe. But my heart's not in it.

Hope this helps.

Rob
 
Alex, can you post some pictures of your fantastic Firefly model lit up at night? And some of her just in normal lighting.
You know how much you influenced me into building a larger model.
Your Firefly pretty much sets the standard in my eyes, so I'd love to see some new pictures of it.
Also the base you made with the Firefly name on it is beautiful.
If possible, I'd like to have one of your Firefly models.
At 13" that would fit in real nice with my 66" Enterprise in scale.
Thank you for the lighting info also, but I must make the core rotate, the whole design of the fuselage is based on the 4 inch round tube for that core to ride on. The gear motor will be under the core with a rubber tire turning the core slowly so there is no friction.
I'd like to see a hard burn picture of your ship as soon as you can post one.
Thanks for adding excitement to the subject, and I appreciate the input on the scale men, and trains.
 
So Rob, the men would be about 7/8 inchs, or over 3/4 for sure.
Those are a good size. A nice big size for detailing.
Thank you very much for figuring that out.
 
So Rob, the men would be about 7/8 inchs, or over 3/4 for sure.
Those are a good size. A nice big size for detailing.
Thank you very much for figuring that out.

You can find pre-painted HO figures at any decent hobby shop. Woodland Scenics has some really nice ones.

Rob
 
Thanks Mike, I never saw some of those pictures.
This picture of the series ship is great,
http://www.leestringer.com/Images/Print/Serenity_in_Space_11x17_200dpi_v01.jpg
I needed that, helps alot.
Thanks also to Leestringer.com for this picture we need for reference.
Nice of you to tell us about these gems.
Fun stuff.

For the label I used the MS paint on the computer.
I used a picture of my model, adjusted the tint to red, and airbrushed it.
The red background in front of the ship is actually the red velvet I shot it in front of. For the fractured shock wave at the nose, I erased in a blast direction from the front and then filled it with black. Looks like it's in Reaver space to me.
Never tried paint before, but I was impressed with the possibilities.
The picture turned out ok, but pretty crude. The power of the ship somehow came out, so I'll use it.
 
Last edited:
This is going to be a fun kit, so I needed a fun label.

This picture, that I never showed before ...
FIREFLYMASTER6-16-2008035.JPG

(The caulk looks like crap, but it is a preliminary step in the master.)

Became...
The box label with about an hour of paint.
FullAfterburnerFireflypaint.jpg


I had to make something for a label.
 
Last edited:
I am not sure if you have seen these photos yet

Picture 102810.jpg was the second model I finished. The first one was given to Ron Glass

This picture was taken in a lit room. I played with the shutter speed and light source (fluorescent) to get the blueish tinge. At this time the bee hive had only 3 LEDs. It looks a lot better now since I increased the number of LEDs. (The bee hive turkey feathers are pinned and if you look closely one of them has been knocked crooked but that was easily fixed)

Picture ser3.jpg is the 3rd model I finished and was autioned off recently for the CSTS screening to raise money for Equality Now. This was also taken with the room lights on but also with a couple of photo lights. The bee hive section is closed since it would be easier to packit for shipping this way.

I used the 3mm 15000mcd white LEDs

Here is a link to a video I made to show the rotating light effect. This was taken with a cheap digital camera with room light so that is why it looks so dark.
http://www.alexkung1.com/scale/serenity/200710/video.avi
 
Ok, since I was the first one to ask about this master in this thread I figured I would chime in now.

I do like the ship overall, and the size is great- I love a model that I can add lights and other things into.
I do however have serious questions when it comes to the quality and finish of the raw kit though. I'm going to use your own photos to illustrate examples of my concerns, and I think concerns of others here (whether they were expressed properly or not). With any of the images, I've marked areas of concern in either red or green to pinpoint where I see issues. I've reduced their size somewhat, but I haven't messed with them otherwise.

Ok, here's the first image...

PRIMEDFIREFLY003.jpg


This was one of the first images you showed of the ship, with it's primered finish. Right off the bat there are some really rough edges, wavy panel lines, and inconsistant depth of panels. While some of the artifacts in the image can be attributed to jpeg compression, the majority of the issues are on the piece itself.

Then we move into the "caulked" images...

FIREFLYMASTER6-16-2008025.jpg


Here's where we first see some serious issues on the overall shape of the ship. There are serious symmetry issues from one side of the ship to the other, apparent misalignment issues if the seamline is to be judged as the centerline (it appears that way at least), and poor fitting of pieces. there's also a very large discrepancy in how thick or thin the caulking has been applied and where....

The next image....

FIREFLYMASTER6-16-2008021.jpg


...further illustrates some of the previously mentioned issues. Miss-aligned pieces and non straight panel lines seem to be throughout, as well as the varied depth and use of the caulking, even on the same panel.

When you show some closeups....

FIREFLYMASTER6-16-2008012.jpg


... Even more of the inconsistancies become apparent. Wavy panel lines, asymmetrical joints and even augers into the panels (whether on purpose or not) become even more obvious, especially with the use of the dark caulking.

And the last closeup I marked up...

FIREFLYMASTER6-16-2008023.jpg


... Has things in it that I don't know whether they were on purpose or not. The most glaring one in the photo is in the top right. Was this on purpose, or just a missed spot when you were cleanng up the piece, or...? There also appears to be different textures on the panels. Or is this an optical illusion? We also see the same issues as illustrated in the other pictures, but I won't list them again, I've just circled some of them.

I understand that this is a large piece. More props to ya for tackling something at this scale. However, you also have to keep in mind that the larger the piece the more glaring issues like asymmetry and poor fit become.

Suggestions:
Hmm, this is a tough one. While, I won't suggest starting over as others have, I would suggest taking the piece back a couple steps as it seems you're prepping it for molding well before it's ready.
I do have to ask you though, why are you adding Soooo much of this caulking all over the piece? The idea is to use as little of it as neccessary rather than bathing the entire piece in it. And why before all of your detail work is finished?
We also don't get to see how you've applied this caulking to the engine section, where you've clearly shown areas that have tubing and the wire mesh that would almost have to be fully filled in if we gauge it by what you've done on the rest of the ship.

I would suggest removing this caulking material, and really addressing the symmetry and fit issues, as well as the overal finish of the piece. Edges can still be straightened and realigned. Fit gaps and inconsistancies can still be filled and finished. And once the hull is cleaned up, less of the caulking would be needed all over the ship! Hehe, I mean when I first saw the images I thought it was an initial stage of weathering, not filler!

Oh and please tell me the final pieces will have a much less prominant seamline to fill?????

I'm looking forward to following your progress!!
 
Status
Not open for further replies.
Back
Top