You are using an out of date browser. It may not display this or other websites correctly.
You should upgrade or use an alternative browser.
You should upgrade or use an alternative browser.
Cassian Andor (Andor Series) Blaster (MW-20 Bryar Pistol)
- Thread starter Mara Jade's Father
- Start date
Mara Jade's Father
Master Member
I forgot to mention my wife got me the Etsy kit I mentioned above for Christmas. I hope to start working on it soon.

It's built on a m712 airsoft version of the Mauser. Like Hans from tfa
Definitely an airsoft just not TFA one but the S:ASWS version I’m pretty sure. The AWC airsoft to be more specific. The tell is how the hammer rests and the gas port on the bottom of the mag (it’s more forward than TFA).
Also there is two versions of the new MS. The “MK 1” version because of the straight wire. Coiled wire they call the “MK 2” I was told.
Any chance you have pictures of this to work off of?Definitely an airsoft just not TFA one but the S:ASWS version I’m pretty sure. The AWC airsoft to be more specific. The tell is how the hammer rests and the gas port on the bottom of the mag (it’s more forward than TFA).
Also there is two versions of the new MS. The “MK 1” version because of the straight wire. Coiled wire they call the “MK 2” I was told.
Any chance you have pictures of this to work off of?
Pictures of what specifically sorry?
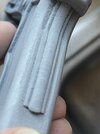
Here’s both airsofts for reference Anakin Starkiller
Left is a yet to be converted AWC (S:ASWS) and right is the HFC m712 (TFA) that has been converted using my own designs (just not painted obviously). But here you can see the hammer differences and the gas port (don’t know the technical term) placement differences.
In ANDOR when the MS first appears you get a look at the bottom of the mag (pretty sure it’s that episode.. you definitely see it at some point if not that one that does confirm it though). The MS pictures posted here you can see the how the hammer rests flush up against the airsoft just like the AWC..
Edged
Well-Known Member
I have this idiotic mental thing whereas I won’t do something simply because I’m paranoid it won’t come out perfectly. I can’t tell you how many expensive Japanese kits I never completed because I was afraid I’d screw it up. I’m not letting that happen this time! Picked up my paints tonight and I’ll start priming in the morning.
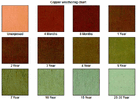
I probably didn’t need all those browns lol, but I just couldn’t decide what shade to go with. Looking at the copper patina chart, it looks like I can pretty much go with whatever. The red brown is more for the grip as I plan on doing a Bakelite finish on that.
Wish me luck!
I probably didn’t need all those browns lol, but I just couldn’t decide what shade to go with. Looking at the copper patina chart, it looks like I can pretty much go with whatever. The red brown is more for the grip as I plan on doing a Bakelite finish on that.
Wish me luck!
Attachments


baron von blondle
Sr Member
I do the very same thing…no progress without making mistakes tho! Good on you, good luck and most of all - enjoy the process and learn from itI have this idiotic mental thing whereas I won’t do something simply because I’m paranoid it won’t come out perfectly. I can’t tell you how many expensive Japanese kits I never completed because I was afraid I’d screw it up. I’m not letting that happen this time! Picked up my paints tonight and I’ll start priming in the morning.
I probably didn’t need all those browns lol, but I just couldn’t decide what shade to go with. Looking at the copper patina chart, it looks like I can pretty much go with whatever. The red brown is more for the grip as I plan on doing a Bakelite finish on that.
Wish me luck!
Edged
Well-Known Member
Thanks! And Agreed! What’s the worst that could happen?!
So, lemme ask, I shouldn’t be overly disappointed if I can’t eliminate EVERY line in these 3-D printed models, right? I figure it’s possible on larger pieces like clone armor for instance, but with all these curves, nooks and crannies, I don’t think it’s feasible.
So, lemme ask, I shouldn’t be overly disappointed if I can’t eliminate EVERY line in these 3-D printed models, right? I figure it’s possible on larger pieces like clone armor for instance, but with all these curves, nooks and crannies, I don’t think it’s feasible.
baron von blondle
Sr Member
If you use a decent filler primer and maybe needle files/folded sandpaper (and a heck load of patience) you should be able to eliminate all visible lines in my experience.Thanks! And Agreed! What’s the worst that could happen?!
So, lemme ask, I shouldn’t be overly disappointed if I can’t eliminate EVERY line in these 3-D printed models, right? I figure it’s possible on larger pieces like clone armor for instance, but with all these curves, nooks and crannies, I don’t think it’s feasible.
Edged
Well-Known Member
Yeah, if I REALLY wanna get in there, I guess it’s possible. Not sure I have the patience for that. Maybe if I had a Dremel.
The Bondo is great stuff. Much less sticky than the Rustoleum I see most guys use. I’ve been happy with it, but this is my first PLA experience.
The first 2 pics are great. This is only my second coat of filler and a 320 grit sand. The handle, however, I’d have to get into those areas for hours and would likely end up losing the detail that’s supposed to be there. I guess I’ll have to do as much as my patience will allow. I may
Attachments


baron von blondle
Sr Member
Trust me if you don't wanna ALWAYS see those lines and wish you'd spent more time on it....spend more time on itYeah, if I REALLY wanna get in there, I guess it’s possible. Not sure I have the patience for that. Maybe if I had a Dremel.
The Bondo is great stuff. Much less sticky than the Rustoleum I see most guys use. I’ve been happy with it, but this is my first PLA experience.
The first 2 pics are great. This is only my second coat of filler and a 320 grit sand. The handle, however, I’d have to get into those areas for hours and would likely end up losing the detail that’s supposed to be there. I guess I’ll have to do as much as my patience will allow. I may

The biggest revelation for me some years back was that the longer you spend on prep the less time you spend finishing and the more happy you are with the final piece.
Edged
Well-Known Member
I’ve tried it. Went over the areas again with folded sandpaper. I just can’t create enough pressure to get rid of these at that angle. Dremel would do it, but beyond shelling out more cash, i don’t want it in my house. I hate tools that I’ll use once then are always in my way.
Funny thing is, most people, even the guy that sold me the kit, said they never even bother sanding these pieces beforehand. They just use the filler primer… I can’t see how. There’s no way the primer is gonna fill these lines completely. Thankfully it’ll just be the handle and few corners I can’t get to. If the whole thing had them it would drive me crazy.
Funny thing is, most people, even the guy that sold me the kit, said they never even bother sanding these pieces beforehand. They just use the filler primer… I can’t see how. There’s no way the primer is gonna fill these lines completely. Thankfully it’ll just be the handle and few corners I can’t get to. If the whole thing had them it would drive me crazy.
Edged
Well-Known Member
Often what happens is that after your first sanding pass on the bare print, the filler primer will fill up the low points in the layer lines that you couldn't sand fully away -- the filler primer is much easier to sand than the plastic, so when you get a good coat on and go at it with 400 grit wet, you're just sanding the surface back down to the level of the high points in the layer lines, such that the filler primer is left in the low areas, leaving a smooth surface.I’ve tried it. Went over the areas again with folded sandpaper. I just can’t create enough pressure to get rid of these at that angle. Dremel would do it, but beyond shelling out more cash, i don’t want it in my house. I hate tools that I’ll use once then are always in my way.
Funny thing is, most people, even the guy that sold me the kit, said they never even bother sanding these pieces beforehand. They just use the filler primer… I can’t see how. There’s no way the primer is gonna fill these lines completely. Thankfully it’ll just be the handle and few corners I can’t get to. If the whole thing had them it would drive me crazy.
I'd recommend Dupli-color's filler primer over Rustoleum, btw -- the DC cures much quicker and better than the Rusto. Two thin layers followed by a wet coat (not so heavy it runs though), with 10-15 min between each is all you need! Then it'll be ready to sand in a few hours on a warm day. You might have to go a couple of rounds of primer/sanding but it's easier than you think once you get the hang of it!
Edged
Well-Known Member
Thank you for the explanation! That makes sense. I now have 5 more coats of filler on. It’s definitely helping now. I just gotta hit these really rigid areas with the file and reprime this one piece.
I’m not using Rustoleum. Too sticky for me. I’m using Bondo. It’s amazing stuff. It’s dry in under a minute. You can sand in 30.
I’m not using Rustoleum. Too sticky for me. I’m using Bondo. It’s amazing stuff. It’s dry in under a minute. You can sand in 30.
Attachments

Edged
Well-Known Member
I think I’m starting to understand how the filler primer works on these pieces now that I’m seeing it in action. The last pic I posted above was looking much better than before I started, but now that I’ve taken the files to this portion. I can really see what’s happening. To the naked eye I was seeing progress and it felt much smoother to the touch, but now that I look at the close up pic it LOOKS worse again. At first I thought the lines just came back, but now I see that the valleys, like you mentioned above, E, are filled in! Once I prime this again, all off those lines will be gone.
Edged
Well-Known Member
Well, I’ll be damned! lol. Never thought it would get to this point, but persistence pays off, I suppose. Still got a few ridges in there that hopefully I can get out, but what a difference another day makes! So glad I did t just rush through it. Thanks everyone for the encouragement!
Blew up the previous pics and added todays. First pic is after 2 coats of primer. Second is after 7 coats and sanding with 400 grit. Last pic is another once over with the files followed by 400 and then another coat of primer.
Ill hit the problem areas again with the files followed by 600-800, then lay down a final filler coat or just go with the Tamiya Fine. Wont be able to paint till next weekend, unfortunately.
Attachments


Last edited:
Nice work! I as well am not a fan at all of Rustoleum. It never seems to dry and it’s so thick it clogs details as well. Krylon primer is what I personally prefer. Here’s a before and after fully 3D printed Stembridge for reference..


baron von blondle
Sr Member
Really love those gripsNice work! I as well am not a fan at all of Rustoleum. It never seems to dry and it’s so thick it clogs details as well. Krylon primer is what I personally prefer. Here’s a before and after fully 3D printed Stembridge for reference..View attachment 1669947View attachment 1669946
Similar threads
- Replies
- 64
- Views
- 8,063
- Replies
- 1
- Views
- 2,285
- Replies
- 7
- Views
- 2,177
- Replies
- 41
- Views
- 6,799
- Replies
- 31
- Views
- 5,486