Hi, Jack!
That's from the Tamiya 1/6 CB750 Racing Type motorcycle, and you need both of them. The struts and the cross-bar (above Part 7) are actually one integrated piece, and you get two per kit.
“Jedi”
Hi, Jack!
That's from the Tamiya 1/6 CB750 Racing Type motorcycle, and you need both of them. The struts and the cross-bar (above Part 7) are actually one integrated piece, and you get two per kit.
I think the Tamiya 1/12 Yardley McLaren donates the most parts of any kit on the Falcon, by my count:
A17
C2, C3, C4, C5, C6, C7, C8, C12, C13, C19, C25, C26, C31, C32, C33, C34, C35
D2, D4, D6, D10, D11, D13, D14, D15, D18, D19, D20, D22, D23, D24, D26, D27, D28, D29, D35 (x4), D36 (x2), D37, D38, D39, D40, D41, D42, D43, D44, D46, D47, D49
E1, E2, E3, E5, E6, E27, E8, E9, E10, E11, E12, E13, E14, E15, E16, E17, E18, E19, E20, E21, E22, E23, E24, E25, E26, E28, E30
G3, G4, G5, G6, G7, G8, G11, G12, G14, G15, G42, G43, G44, G45,
H13 (x6), H23
J2, J14 (x2)
The Tamiya 1/12 Ferrari 312b also donates a lot, but not nearly that many. And you get a lot of pieces from the Aurora Sealab, but so many of those are multiples of the same piece that I don't think that counts.
The Yardley McLaren kit alone donates over 100 pieces. Nothing else comes close.
This is part of my goal once I get my parts map finished.Thank you for this. We need a list for every kit like this. But the amount of work would be staggering. Great job man !
Yea these threads are fantastic. The youngsters don't know how good they have it, ; ) Everything is gonna be here in one spot. Thanks to you and everyone that is contributing. Much appreciated !This is part of my goal once I get my parts map finished.
Thanks for this... I did extencsive research and one day 1 thought the Academy COULD be a substitue.. but never had one for good reference.A decent substitute will do in a pinch...
View attachment 1556344
Pictured at bottom in green: the original elusive mandible pit greeblie upper hull Tiger II deck.
In tan, above, on left and right, two reasonable substitutes in case you can't find the original.
In tan, on upper left, the Academy 1/48 Hunting Tiger.
In tan, on upper right, the Academy 1/48 King Tiger.
Now notice the teeny-tiny differences, think about the superimposition of additional greeblies, and make your choice accordingly.
Look closer - this isn't a "Where's Waldo?" mystery, this is a two-part game with consequences.
Part 1: Notice what the three hulls have in common, and then notice what the three have in differences -- no two are identical.
Part 2: Choose which differences you can live with, because those will either "show" or "be hidden" more, depending on the choice you make.
- Top line of the Hunting Tiger doesn't give you as much real estate on your horizontal surface thanks to the vertical plane of the upper box.
- Door hinge clasps are different between Hunting Tiger and King Tiger, but one of them is a closer match to Tiger II
- The two round vent centers on Hunting Tiger and King Tiger are very different, and one of them is identical to Tiger II
- The Tiger II has protruding nipples on the two small rounds at bottom, whereas on the Hunting Tiger and King Tiger they are both indented.
Don't know about you, but for my money, I would choose...
View attachment 1556351
1. You can always add a strip of sprue to the upper horizontal section of the Hunting Tiger for more real estate.
2. You can always "warm up" those cold inverted nipples on the two small rounds by adding two small pieces of round tube stock.
3. You can't possibly "fix" the two large round vent center differences between the Tiger II and the King Tiger, so go with the near-identical pattern on the Hunting Tiger as those "show" the most, and will be the key "tell" that let's people know you're using originals versus faking it.
And then of course, finally, get a life! NOBODY is going to notice this or care one way or another, ONLY YOU are, so really please never forget that you are not pleasing your audience, but only your inner obsession and nothing else... There will be exactly ten other humans on planet earth who would even notice this, and nine of them are never going to see your build anyway.
") But anyway, thanks for sharing. Looks like a good alternative.
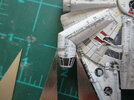
But anyway, thanks for sharing. Looks like a good alternative.I was an English major too. It’s all starting to make sense now….How do you build this section on the bottom of the Falcon...
View attachment 1556523
Without creating this problem... since the Bandai M60 upper hull section HAS to be pushed flat to achieve a level surface match with the Yardley McLaren monocoque body piece?
View attachment 1556524
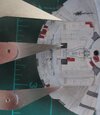
Answer: a section of H-beam, cut and sanded to height and length, and a "stiffener" in the center portion:
View attachment 1556525
So that the end result looks nice and flat and flush to the Yardley chassis:
View attachment 1556526
Also, am I right, that THIS is the original R2-unit droid socket:
View attachment 1556527
I feel like it needs saying, because I've seen/heard no one else say it, and I think it must have been the original inspiration for the "droid strip" section of the X-Wing and the Y-Wing, but then again I was an English major and tend to let my imagination get the better of me...
Ha! That's funny. Thanks to Star Wars, I was originally a comparative religion major, but after I'd read all the Joseph Campbell I could get my hands on, I decided to stick with writing and literature and communications in grad school. It was only years later that I learned that Lucas went to community college before moving on to film school... so of course, I also got a master's degree in Film and Media, you know, just in case!I was an English major too. It’s all starting to make sense now….