The multiple 150 page Hoverboard threads are great but I have yet to see the following questions definitively answered for a hero hoverboard prop replica
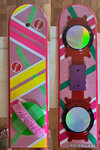
What are the dimensions of the board and What thickness should it be? Answer: Using the known measurement of the hook and loop as 1 inch wide I looked at this image, and calculated the width was 8 inches wide or 203.614mm wide x 743.974mm long. As far as thickness it appears its 3/4" but its hard to tell . I can't recall where I found the document but i'm using a downloaded PDF for the art. Here are the non gaffer tape and velcro decals. for cutting on your cricut. Here is the link to the pdf BTTF_HOVERBOARD.rar


 x2
x2
 x2
x2
 x2
x2


What angle cut for the rear part the bends up Answer 15 degrees
Where do you get the color hook and loop velcro
Answer:
Green DuraGrip® Brand - 1" Neon Green Hook Sew-On
Pink DuraGrip® Brand - 1" Neon Pink Hook Sew-On
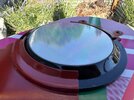
For the Lenticular sheet what is the closest alternative Answer: I found this looks pretty darn close. I picked up 3 feet of it to test. https://www.tapplastics.com/product/plastics/plastic_rolls/clear_honeycomb/449


Is the edge beveled or rounded over ANSWER BEVELED
Is the edge inset for lenticular film or is it painted silver
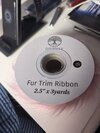
Where to buy the pink fur foot strap material. Amazon.com
Thanks in advance to all the experts who have this stuff memorized, hopefully for others wanting to take a crack at making their own hero version this thread will help.
Rob
What are the dimensions of the board and What thickness should it be? Answer: Using the known measurement of the hook and loop as 1 inch wide I looked at this image, and calculated the width was 8 inches wide or 203.614mm wide x 743.974mm long. As far as thickness it appears its 3/4" but its hard to tell . I can't recall where I found the document but i'm using a downloaded PDF for the art. Here are the non gaffer tape and velcro decals. for cutting on your cricut. Here is the link to the pdf BTTF_HOVERBOARD.rar
What angle cut for the rear part the bends up Answer 15 degrees
Where do you get the color hook and loop velcro
Answer:
Green DuraGrip® Brand - 1" Neon Green Hook Sew-On
Pink DuraGrip® Brand - 1" Neon Pink Hook Sew-On
For the Lenticular sheet what is the closest alternative Answer: I found this looks pretty darn close. I picked up 3 feet of it to test. https://www.tapplastics.com/product/plastics/plastic_rolls/clear_honeycomb/449
Is the edge beveled or rounded over ANSWER BEVELED
Is the edge inset for lenticular film or is it painted silver
Where to buy the pink fur foot strap material. Amazon.com
Thanks in advance to all the experts who have this stuff memorized, hopefully for others wanting to take a crack at making their own hero version this thread will help.
Rob
Last edited:

")